
Landscaping : The art of yard designing with Foliflor
Dealing with the right landscaping company
For our own landscaping, we dealt with the Foliflor Center and I highly recommend this company! The team gave us great advice in addition to excellent service.
Understanding plants, their specific needs and the synergy between them can be challenging, but they were able to explain things in simple and efficient manner. In addition, they recommended plants adapted to our specific lot and lifestyle.
Foliflor were also the ones who took care of coming and planting them with us, it was a great team effort! They have a keen eye for detail which in turn allowed them to achieve these beautiful results!
Try planning your landscape during construction

Many people ask us whether landscaping should be planned during the construction process. Personally, I think we can think about it without having to plan EVERYTHING. Having a general idea of the look can help organize certain elements accordingly, but if you don't know what you want, it's really not a problem. Fortunately and luckily, exterior design is very versatile!
Camouflaging using landscaping
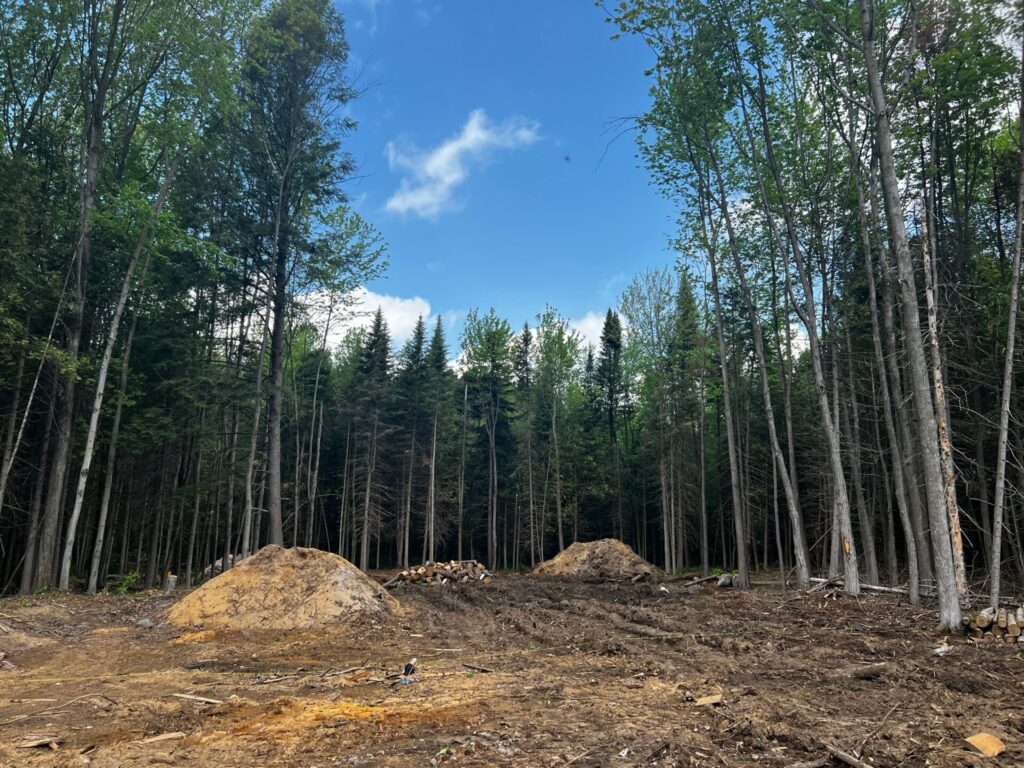
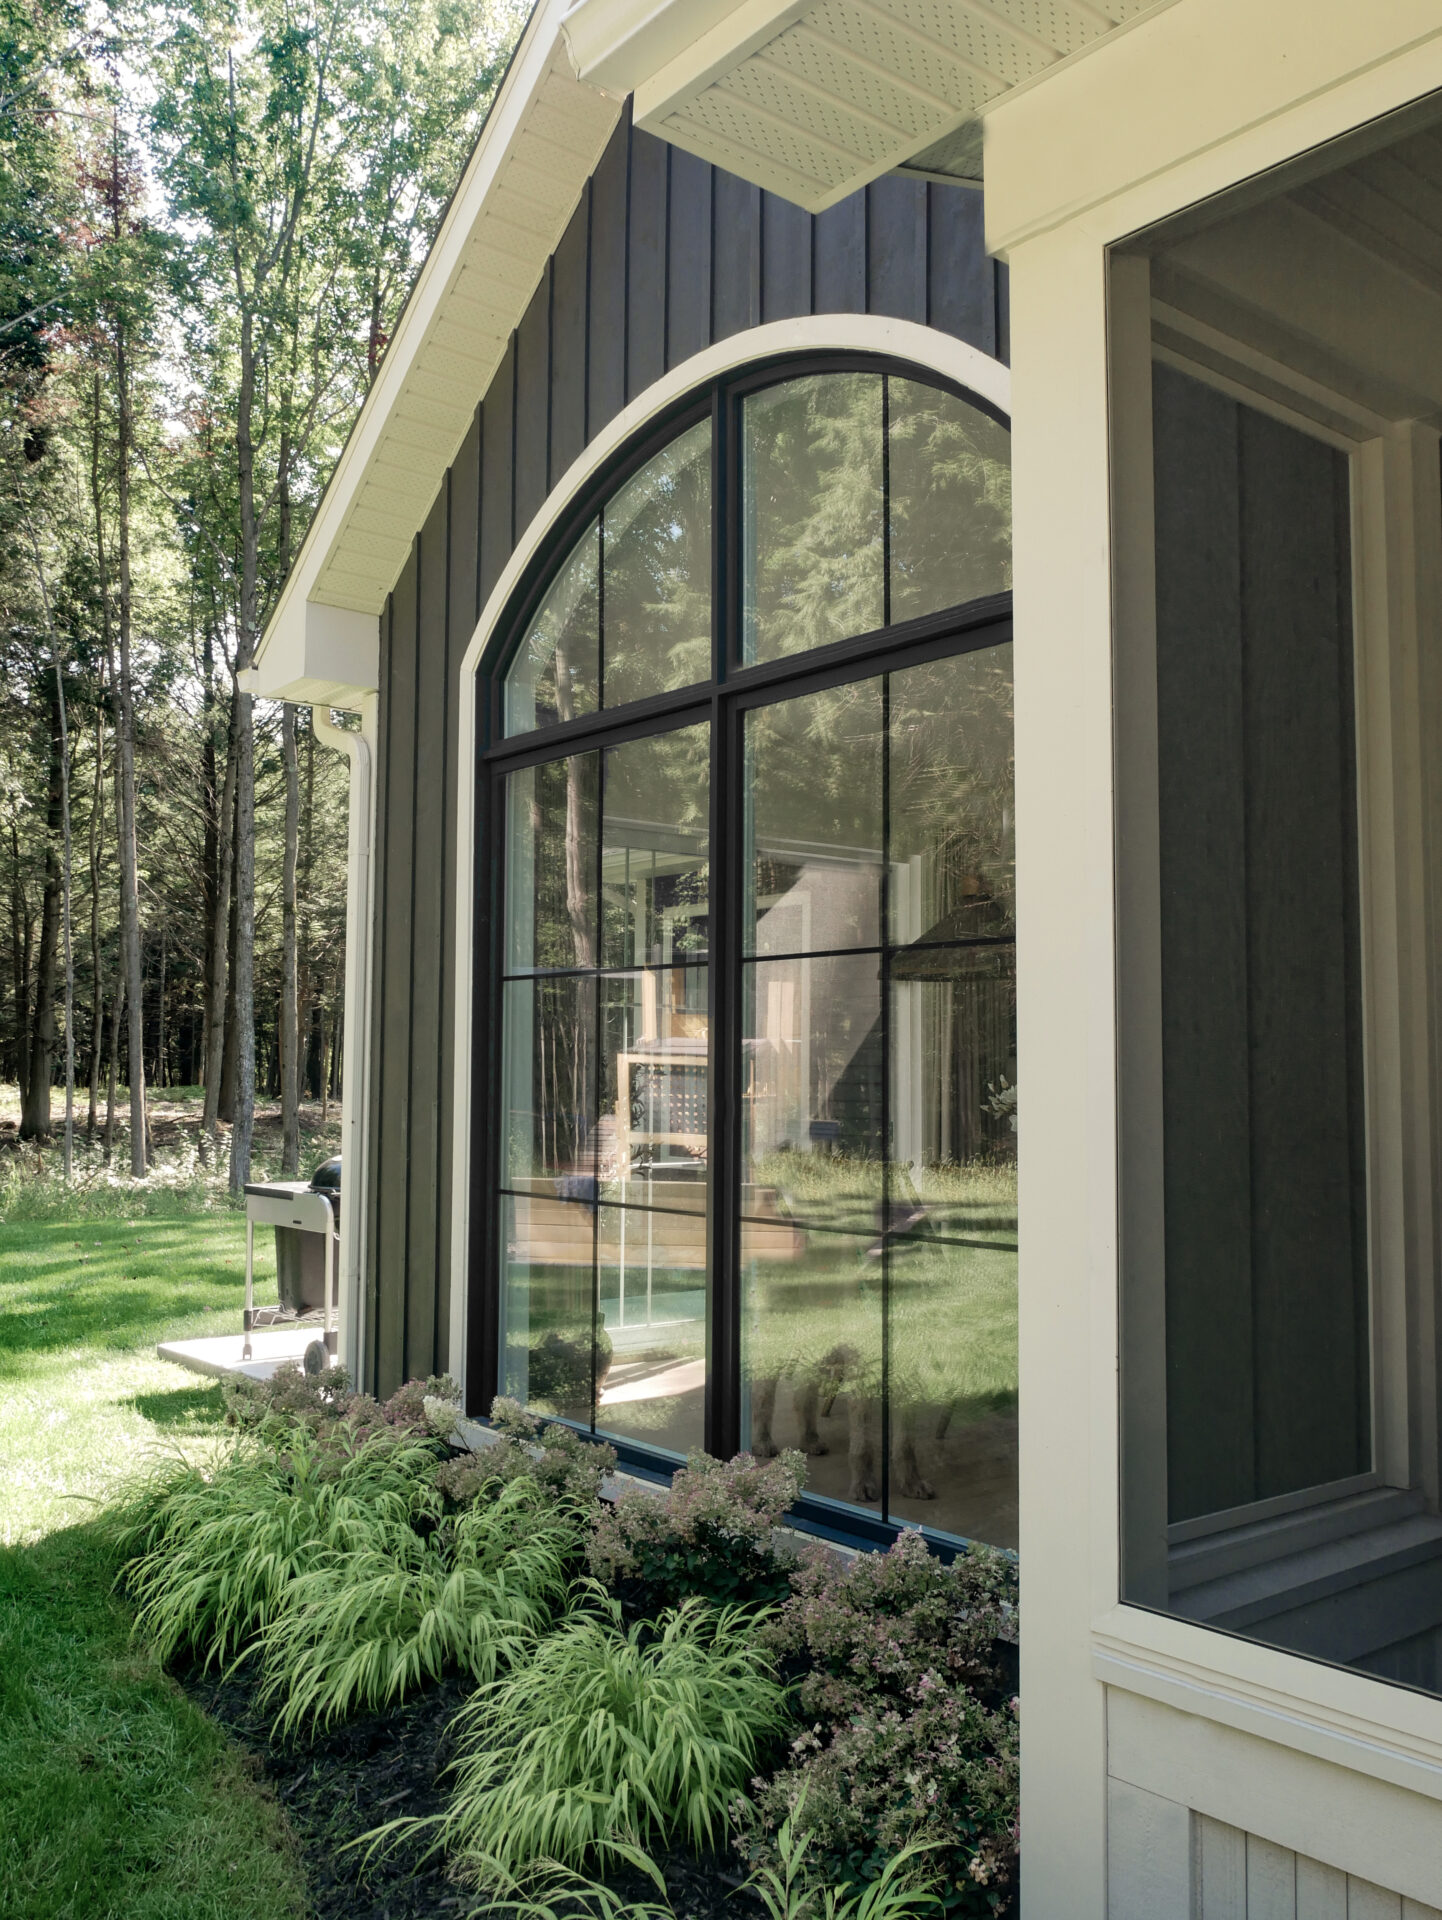
Landscaping your yard with plants can also be very useful for hiding certain elements. Anything that is necessary for a home but not aesthetically beautiful can be hidden by landscaping. For instance; the outdoor heat pump, septic tanks, sewage field... You know, the kind of thing that is not aesthetically pleasing to the eye but is essential? Well, these elements can quite easily be “camouflaged” using different landscaping strategies.
At my home, we chose to hide some of these with hydrangeas which will grow and do a great camouflaging job. To hide our large gas cylinder, we surrounded it with Salix which are large bushes that will eventually become dense and hide everything.
Budget landscaping in your construction
During construction let's face it, there isn't much going on the flowerbed front. With all of the trades going back and forth, the time is not chosen to start planting flowers. Flowers that would most likely be stomped on and ruined. However, you can plan your paving stone during construction if your budget allows it. And of course, this can also wait. Flowers, bushes and plants can be significantly expensive so we can plan for it in the long term. The advantage is that we can do it in stages to better integrate it into the budget.
For our project, the people at Foliflor were able to guide us according to our budget and offer us alternatives to achieve the result we wanted while respecting our financial plan. It’s not completely finished yet, but it’s a really great start!
Landscaping done in an orderly fashion
Here is the order in which you should plan your exterior landscaping according to the experts at Foliflor.
1- Choose where your main path/passage way will be seeing as the layout will depend on it.
2- Tree planting. Choose their location seeing as they take up the most space.
3- Next comes the shrubs.
4- Choose your perennials that will come back year after year
5- Now comes the choice of annuals plants and flowers.
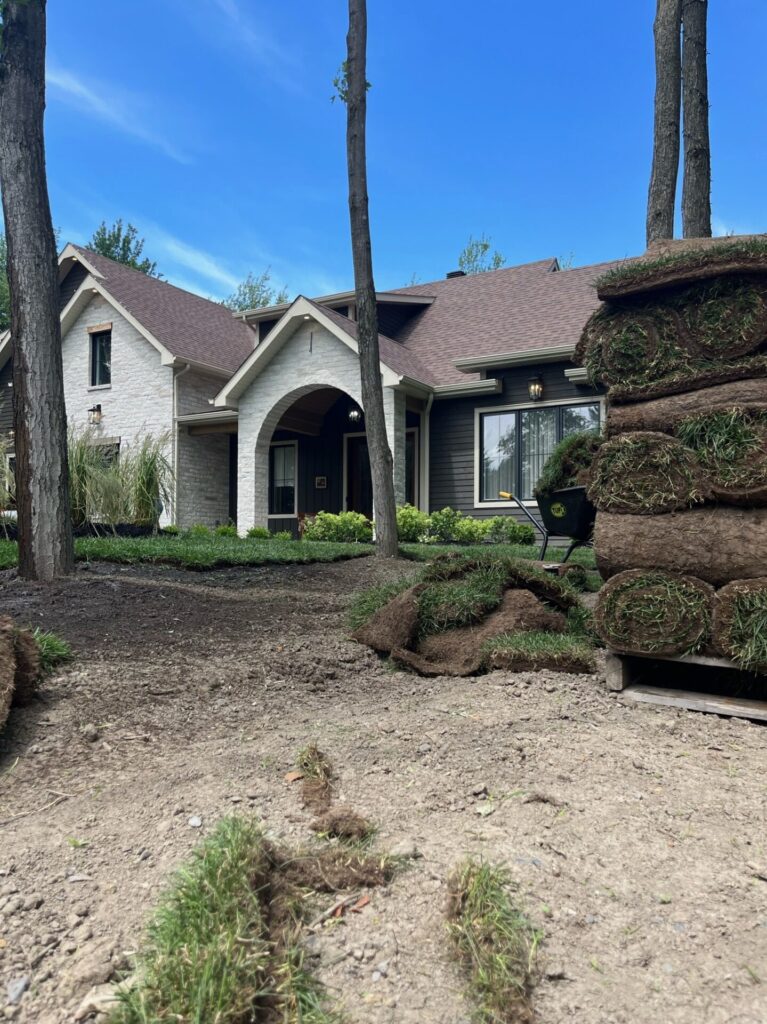
6- At the very end, you can move on to the grass/lawn. This way you will know the exact amount to buy if you opt for lawn rolls
Our plant choices
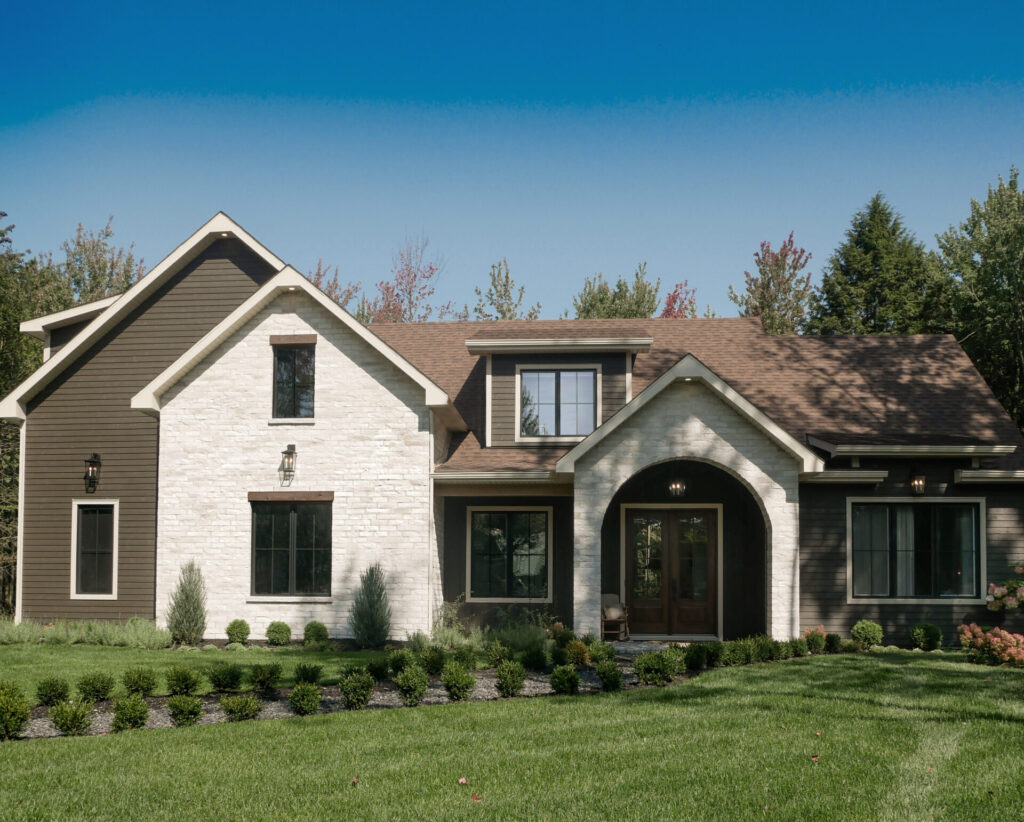
Kevin my spouse, the Foliflor team and I chose the location of the plants based on their volumes. I wished to have a nice variety by alternating the different plant heights. We also chose some that actually helped to highlight the house.
Since our house is on land surrounded by forest, we didn't want to steal too much of the spotlight. We wanted fairly neutral shrubs and flowers. We mostly opted for green and white plants and flowers.
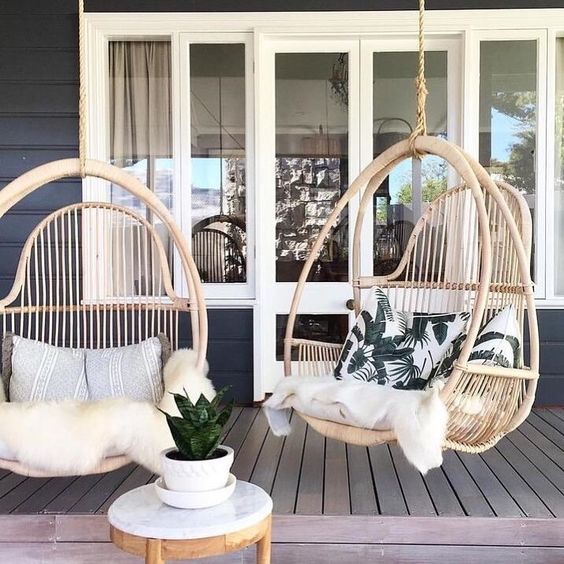
Our little entry pathway
I absolutely LOVE the path that leads to our front door. Generally speaking, I’ve always been attracted to delicate, almost mystical pathways so it became very clear that I would have something similar and orginal as a pathway to my home.
My spouse and I chose to start it at the entrance to my yard. People naturally park their cars there and don't tend to enter through our other secondary door. I also like that it goes through the big patch of grass in front of my house.
Our little path offers lots of design possibilities. We topped it off with a repetition of really cute Buxus (also called “Green Velvet”)
Eventually we will add paving but it is not a priority at this time. I already have no many other landscaping ideas!
Originality in the choices you make
We wanted to add a little originality to our exterior decor. Here are some of our favorites in a nutshell.
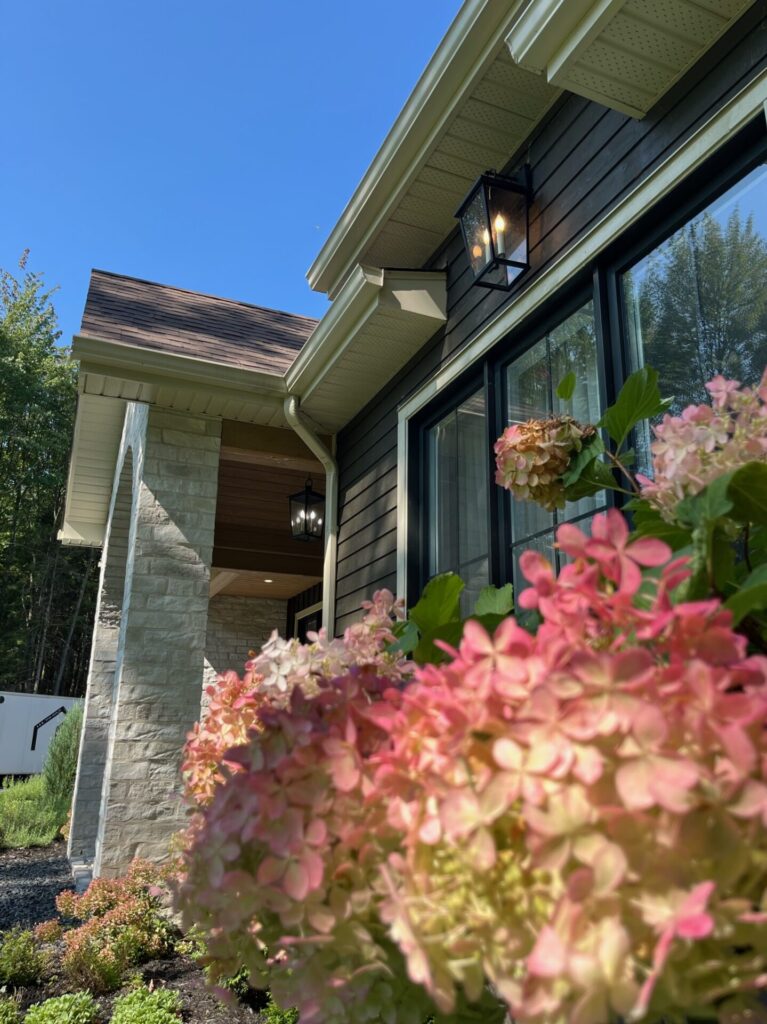
This lilac planted near our bedroom window is ideal for giving us some privacy. It reduces the view of our room from the street. Plus, I really like that it makes flowers and that it stands out from the trees that surround it.
Our Weeping Willow was the only tree my hubby absolutely wanted to have. As it gets really big, we placed it on the corner of the lot so as not to hide the house. I like the idea that when it's bigger, it will be the first thing people see when they enter the street.
We chose an apple tree to put near the park area seeing as I thought it brought back the playful and childish aspect of apples.

We love lavender, in addition to being beautiful, it smells so good!
To obtain a quote or a landscaping plan, contact the Foliflor team located in Saint-Cyrille de Wendover.
Now, to your rakes everyone!
Jenn xxx
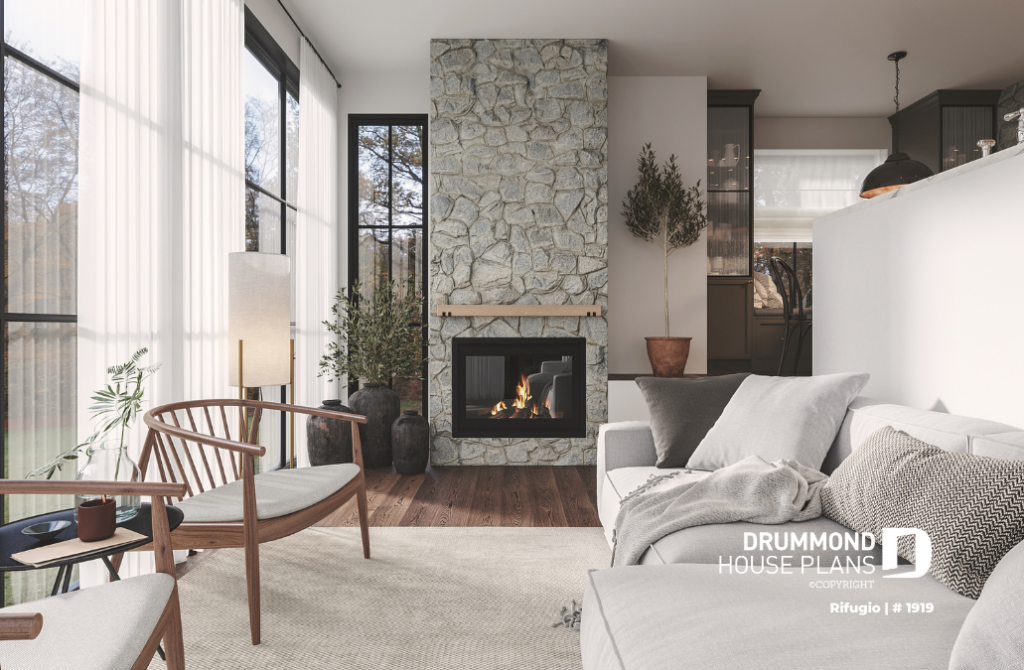
Rifugio tiny cabin - A absolute haven of peace!
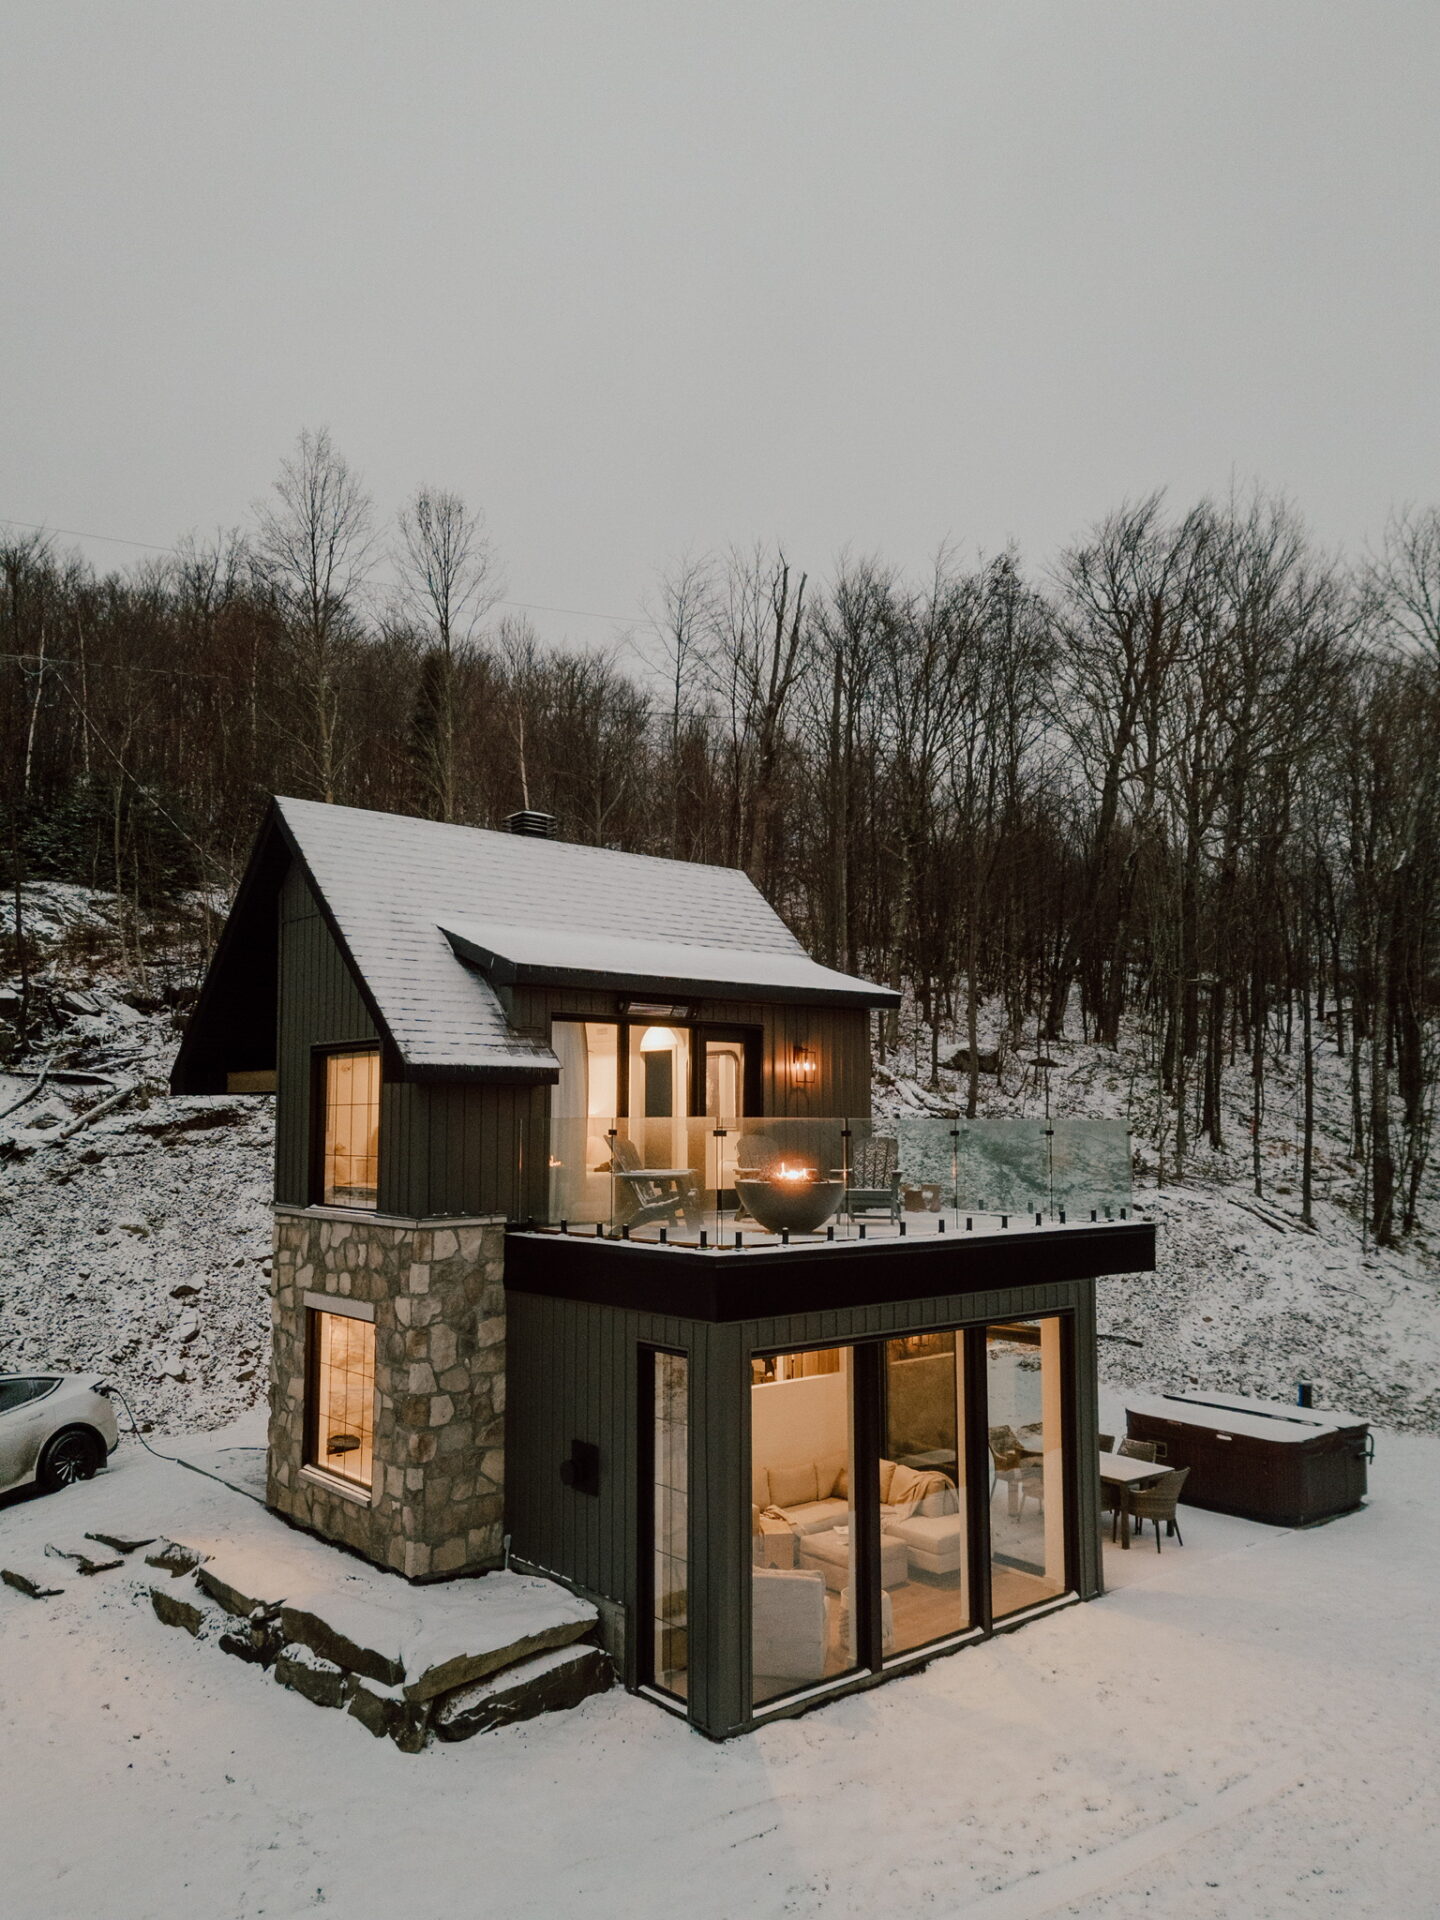
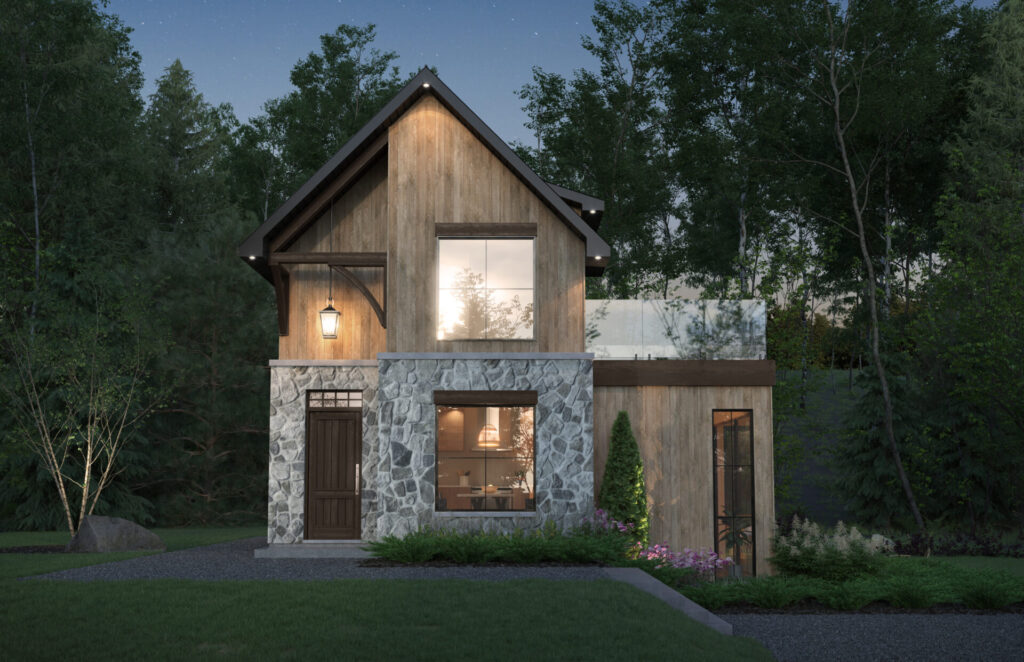
Last year, we were given the challenge to conceptualize a tiny cabin for rental that was to be located in a remote yet beautiful mountain area. The challenge of this project was not only to create an architectural experience, but also maxime the mountain view. It was therefore very different from that of designing a traditional cottage!
Standards for creating this type of particular plan
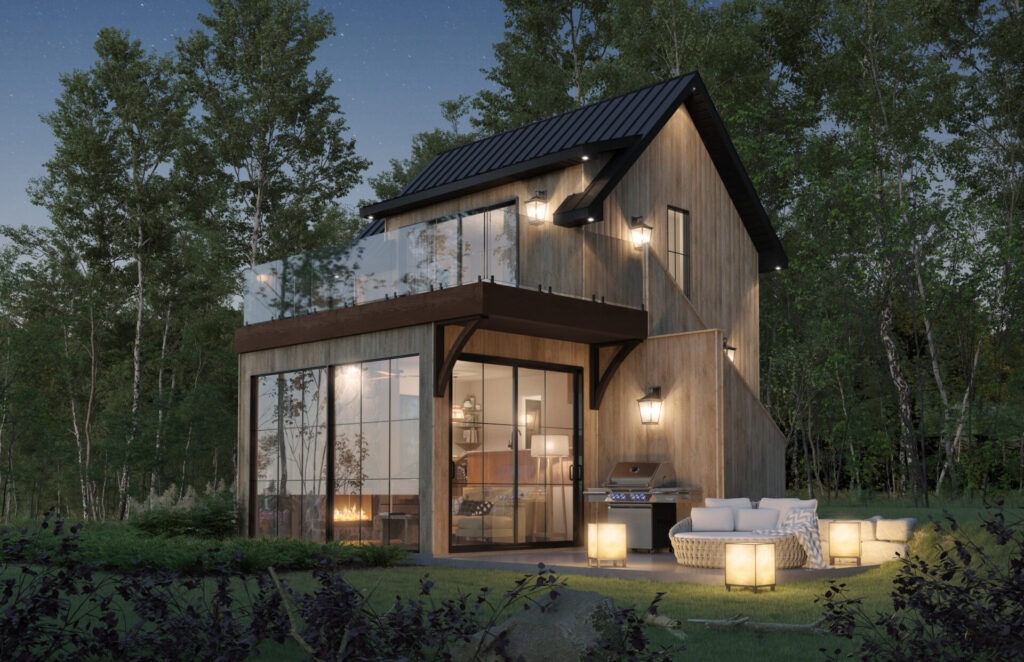
“A unique 4 people tiny cabin, European style, using architecture to help the outdoor environment stand out.” Those were the key words that dictated the design of this project.
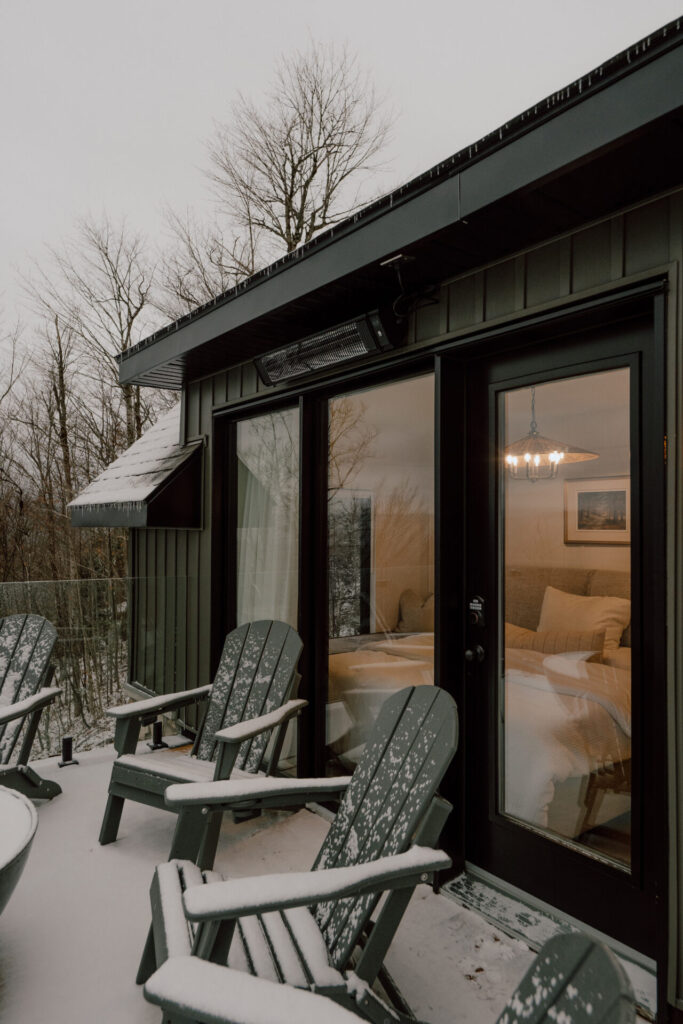
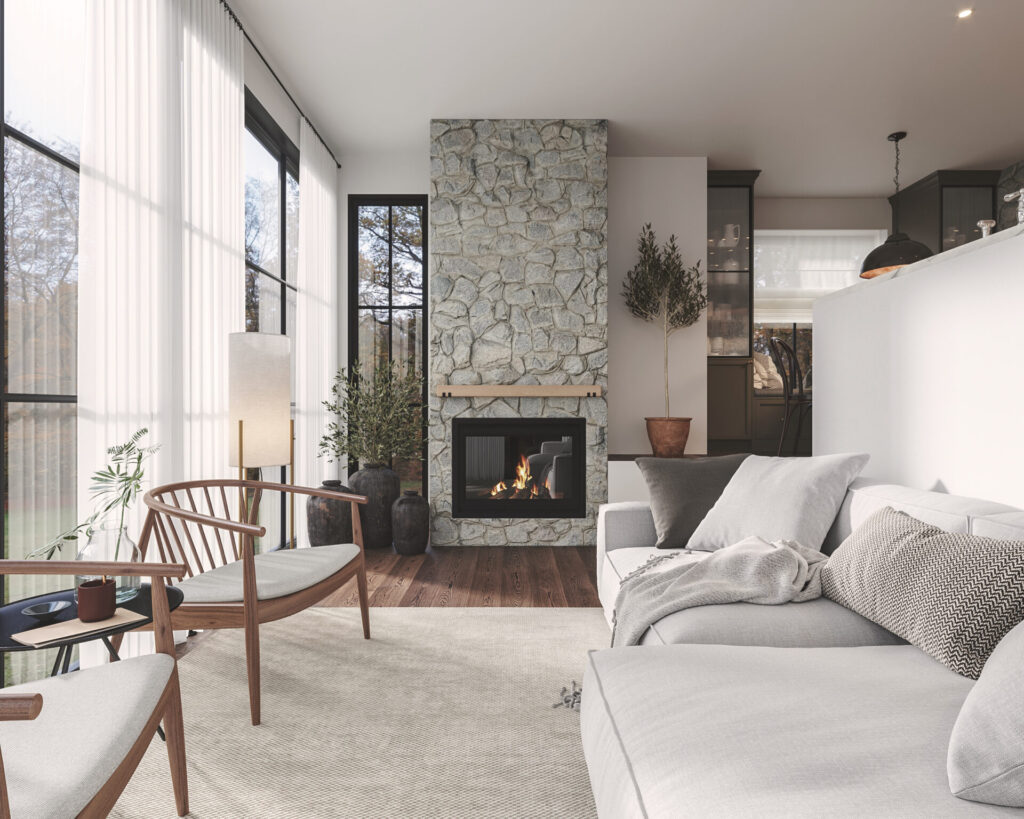
Seeing as this would be built on a sloped lot, we took advantage of this to create a living room a little lower in order to achieve more height, with larger windows.
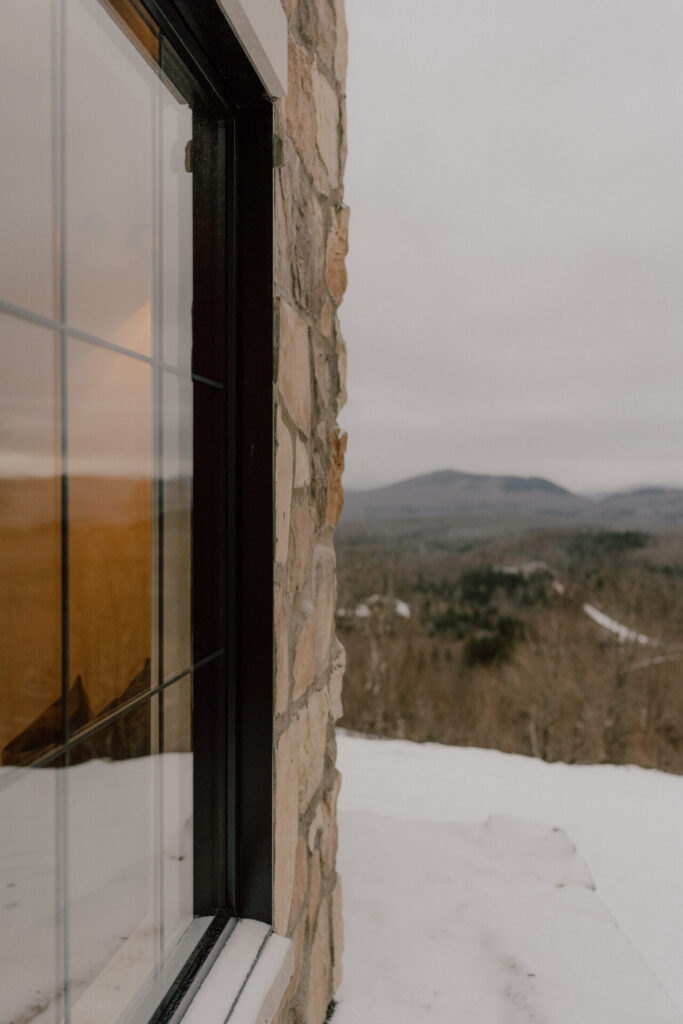
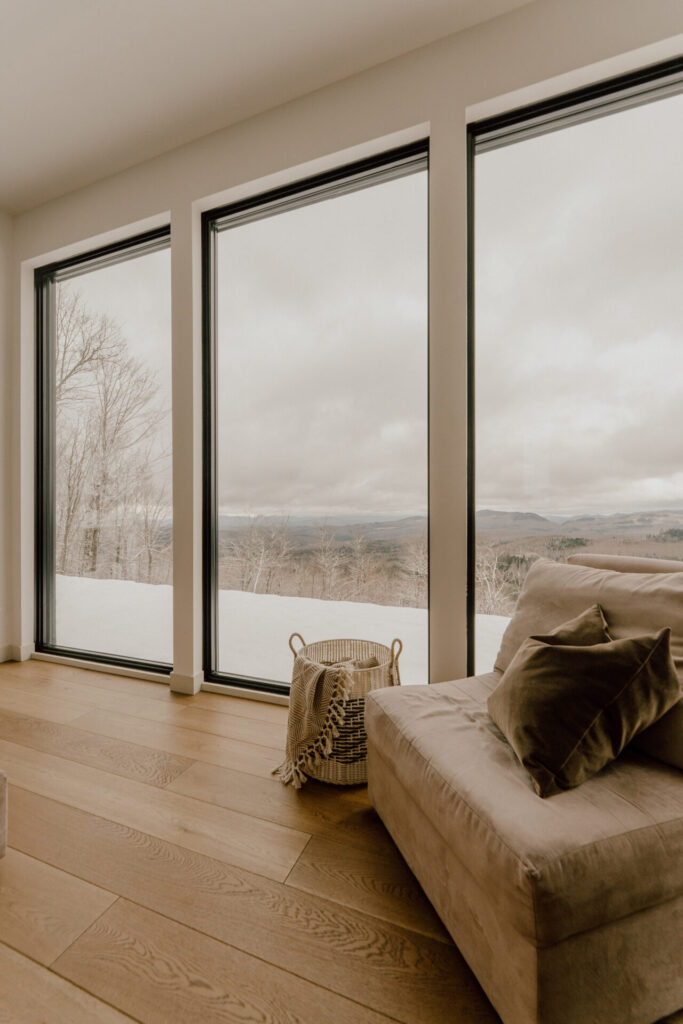
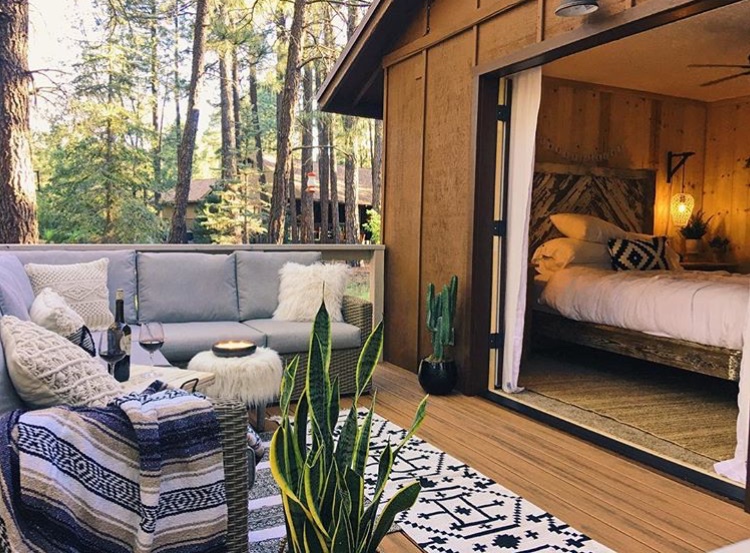
The owners wanted to be able to enjoy the view from higher up seeing as the cottage is located in the mountains. It therefore includes a second level long porch which takes up the entire width and allow the occupants to enjoy the panoramic view and breathtaking landscape. It is also outside this same porch that an emergency exit was designated.


Optimize your space in a tiny cabin
Seeing as this was going to be a rental cabin, the owners wanted it small but optimal. They were on the lookout of a smaller square footage where less maintenance is required.
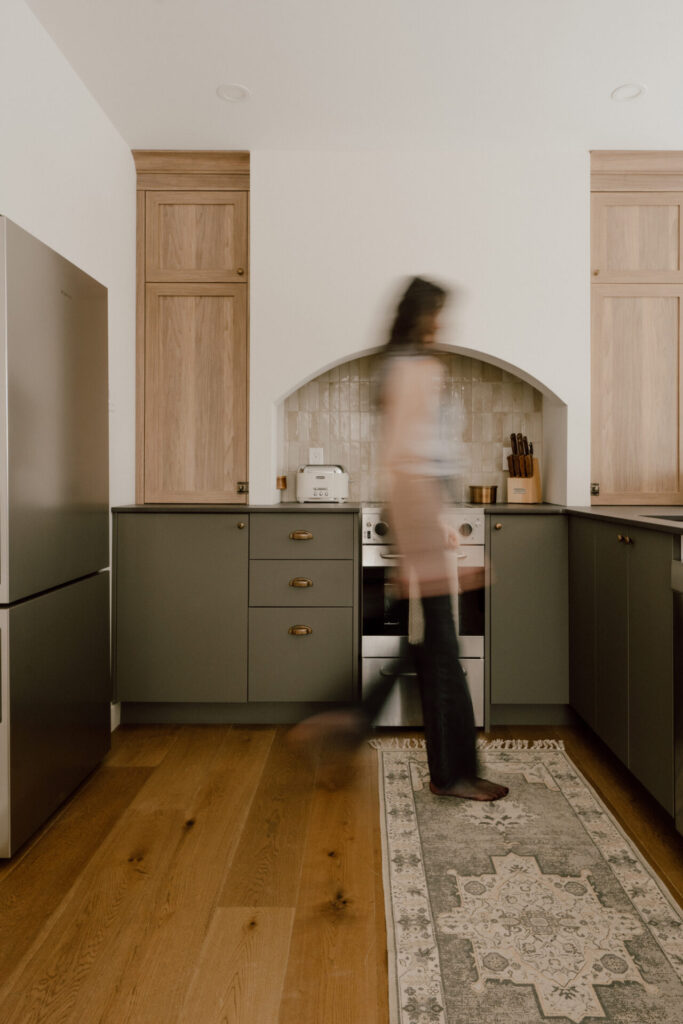
The spaces for household appliances are compact in order to reduce construction costs and of course, the costs related to the purchase of the appliances. The cottage aims to attract customers who will have a short stay so there was really no need for regular-sized appliances.
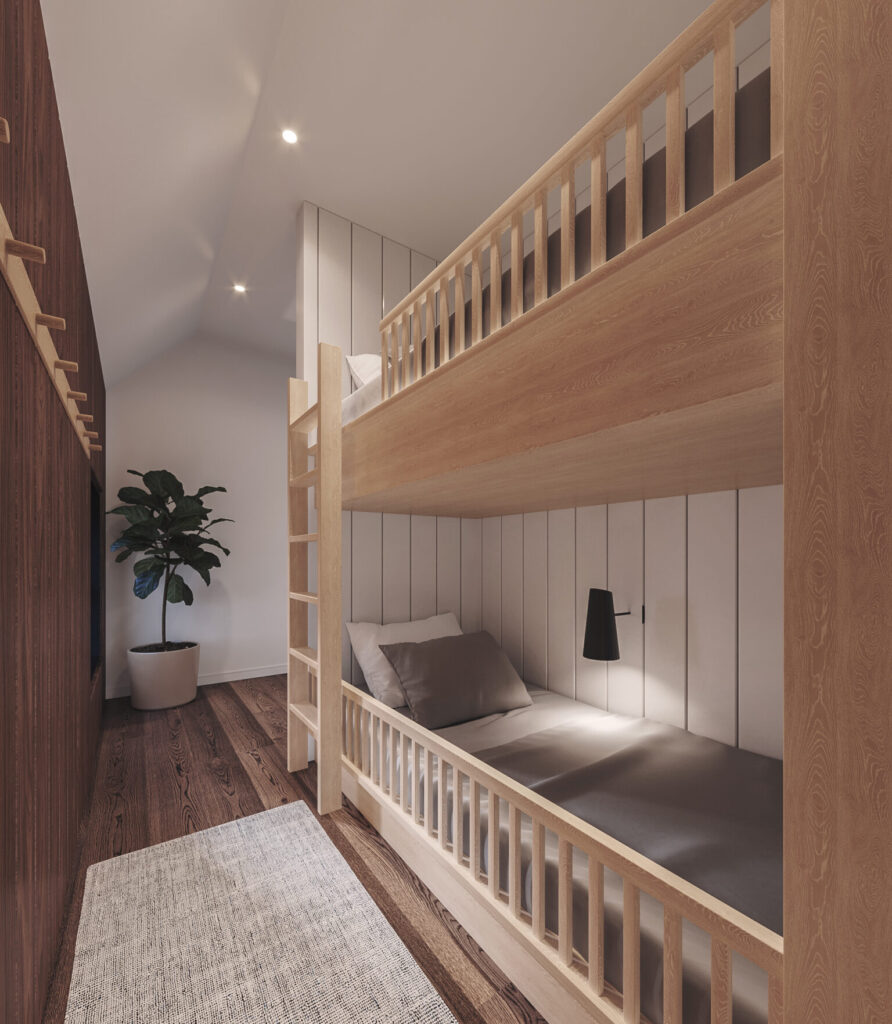
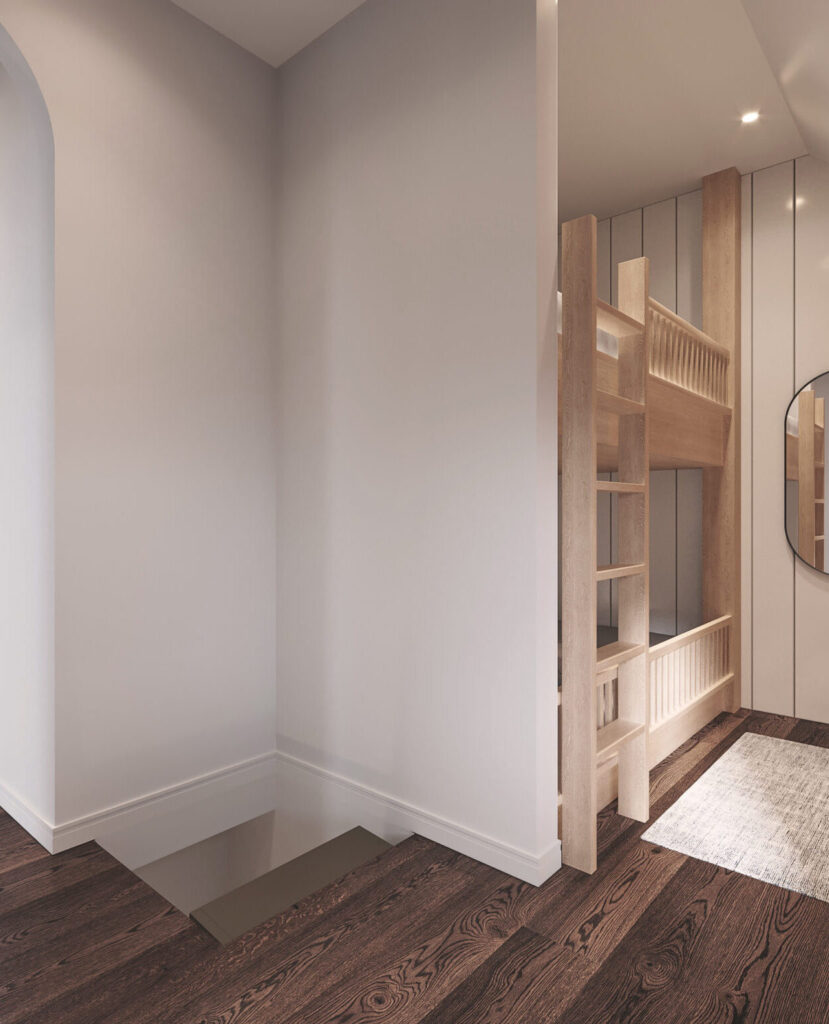
Access to the second floor is done via a ladder which allows to save space while also offering a unique experience for the tenants. On the second floor you will find a very small bathroom, designed lengthwise with a master bedroom that includes a king-sized bed and reading corner. There is also another sleeping area that includes 2 single bunk beds. The sloped ceiling offers a super cozy atmosphere.
The must-haves in a cottage
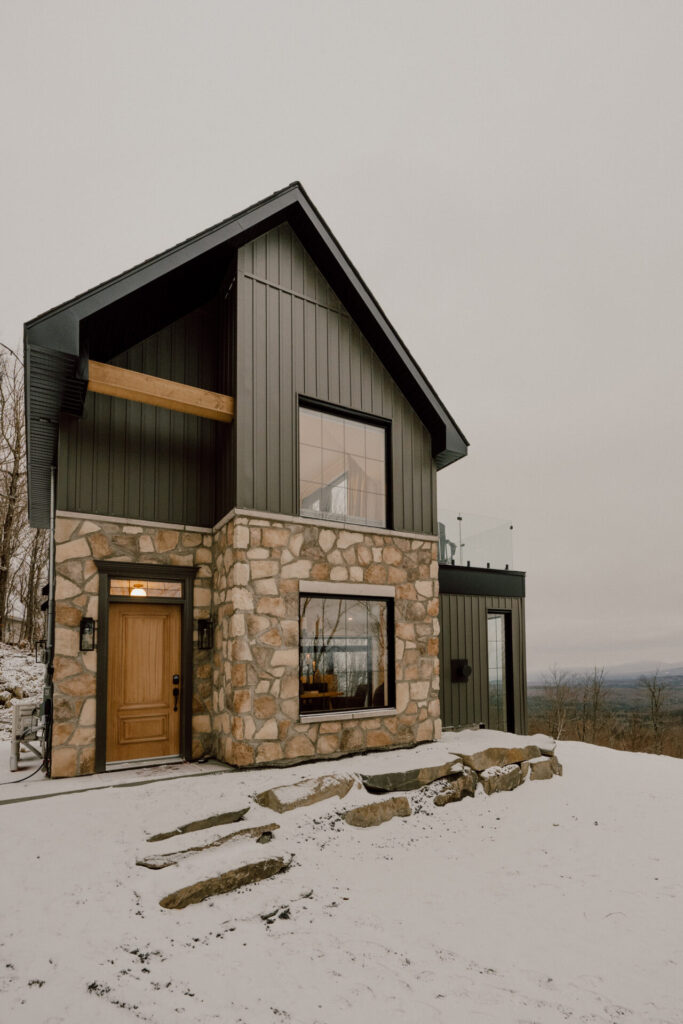
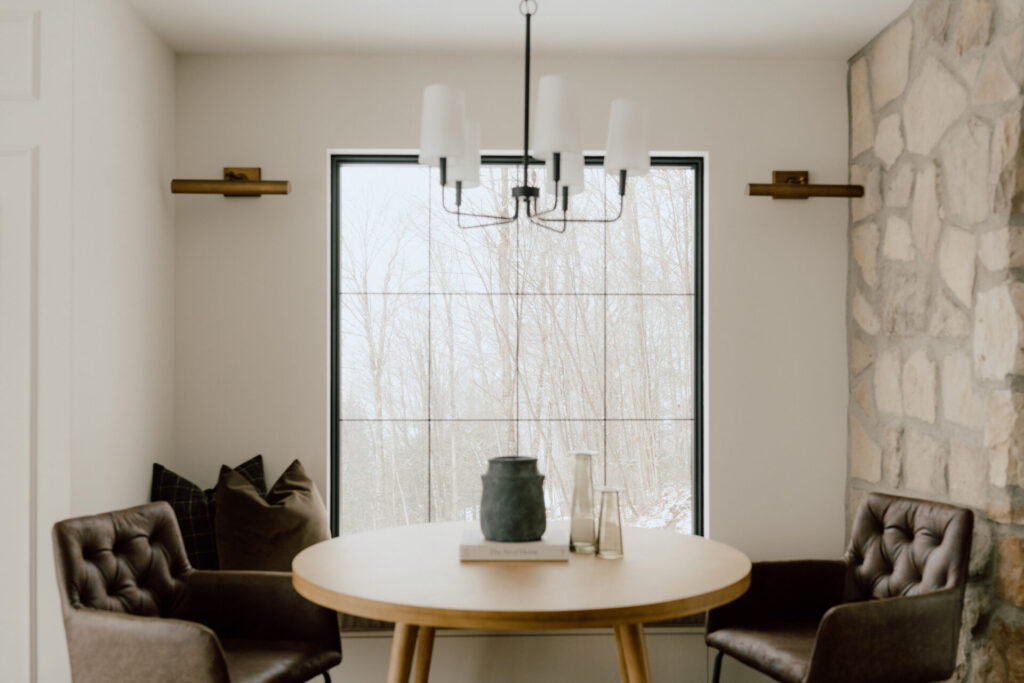
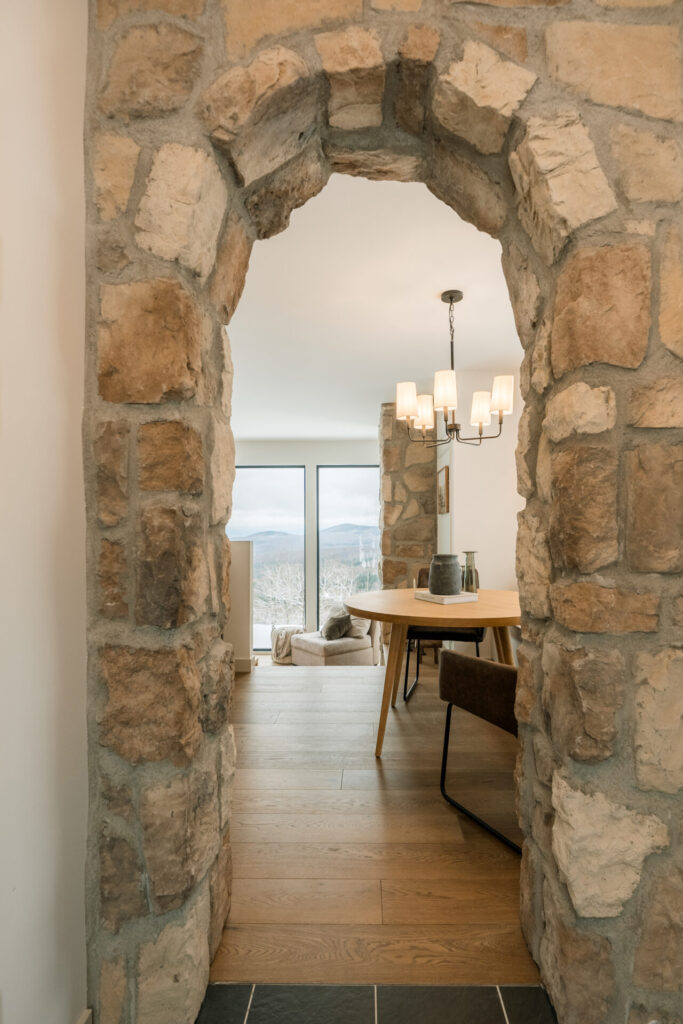
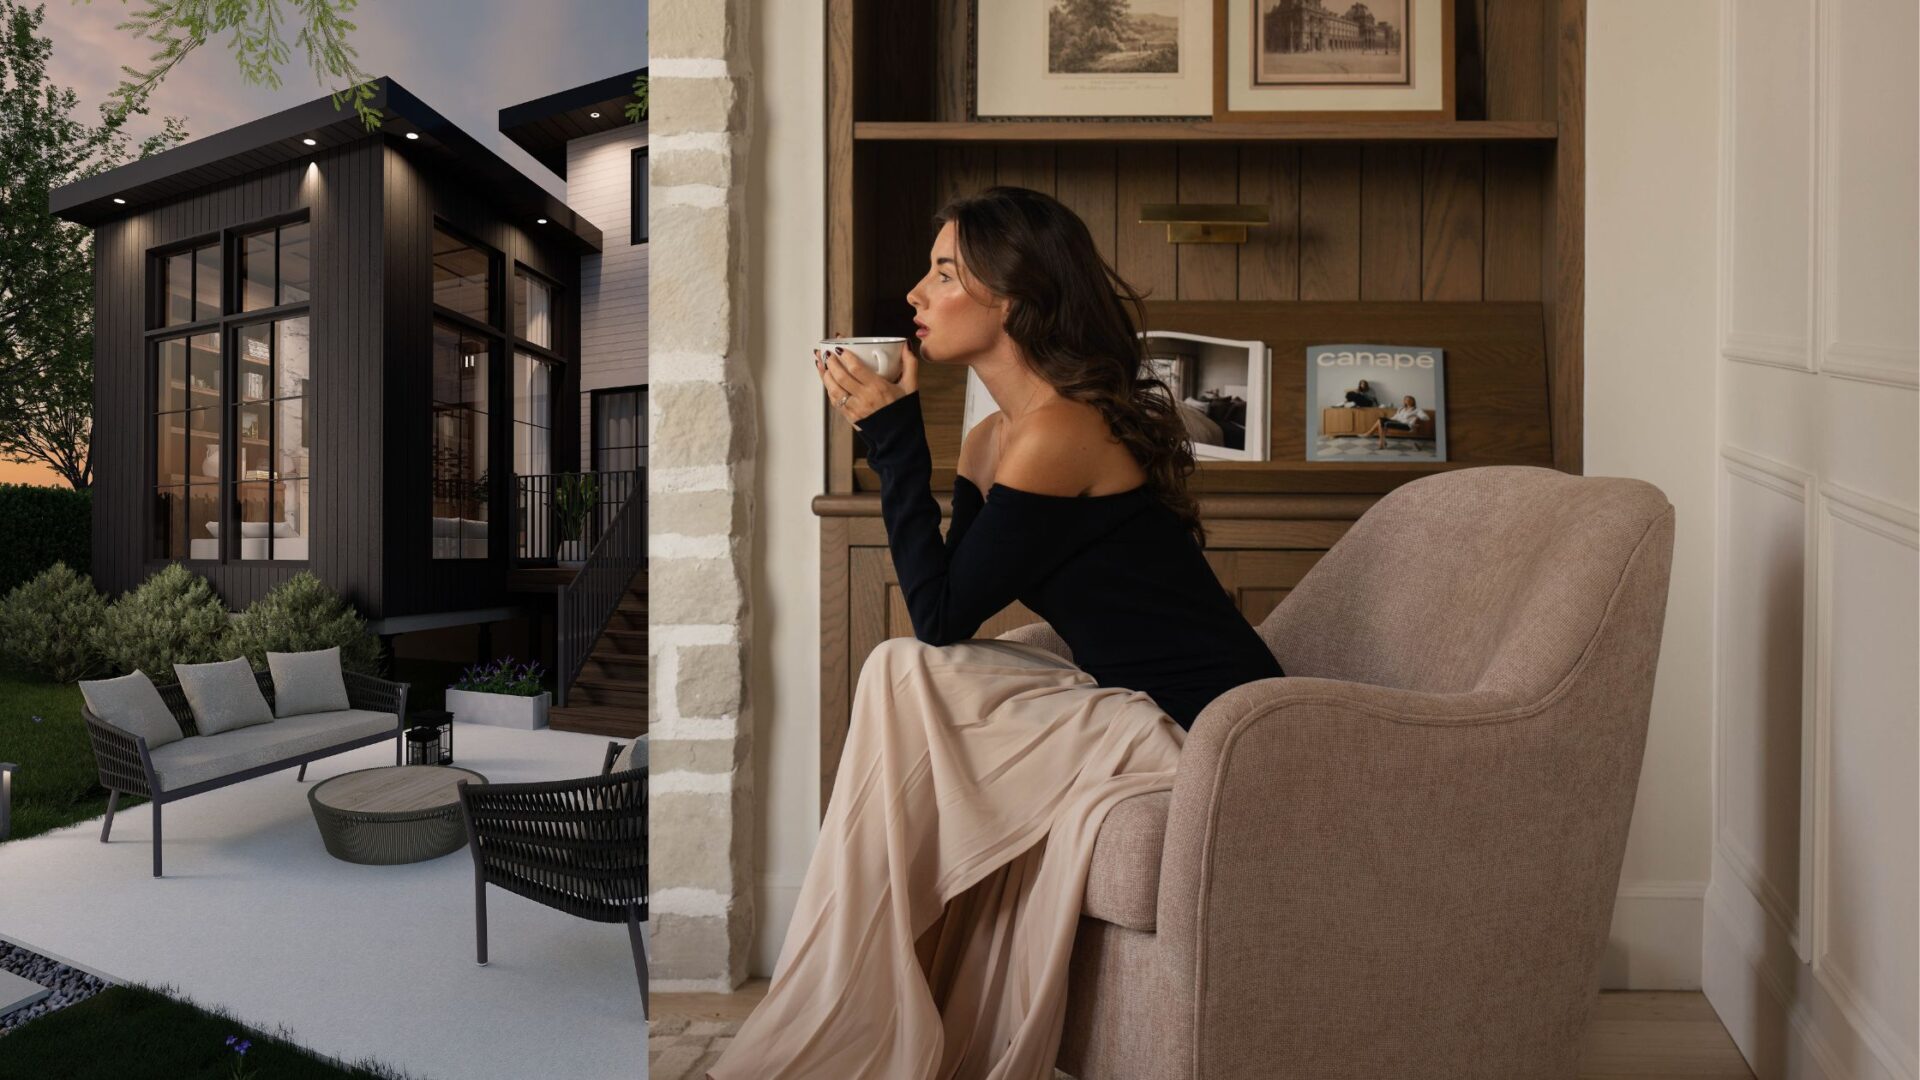
Of course, there are certain elements that cannot be missed in the designs of a recreational cottage and that are also very appreciated such as a fireplace and multiple areas designated for relaxing, such as seating area found in the dining room. Another must would be a spa. This is why the terrace/BBQ section at the back allows you to enjoy the view. The stone wall creates appreciated intimacy from the parking area and you will also see this same stone repeat on the house.
Location is key for tiny cabin!
We located the mechanical room and the stacked washer-dryer on a corner of the house that is only accessible from the outside of the house. This way, the interior is compacted, avoiding the loss of space. Seeing as only the owners need access to this space, its location is best for all!
We fell in love with this custom project so much that we, in agreement with the owners who are good friends with Jenn the designer, decided to retrieved the plan for our own plan collection. We couldn't miss passing the opportunity on this unique little gem!
Having stayed at the Rifugio a few times, it is a place that we absolutely recommend. You will find the contact details to book a stay below!
See the Rifugio plan
See renting details
Learn about out materials list
@llesdeux’s renovation project
The wonderful content creator Maude C. Pion, also known as @llesdeux on Instagram, approached us to create her renovation plan. She and her life partner Jordan, noticed that the space they had in their current house was starting to get tighter as the family grew. With the arrival of their youngest daughter, they discovered the need to expand their dining room and family living room.
Your land : can it be a barrier to expand a house?
In the case of @llesdeux, their house is located on a fairly narrow plot of land, in a very ecological residential area. We therefore had a percentage constraint in regards to the footprint that needed to be respected in this particular expansion.
Stretching a house in the renovation process
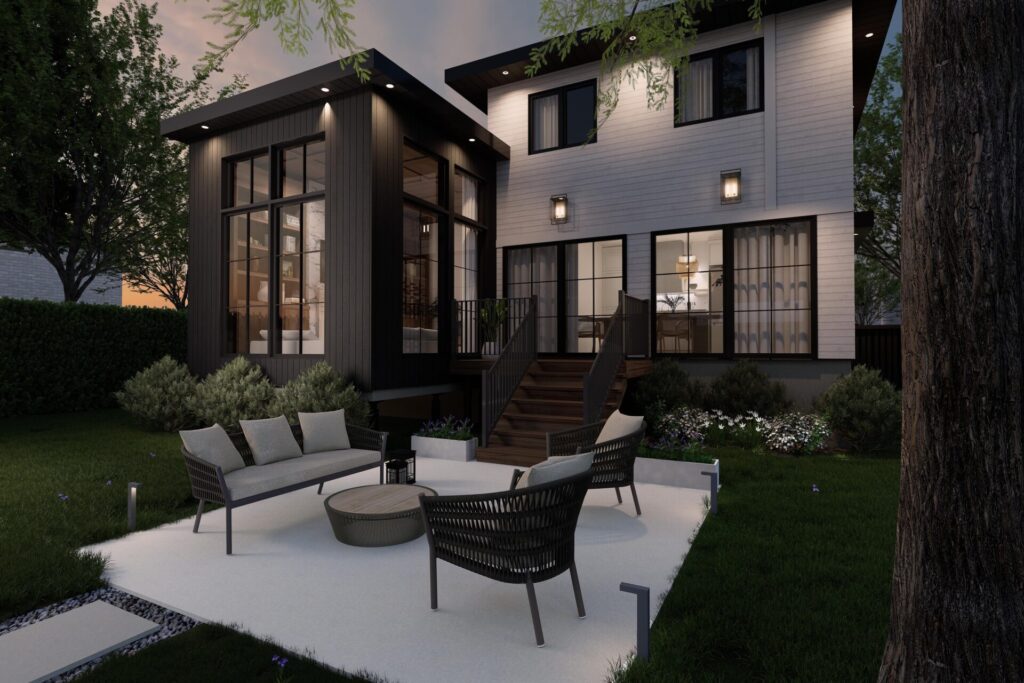
To enlarge or extend a house, everything must be well thought out. In the case of Maude's family, as the desire was to extend the house towards the rear and having a maximum dimension to respect, we took advantage of the fact that their garage was located more towards the front of the house to add a new room behind it. In doing so, we did not take up too much footprint, and much less demolition was required. We also took advantage of this space to set up their new living room, now accessible from their dining room.
How to keep the same appearance if desired
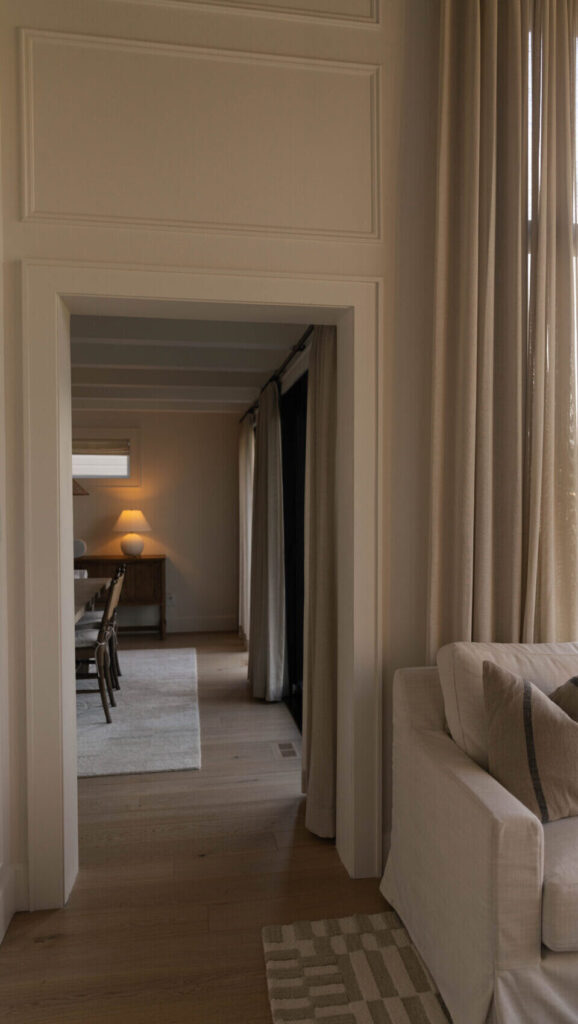
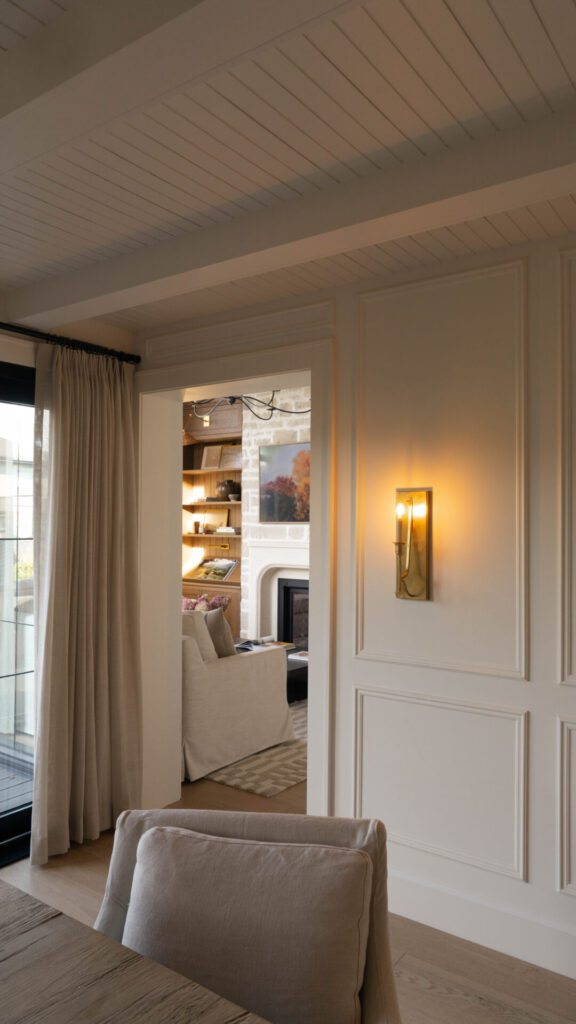
Maude and Jordan's house has a contemporary style appearance that they wished to conserve. We therefore opted for this same style for the exterior, adding a more contemporary contrasting touch. We also chose a black fiber cement exterior so that the extension would better blend in with the look of the house.
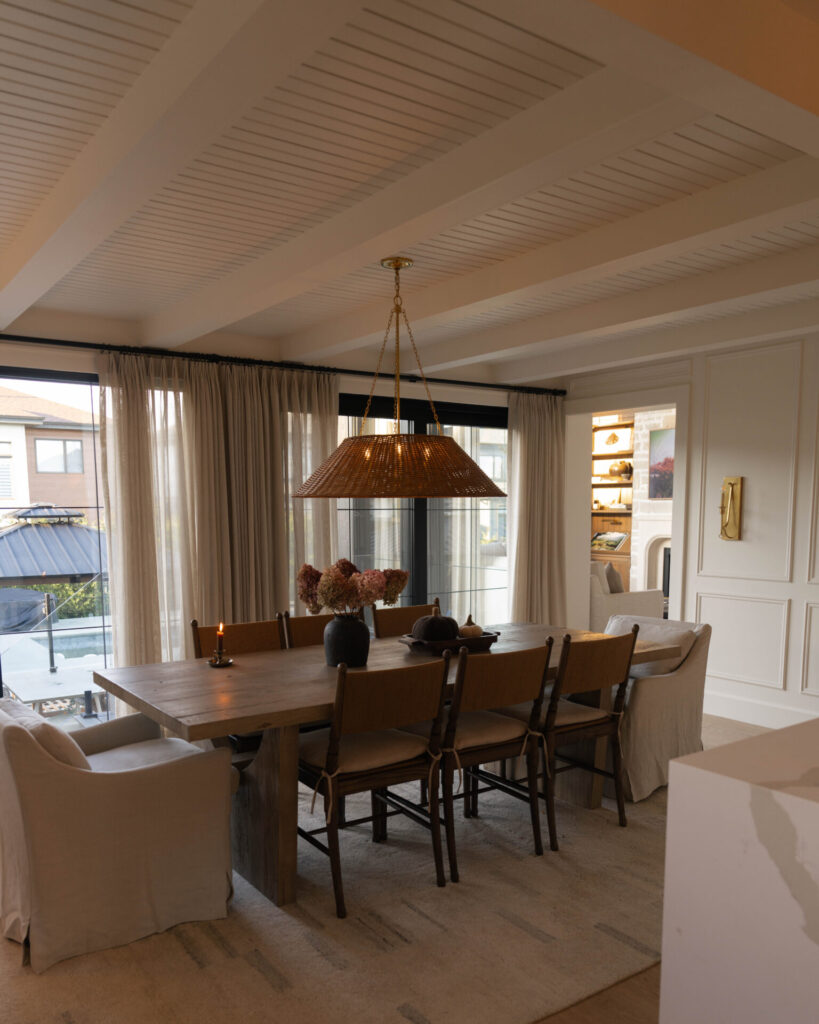
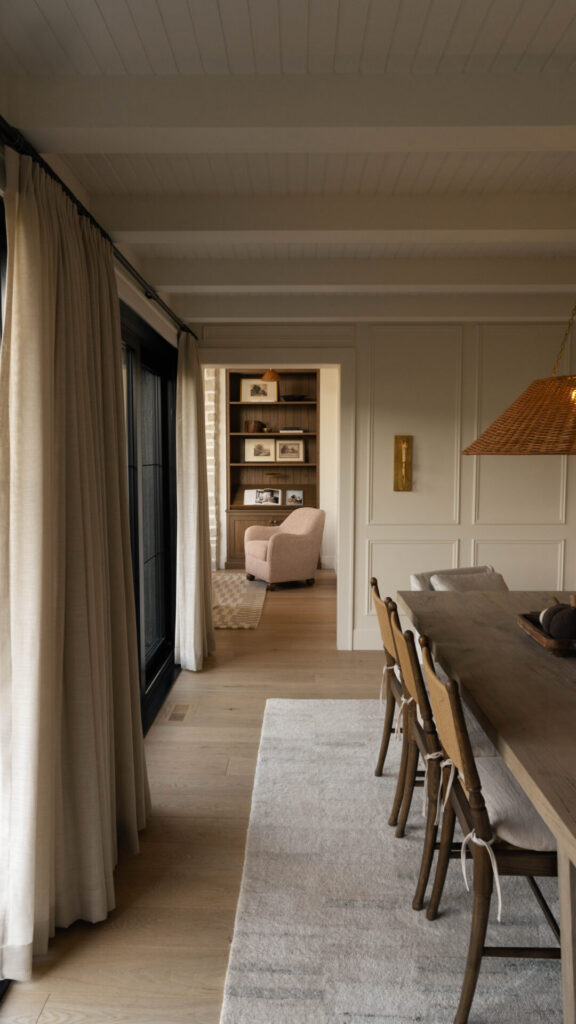
For the interior, the house has 8 foot ceilings. We took advantage of the fact that the living room is a little set back to give it volume and opted for 14 foot ceilings for this room. The team of interior designers AKB Design suggested a chic and warm Californian look. They did such a wonderful job, we are completely in love with this project!
The possible city constraints and their regulations
Initially, we wanted to add a covered terrace accessible from the new living room. However, the city did not accept this as it did not meet their requirements and regulations.
Tip: it’s important to consult the city’s construction requirements and limits before embarking on a new construction or renovation project. Ask one of our architechtural designers. They will be able to guide you and advise you on the steps to follow for your project.
Because of the restriction, we opted for a balcony adjacent to the house which happily complied with the city's regulations.
Seing as you are already renovating, why not…?
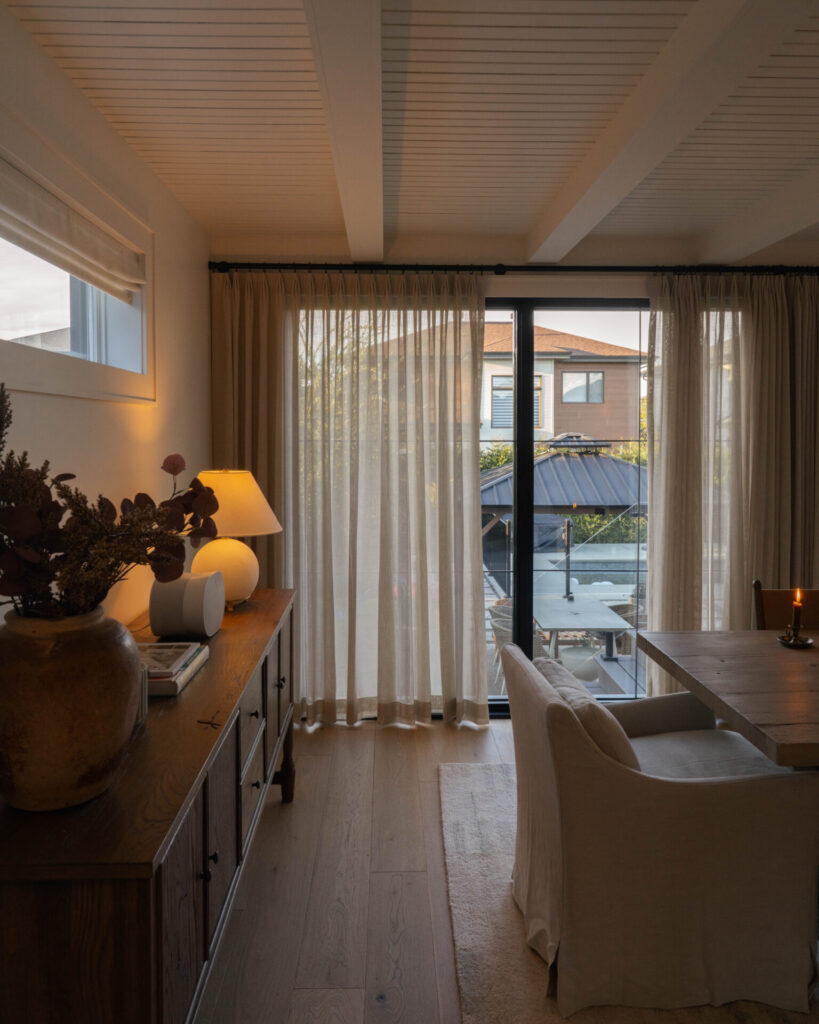
We know that when the time comes to do a renovation, we often tell ourselves that as long as the house it often a chaotic mess because of the renovation work, we might as well do more of them! In the case of the Epicon family, their desire was to review the fenestration of the house. We therefore added several windows to increase the entry of natural light. It gives a magnificent effect to their residence.
In this project, we had the pleasure of working with the following companies:
Union Lightning : @unionlightingdecor
Pierres Royales : @lespierresroyales
GIT portes & Fenêtres : @gitportesfenetres
Armoires Cordeau : @armoires_cordeau_
Miziano Construction : @mizianoconstruction
Toiles signatures : @toilessignatures
This is a project on which we are happy to have had the opportunity to participate in and add our little touch of creativity, as well as contribute to improving the daily life of this charming family!
If you have a renovation project, click here to know more. To read other blog articles about renovation click here.
See you soon
Jenn xx

The advantages of having a materials list during your construction
A material list is now available for every plan offered in the Drummond House Plan collection and can be ordered directly on the website! You can obtain your material list by adding it directly in your shopping cart. You will find this in #3 of your cart in the additional options.
The Material list: what is it and who is it for?
The material list is very helpful during construction. It is a facilitating tool especially appreciated in the auto-construction process. It is a detailed list of material quantities that you will need depending on your home. This list may not be ideal for all of you, especially if you are dealing with a general contractor. However some contractors can charge you an hourly rate for this or require that you supply the materials, in which case our material list will come in handy.
What differentiates Drummond House Plan’s materials list from others
The Drummond House Plan material list stands out from others because it is VERY complete. It is done in three stages. First, we classify all the materials by trade. Secondly, we separate the materials by construction stage. Thirdly, we classify the materials in alphabetical order.
When you get a list of materials from a retailer (materials merchant), they will necessarily put their logo on the document. It can therefore be quite annoying if you go to a competitor with another competitor's list and logo… You then feel like you should perhaps have a different list to hand out and this all can cause additional delays. In construction, when you can save time, you do it! Additionally, they may not count materials the same way which can also add a degree of complexity in comparing bids.
Drummond House Plans anticipates an approximate 10% loss margin which gives you room for error. This is the ideal rate to allow for minor errors without having a huge excess of materials on the job site. Including it in your quotes helps you respect your budget and avoid unpleasant surprises. In addition to avoiding unforeseen costs, you ensure that you save time in the event of an error. No one appreciates having to return to the local hardware store during the middle of the process to buy extra materials. Even worse, having to reorder which can put the entire project on hold. This error margin will help you prevent these scenarios and improve your construction experience.
What are the advantages of having a Drummond House Plan material list?

The Drummond House Plan material list is neutral and you can therefore take it to several retailers without problem. Another advantage of having our list of materials is that you will be able to compare the same number of items from quote to quote. This will help you find the best price faster, have an overview of the cost of your project, and be able to choose where you wish to put a few extras.
Having separated the material list into three categories will be useful for the different stages of your construction. We now enter the quoting stage. This step will be made easier for you with the separation of materials into trades. Thus, each trade will know which section to refer to more specifically, and refer to it.
The second section will help you during the actual construction. By referring to the site delivery stage section, you will be able to navigate towards the next stage by programming your trades and ordering the materials necessary for the next stage. You will find a great advantage of not having too many materials lying around on the site, thus avoiding the risk of material theft.
We also have a section where materials are sorted alphabetically, which will help you find a material quickly.
What the Drummond House Plan material list excludes
The Drummond House Plan material list excludes certain items. We do not count the concrete needed for the foundation, certain items related to electricity and plumbing such as wires and pipes seeing as these are steps that you must have done by a professional and they often work in different ways. We do not count joint compound (drywall) as well as paint since the quantity varies a lot from person to person.
To see all the inclusions and exclusions of the Drummond House Plan material list, see this page.
For other tips and tricks, click here.
How to prepare your flowerbeds for winter with Foliflor
With fall coming to an end, we need to take care of our flowerbeds and prepare them for winter. To do this, we decided to ask a few questions to the Foliflor team who were able to give us several tips and good advice on getting your yard ready for the winter. Foliflor is a dynamic team of experts in the art of garderning and landscaping. They are actually a garden center that also offers landscaping services. Being that they are experts, they were well able to assist us with all our questions.


What plants should you cut to prep your yard for winter?
To properly prepare your yard or flowerbed for winter, you often immediately think that you have to cut everything down. Error! In the fall, you must cut only perennial plants and non-woody plants. More particularly, it is necessary to cut the grasses and hostas which can be cut to the ground. Before cutting down your perennial, find out more about them before making the mistake of perhaps cutting too much of them. Ideally, leave a maximum of 6” of the plant and cut the rest. The plant will grow back healthily next spring.
If you choose not to cut your perennials, that’s okay too. Just take into consideration that you will have to collect its dead leaves next spring.
Which perennials should you not cut from your flowerbeds for the winter?
You should not cut perennial plants such as bellflowers and heucheras. For hydrangeas, you should not cut them too close to the ground. You can cut about 1/3 of the plant to give it a nice shape. It will also help it grow healthier next spring. We can concentrate the cutting on the dead flowers only.


How do you know if perennials will grow back next season?
If your perennials are completely brown and have completely lost its color, things aren’t looking too good… On the other hand, if it is a fairly recent plantation, there is a possibility that they will sprout out some new growth and become beautiful again next spring. A good long-term indicator of whether a perennial is still alive is that it will produce new sprouts.
When a perennial is completely dead, it can be removed by simply pulling on it. The plant and its roots will easily follow.

How to cut a plant or tree branch?
A plant or tree should be cut down when it shows signs that it is dying or is already dead. For cutting, you must opt for a beveled cut to allow the water to drain and not remain stagnant on the plant's wound.
For cutting, it is suggested to prune the plant with shears which have been disinfected to avoid transmitting diseases from plant to plant. Cleaning shoud be done between each cutting of different plants.
How can you tell if a tree is dead?
To know if a tree is still alive, it's almost the same way of determining as for perennials and shrubs. We often start to question ourselves when the tree no longer produces leaves. A good tip would be to scrape the bark. If there is a nice green color under the bark, the tree is still alive. In this case, we can look to see if there are just simply dead branches.
For the dead branches, we cut using the same bevel technique mentioned above. By cutting dead branches, we allow the tree to concentrate its energy on the remaining living parts. It also gives the tree space to grow new branches.
Should we protect our plants for the winter?
We don't have to protect all our plants for winter. We may decide to focus only on some, notably decorative cedar. Decorative cedar risk breaking from the weight of the snow and weakening. You can wrap your cedars in burlap or in any other type of plant protective gear. You can also apply this technique for junipers or other shrubs whose shape you want to maintain.
Also, and for those living in more woodsy or forest areas, deer love to munch on cedar in winter so this also protects your cedar from dear.

What do we do with the mulch at the end of the season?
At the end of the season, you can leave the mulch as is and even add more next spring. By adding a good layer of mulch, you prevent the spread of weeds that you will have to remove next spring.

Now that you have everything you need to know to care for your flowerbeds for the winter, let's get to work! 😁
Jenn xx
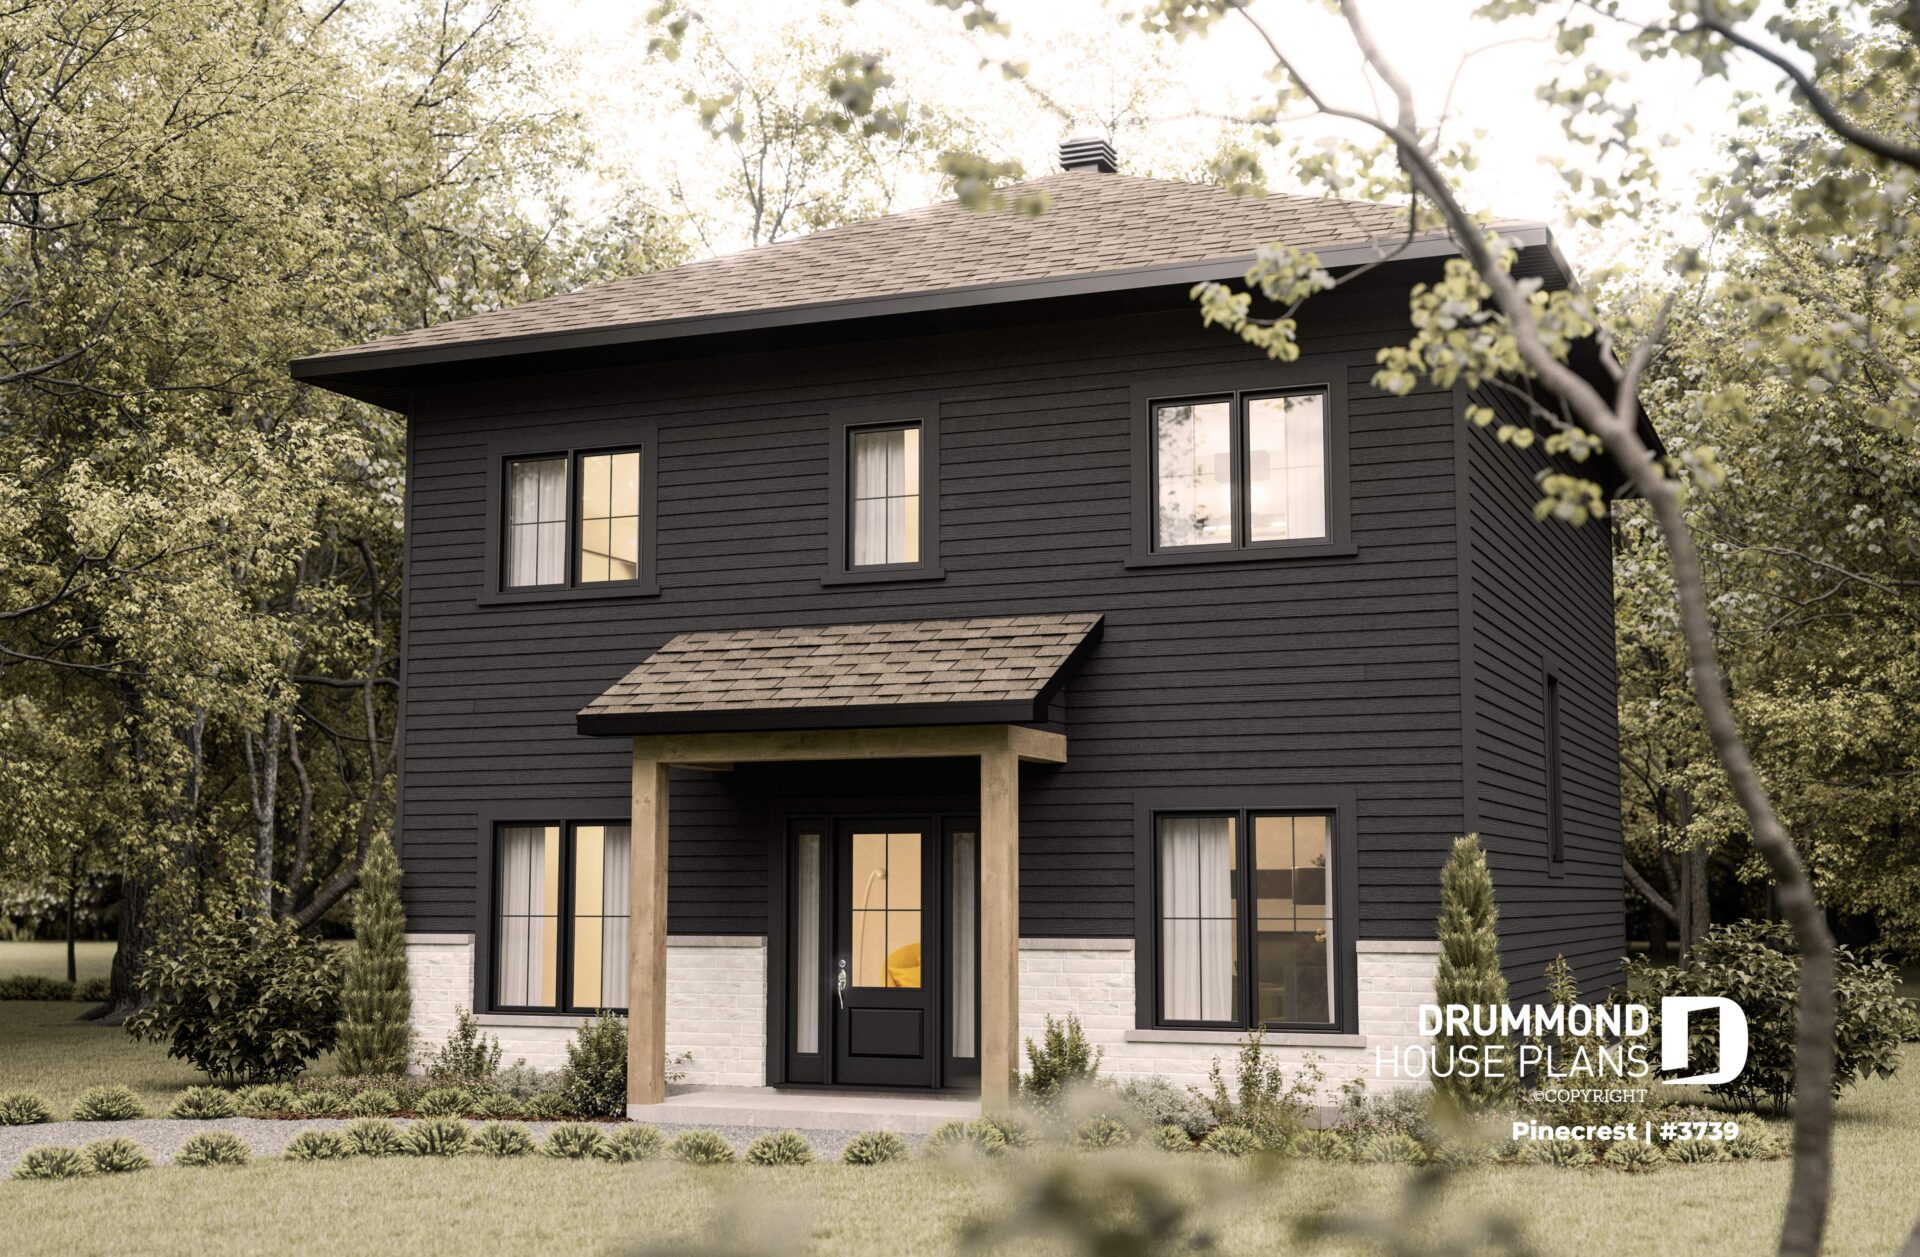
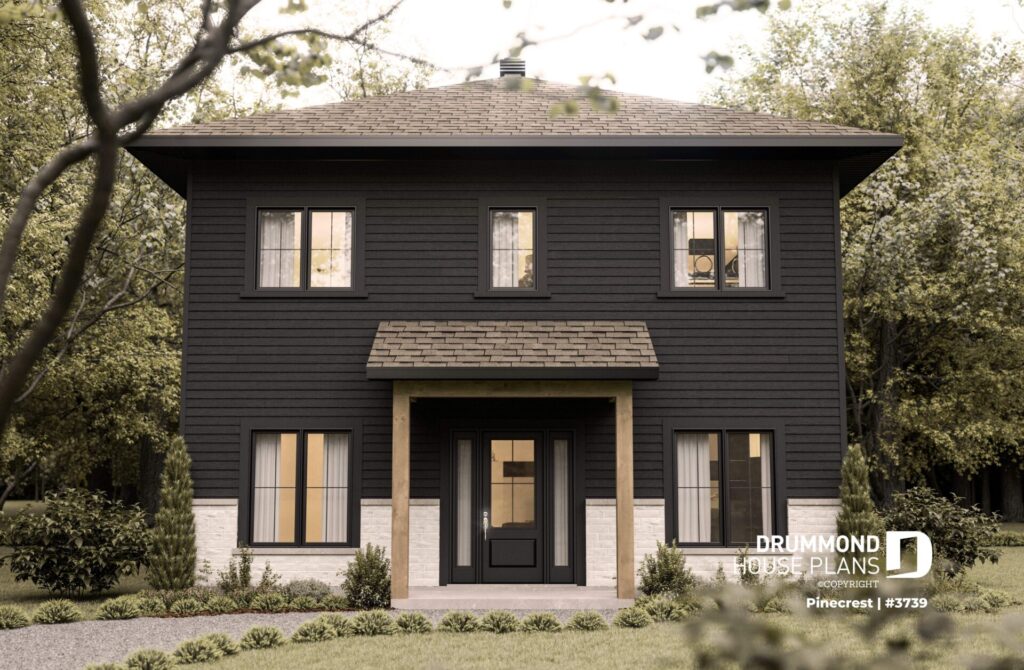
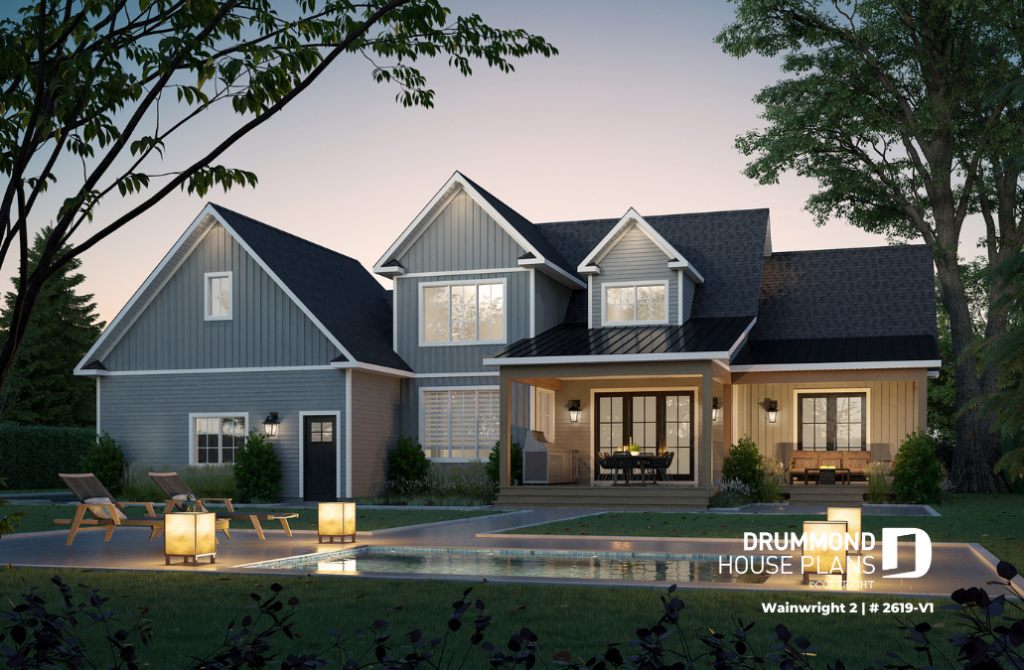
Economic Contemporary two storey House Plan
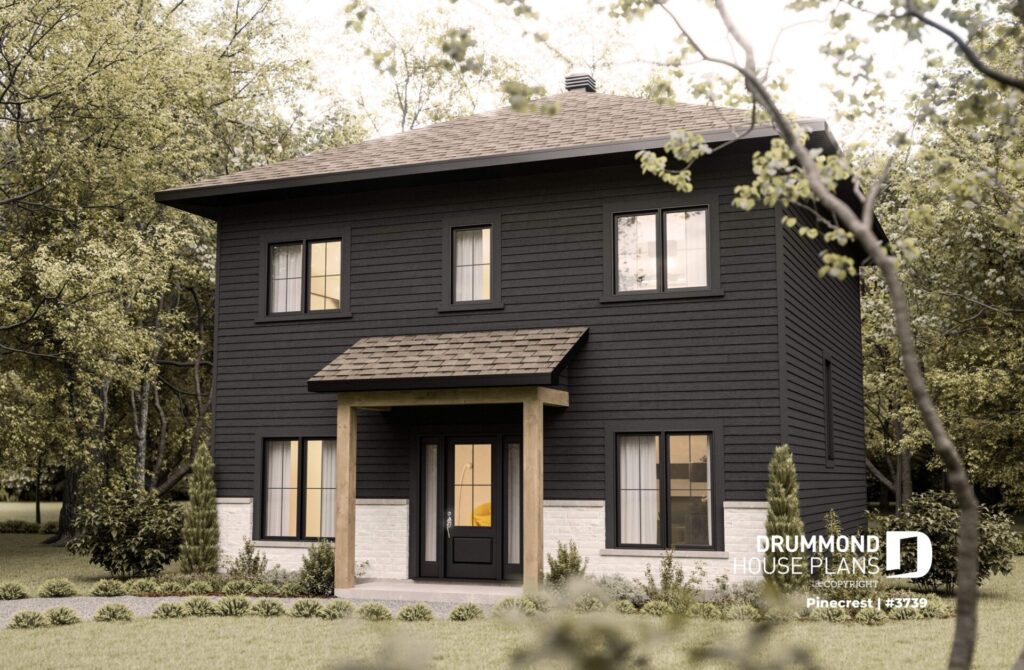
New in our rustic/modern house plan collection!
Firstly, let’s note that this economical, contemporary and warm feeling house plan offers two floors and three bedrooms. It is ideal for a small family. The house also has a warm and modern rustic exterior thanks to the materials that are used. The mix of wood and brick, pale and dark add a beautiful contrast to the front of this two storey house.
Afterward, we have to admit, we have a soft spot for the lovely sheltered front porch which is also very useful in bad weather.
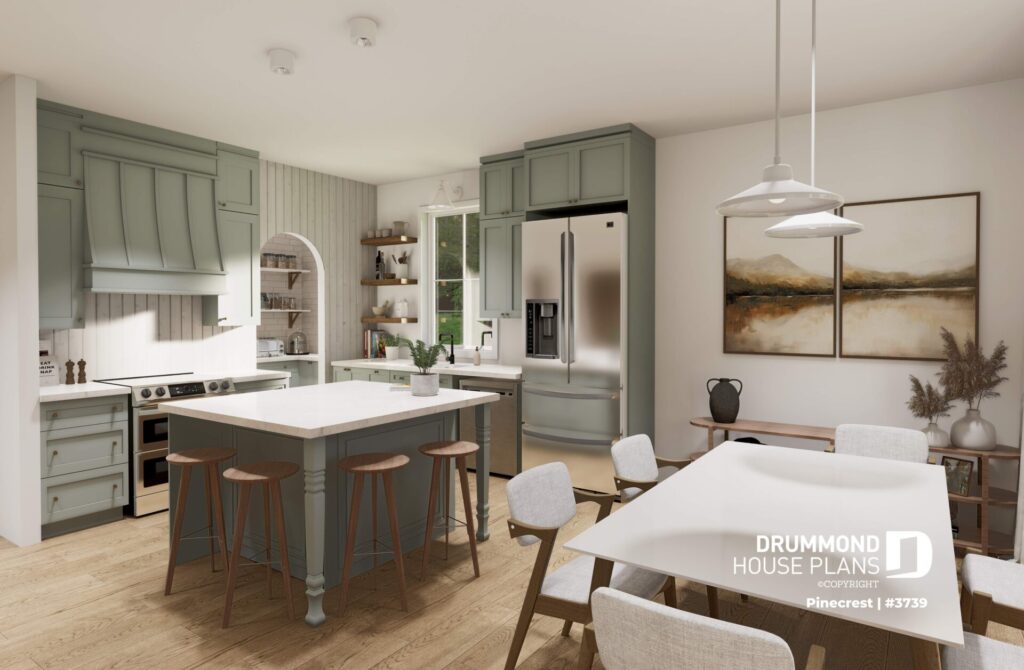
Modern house amenities
On the main floor, you will find all the necessary accommodations; closet space upon entering opposite the office, the open-plan living area with kitchen, dining room and living room and a pantry.
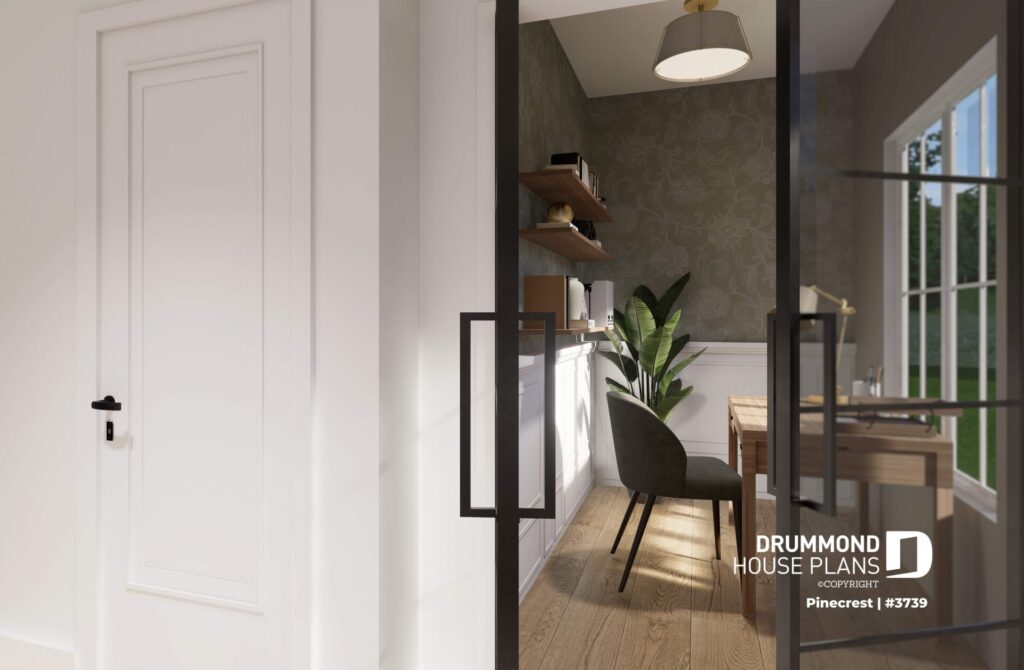
The location of the office with large windows is ideal for self-employed workers, those who work from home as well as those who receive customers at home. The small bathroom located right next door is also appreciated.
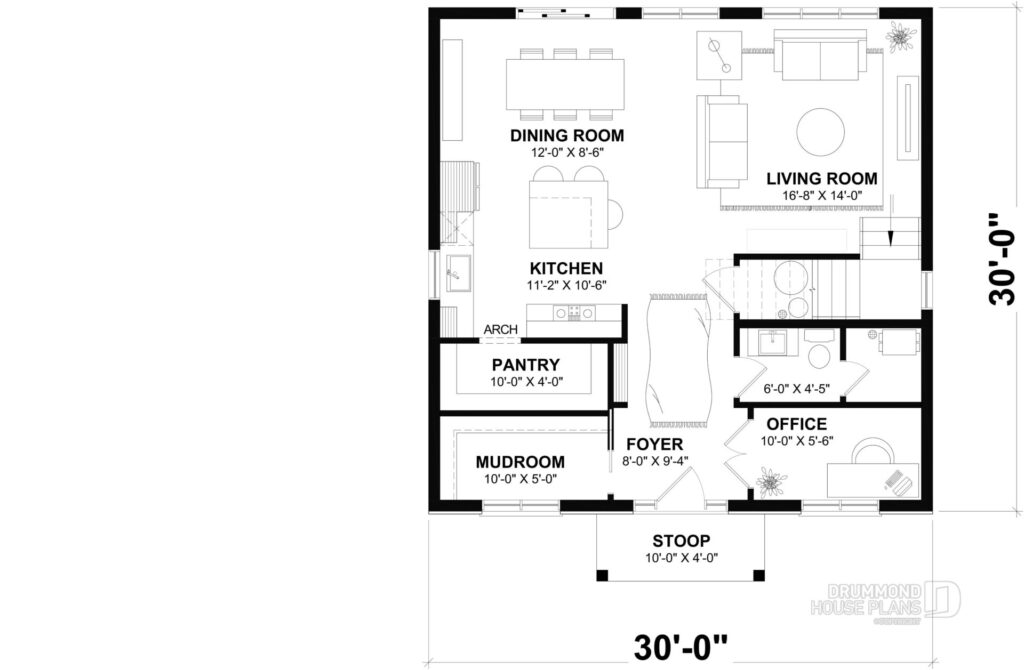
This beautiful Contemporary home has 1800 sq. ft. as well as 9-foot ceilings on both the ground floor and second level.
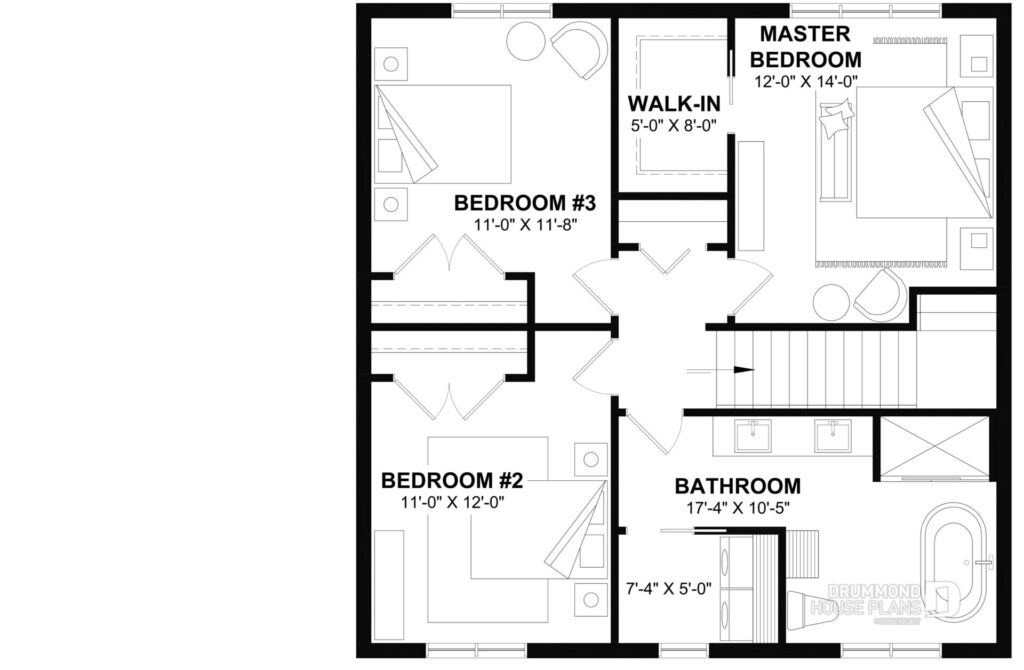
Bedrooms all on the second floor on this house plan
All 3 bedrooms in the Pinecrest plan are on the second floor. To begin, the master bedroom has a walk-in closet and a small reading corner. Then, the additional bedrooms are large enough to accommodate queen or double beds. The full bathroom and laundry room are also upstairs to make everyday life easier.
Finally, the initial foundation provided for this plan is a floating slab. However, several foundation options are available, and our modification service is available should certain adjustments be required.
Do you wish to make your construction project a reality? Contact one of our Drummond House Plan offices : 1-800-567-5267 or [email protected]
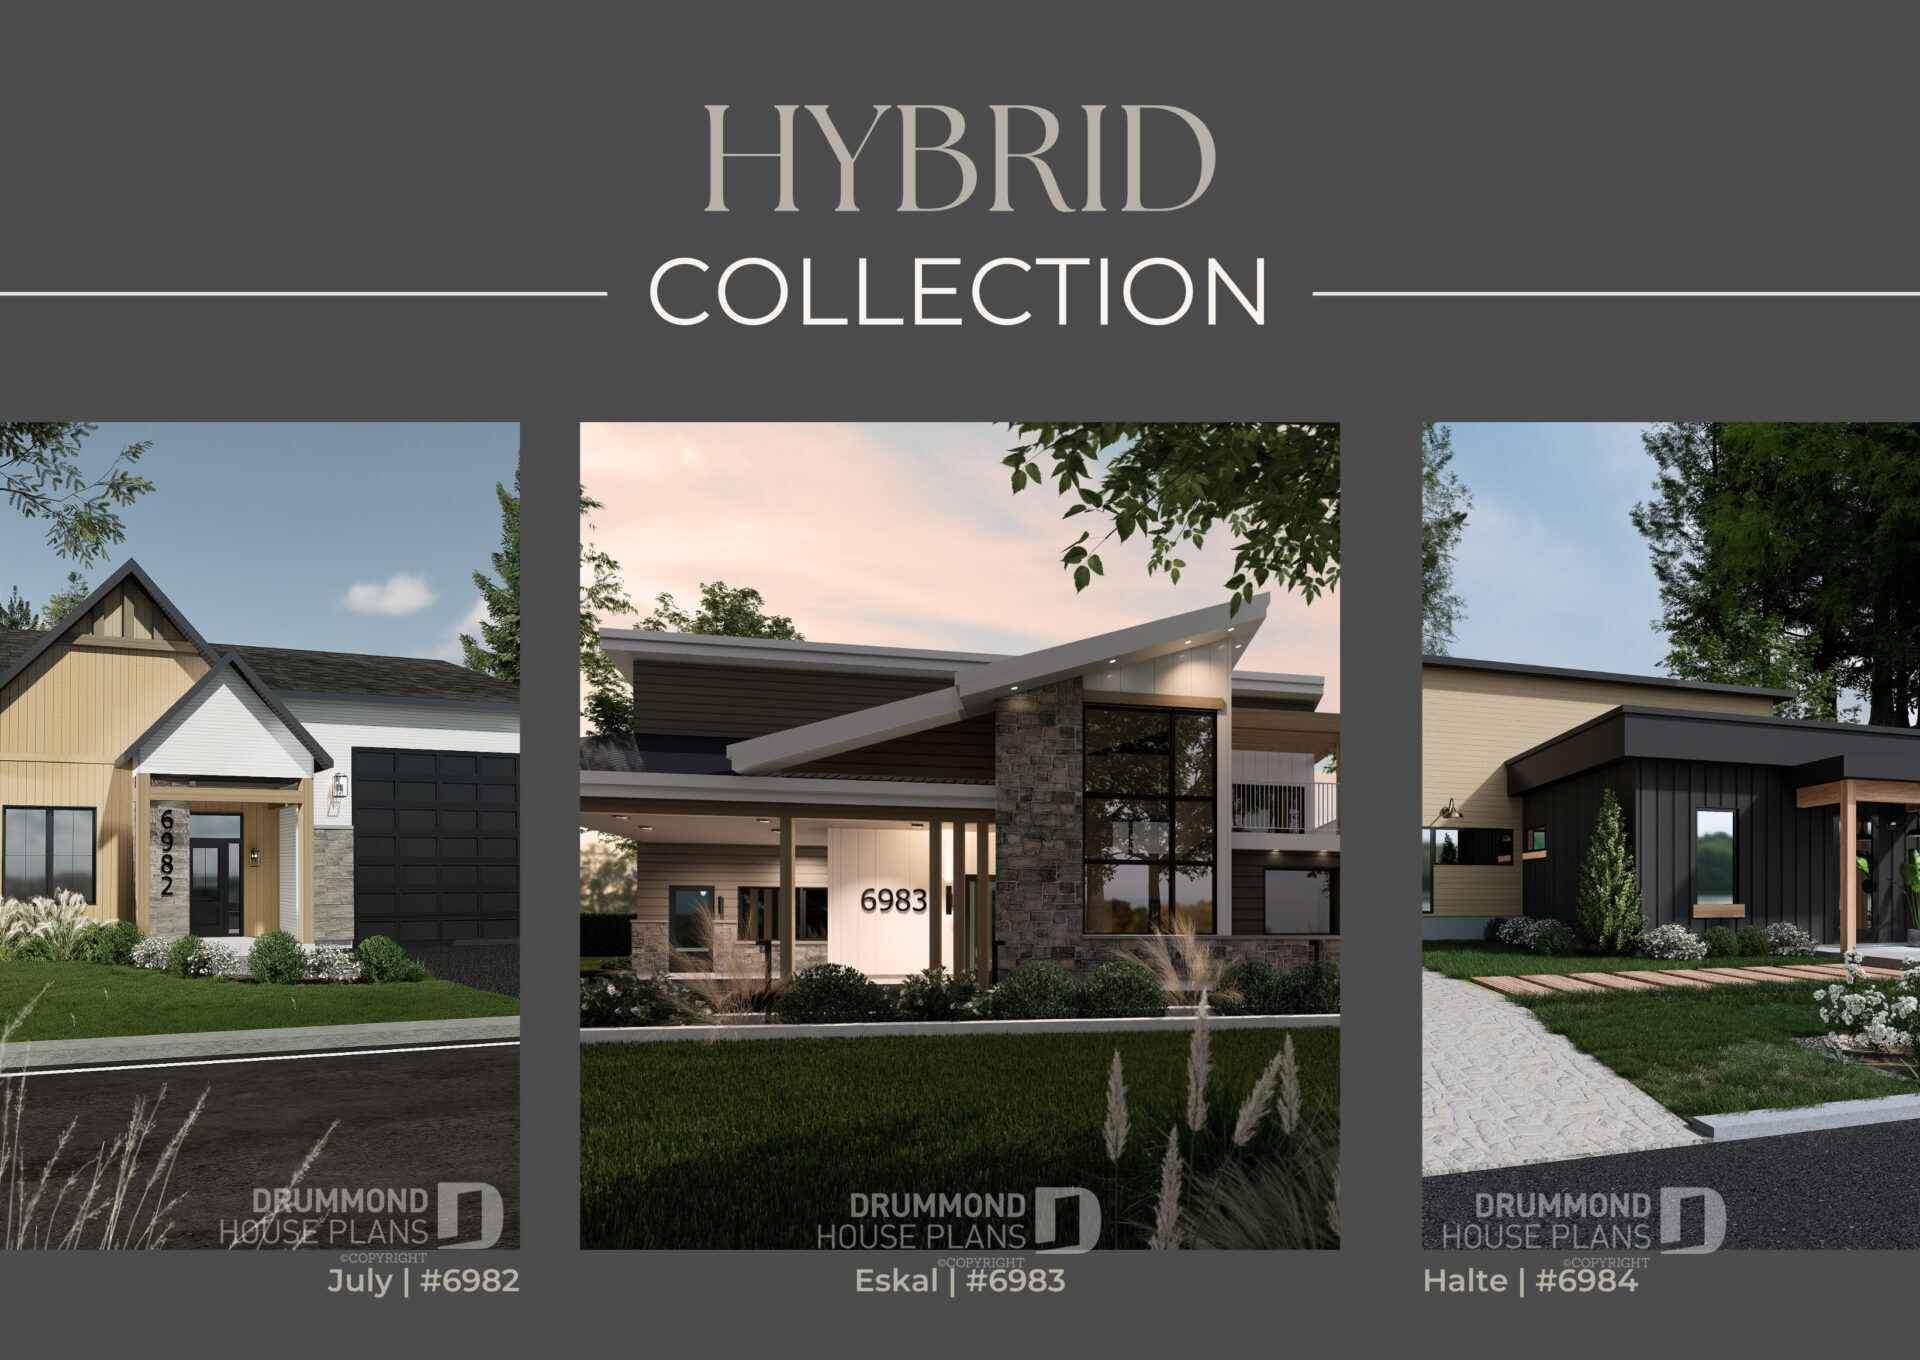
RECREATIONAL VEHICLE ENTHUSIASTS COLLECTION
Heat lovers, of travel and RVs, we have the collection you need! The single-family home collection with garages that can accommodate an RV is now available on our website.
A hybrid home that can have a RV garage or a bonus living area
The idea was originally thought up by the company call Laforest Habitation Durable after which we developed different plans for our collection. You will find several styles with several possible layouts to meet different needs.
Together we created a revolutionary concept: a collection of hybrid concept homes. Let me explain: these are house plans that are flexibale and are designed to store your RV as well as offer you the possibility of living there comfortably all year round, even in winter.
These plans are designed to adapt to your changing needs. You will be able to plan your RV trips according to your evolving budget, without weather constraints.
The concept allows for a flexible transition between a standard home and that of having recreational vehicle (RV) space. You will find unparalleled comfort with the possibility of welcoming family and friends as well as easily converting the existing space according to your evolving needs. Enjoy unparalleled comfort in the living area and the possibility to host get togethers and parties in the hybrid/flexible space.
Multiple possibilities : from RV garage to living area

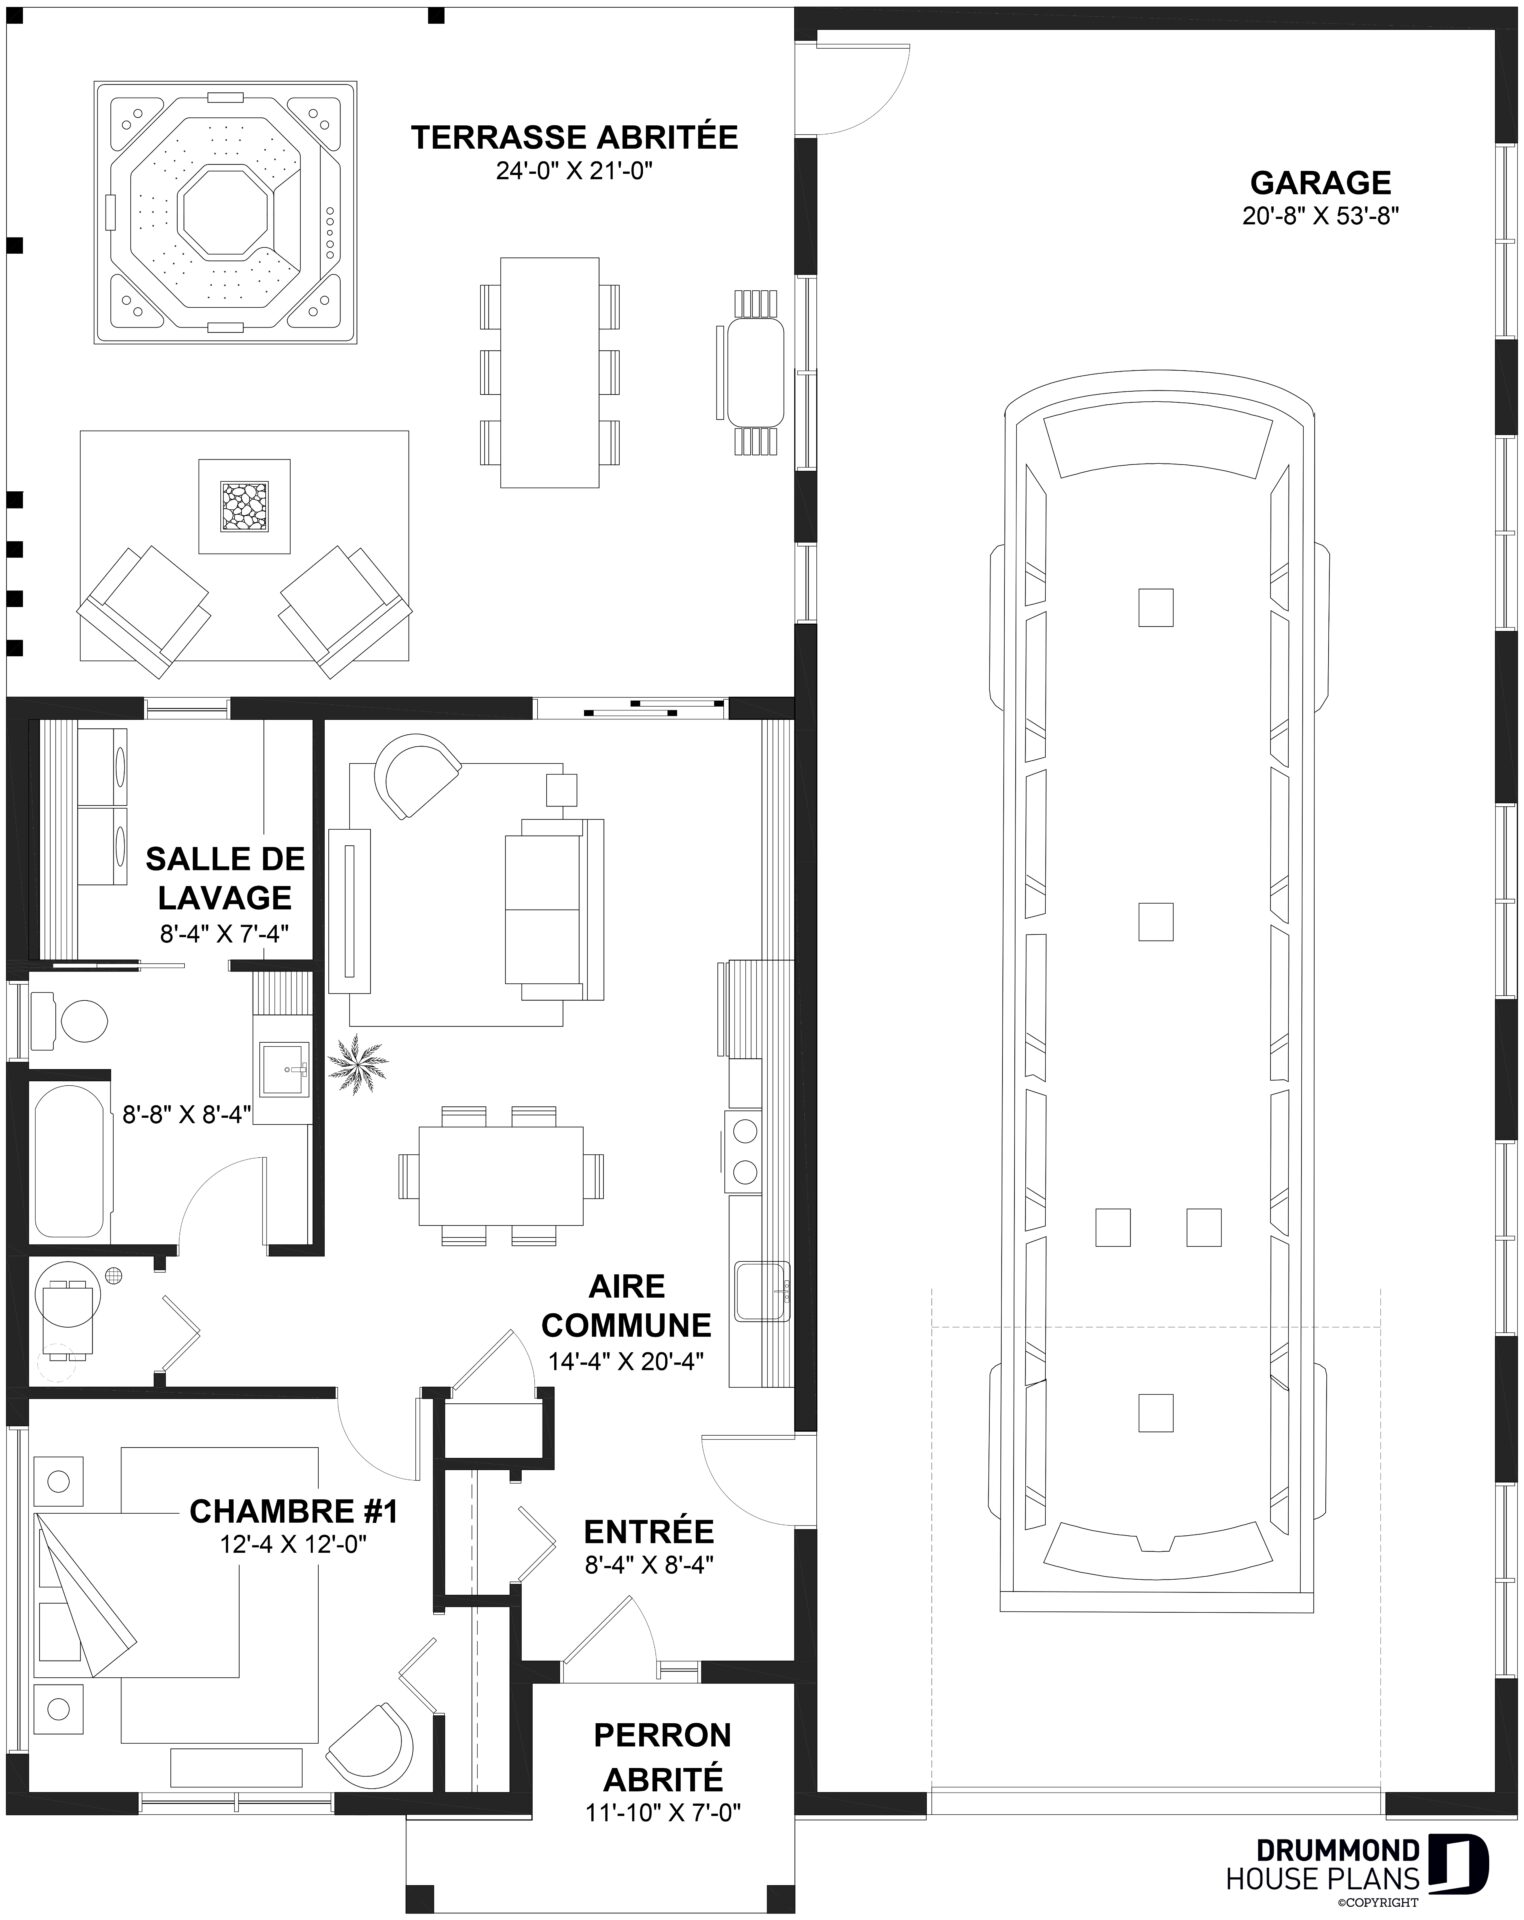
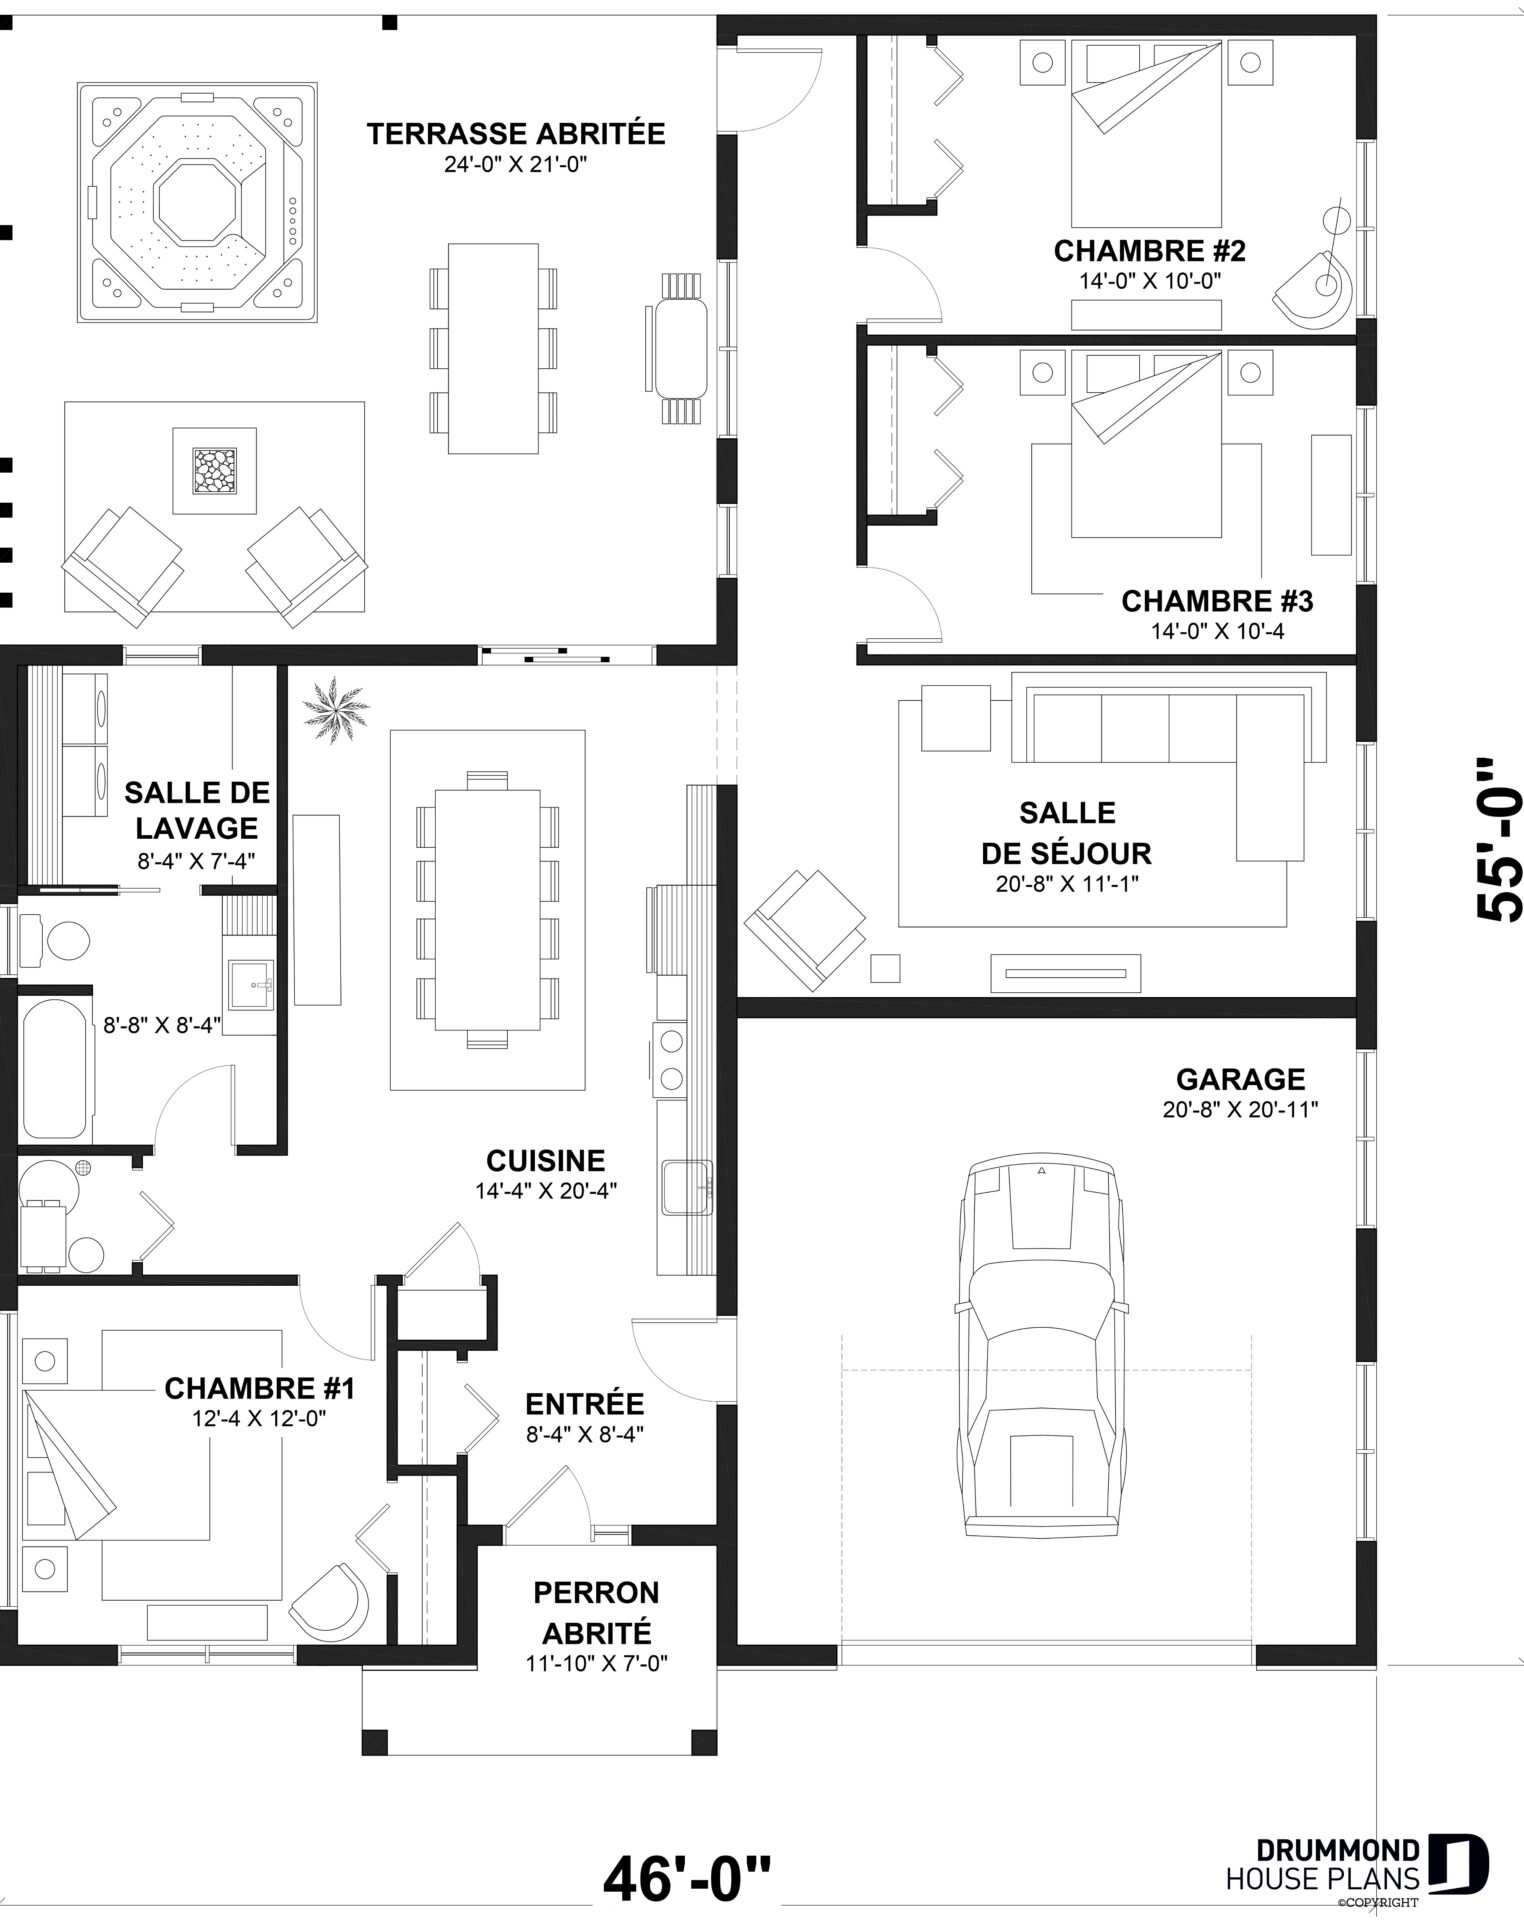
The concept of Hybrid home plans allows you to maximize the value of your investment. Should your needs change in the future, your home can be converted into a standard home with minimal costs, saving you the hassle of selling or moving. Your loved ones will also be able to enjoy this space during your travels, and it can also be converted into a standard home or chalet for them down the road. You may even decide to rent the space during your extended absences, thus offering a return on your investment.
Imagine a home that becomes flexible according to your needs and has the capacity of evolving with you. Thanks to our unique concept, enjoy the tranquility without a single compromise.

DIY: Rustic Christmas decorations
In this article, I will introduce you to DIY rustic style Christmas decorations. The holiday season is the time of year when you can go overboard on the number of decorations without a problem! Personally, I have a thing for decorations in neutral tones. Decorations can sometimes get very expensive, so here is a great alternative to save on your decoration budget.
Handmade tree decorations 🎄
Do this using string

For the ones above, all you have to do is cut a shape out of cardboard, wrap it with rope and glue the rope to the cardboard. Simple, effective and inexpensive!
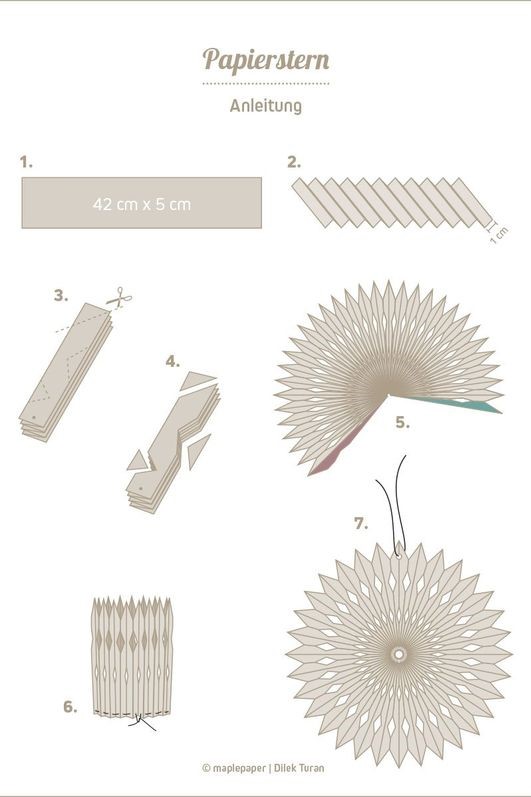
For this one, use paper


To make from recycled ornaments
What's better when doing things yourself than to recycling what you already have?


To achieve this result, all you have to do is mix baking soda with glue and paint. Then, you apply the mixture to your piece to have this opaque and textured effect. I love the vintage style it gives to the Christmas ornaments
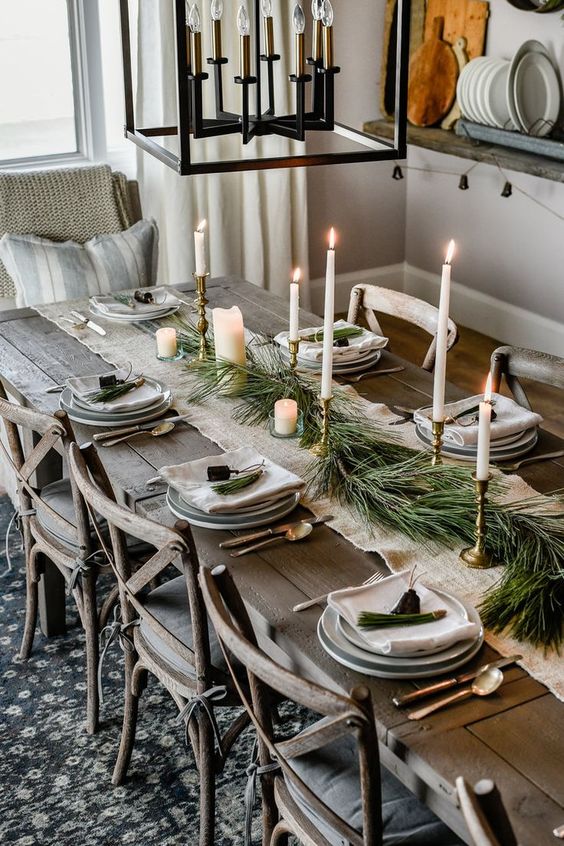
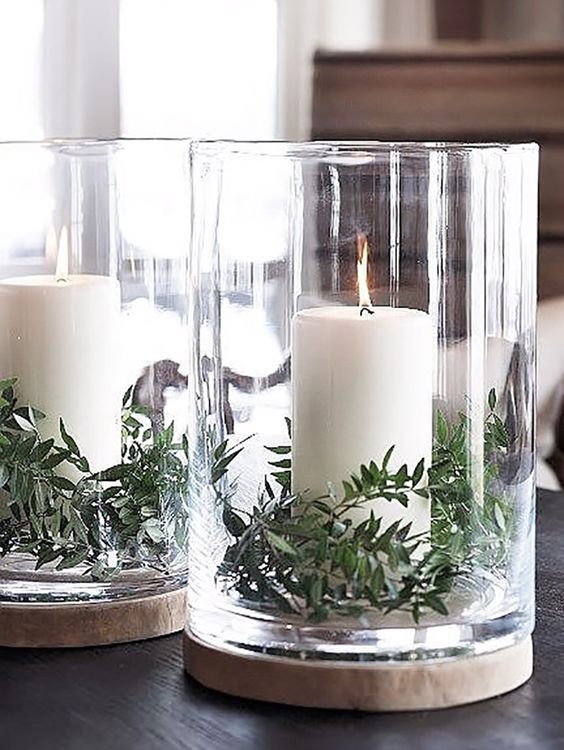
Christmas candles 🕯️
Candles help create a relaxing and warm ambiance. Here are ideas on how to showcase your candles.


You only need a few things to achieve the result. For fir branches, you can even take them directly from the forest. Can it get more DYI? 😂!!
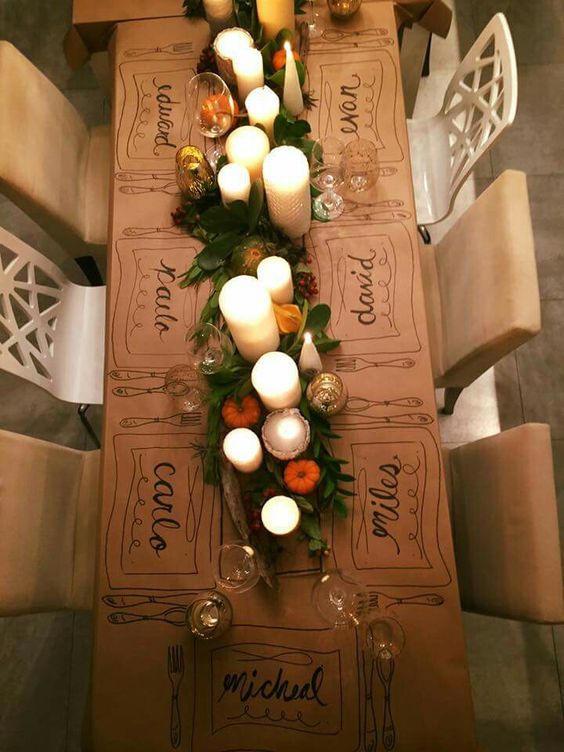
Make your own Christmas village 🏠

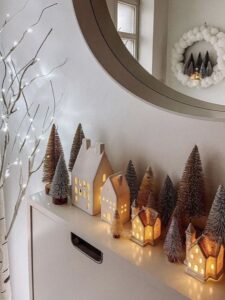
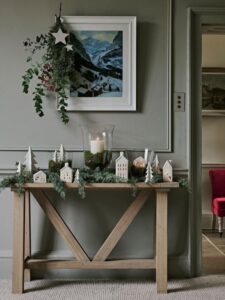
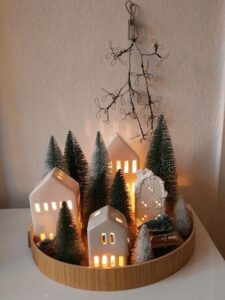
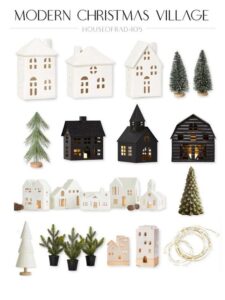
Gather all your houses, branches and mini trees to create your personalized Christmas village.
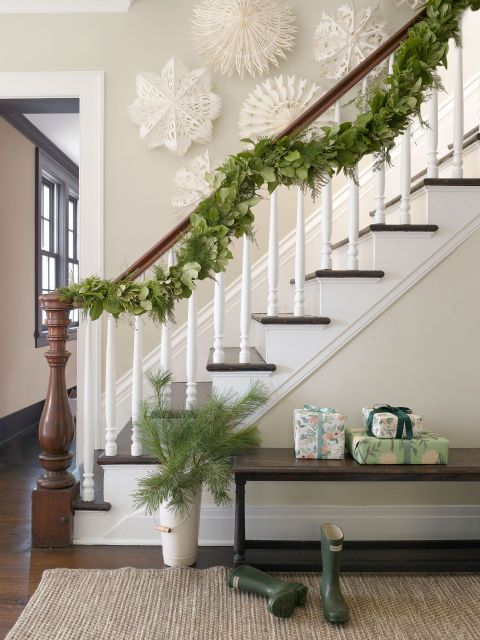
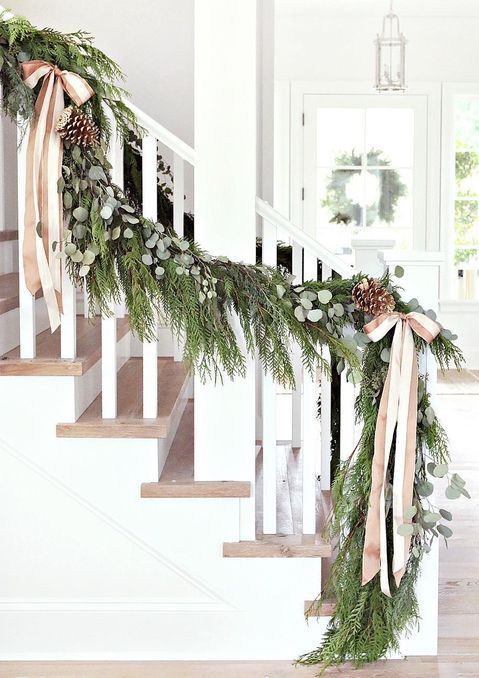
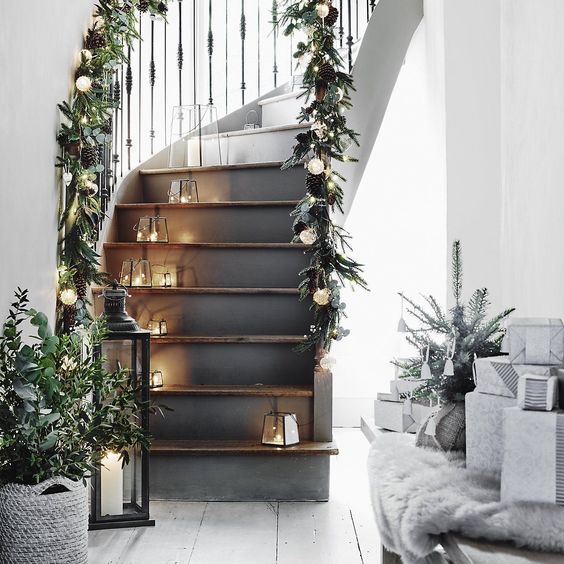
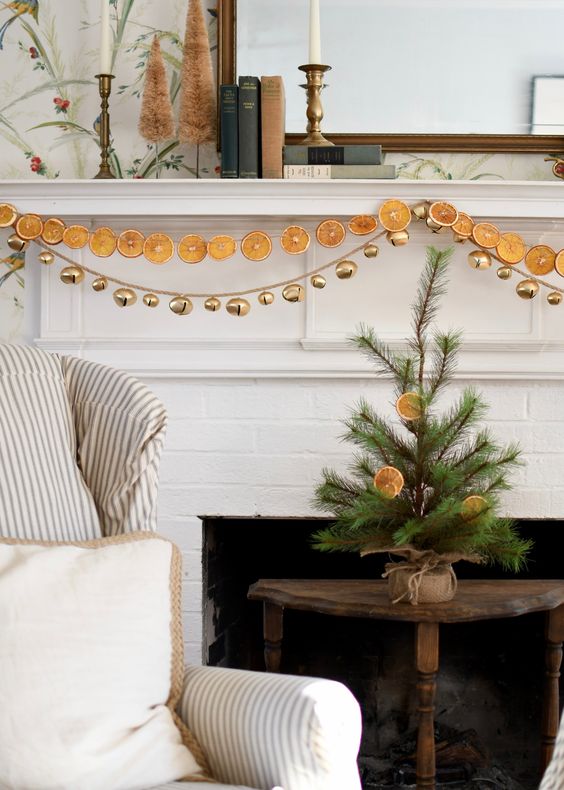
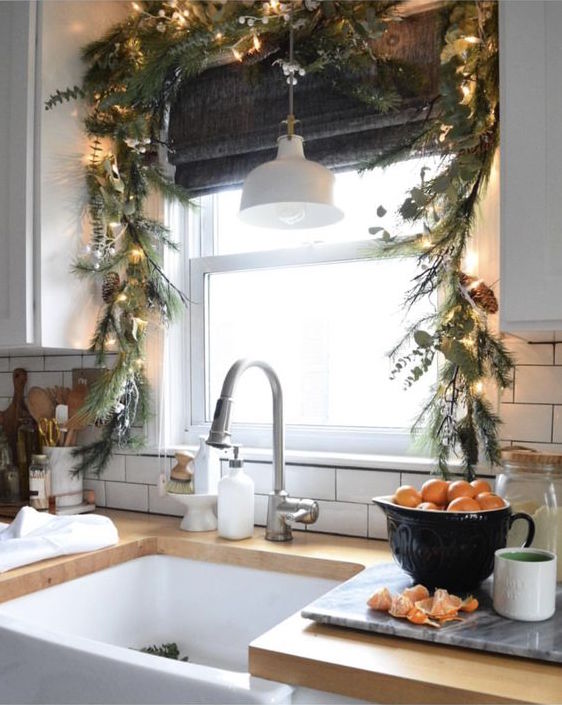
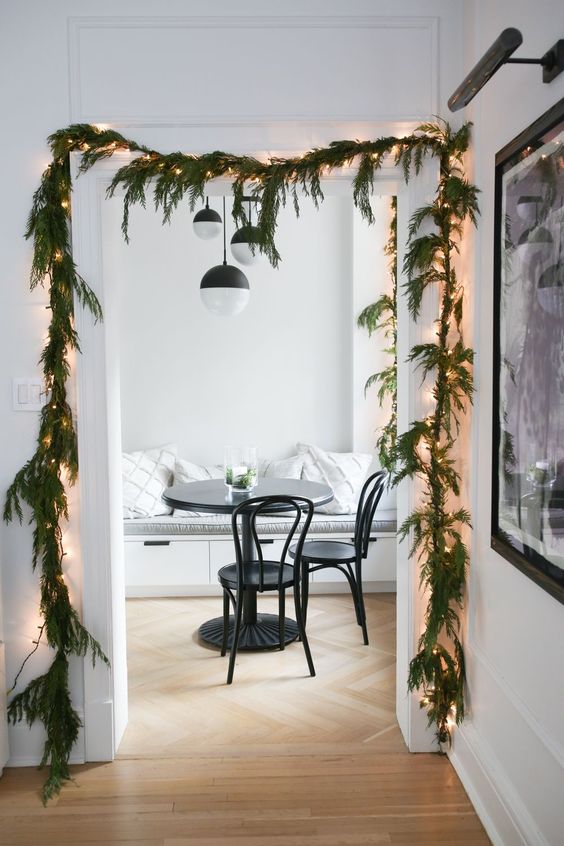
Homemade Christmas wreath
Garlands look beautiful when you hang them above the fireplace, door frames or even on a wall.
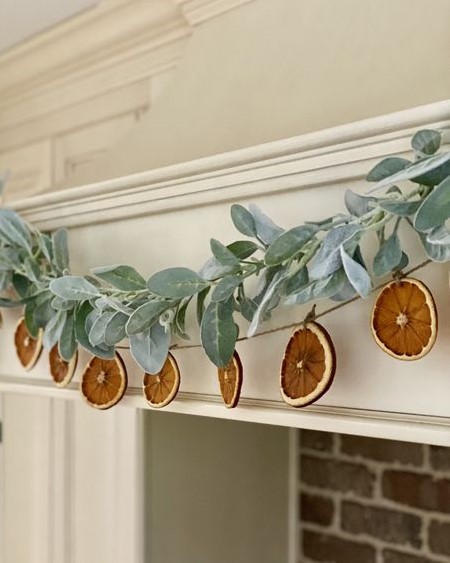


The first garland is made of dried oranges. All you have to do is slice an orange thinly. Dry them in the oven at 175°F for one hour or until the slices are completely dry. Tie the dried orange slices to a burlap string, then add a leaf garland on top.
The second is made of pine cones and wooden beads glued to burlap string. Make a sequence to have the pattern effect.
The third garland is made from paper cut into a repeating patterns and string or wool.
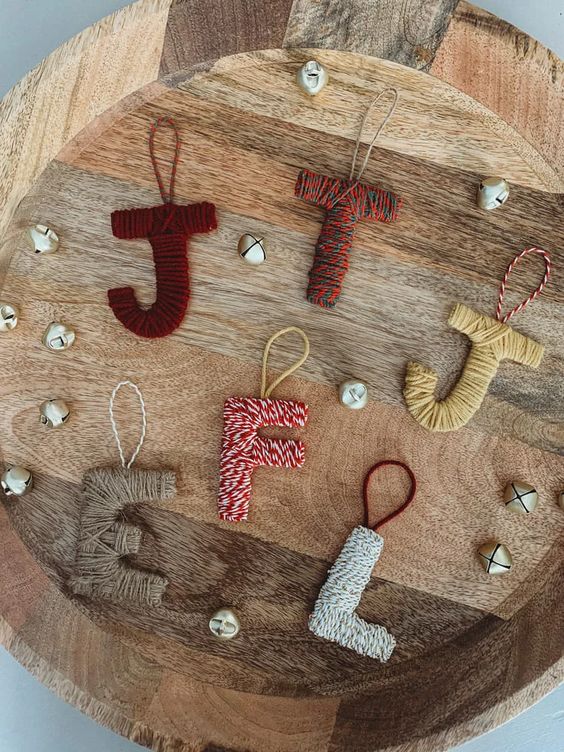
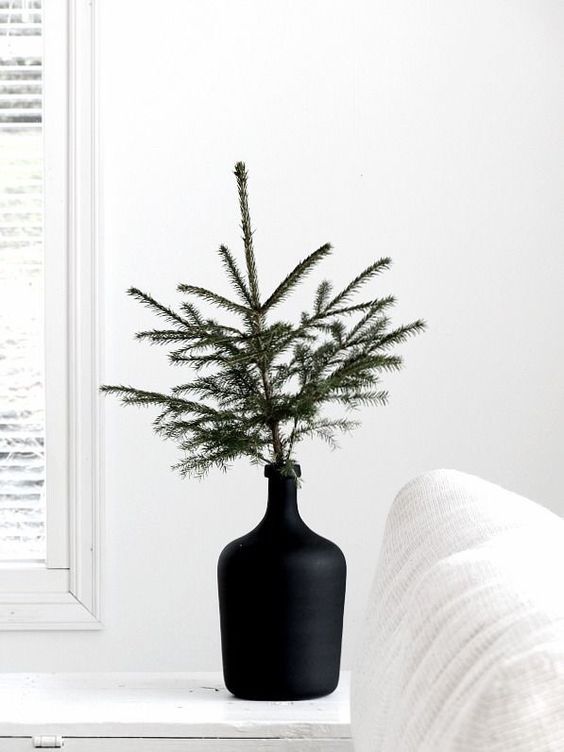
Make your little trees 🎄
I would put little trees everywhere. It looks beautiful on a desk, on the fireplace, in the center of the table, everywhere!


To achieve this result, all you have to do is make a cardboard cone and wrap it with string and glue it all together. Otherwise, you can also just make a triangle instead of a cone like in the last image.
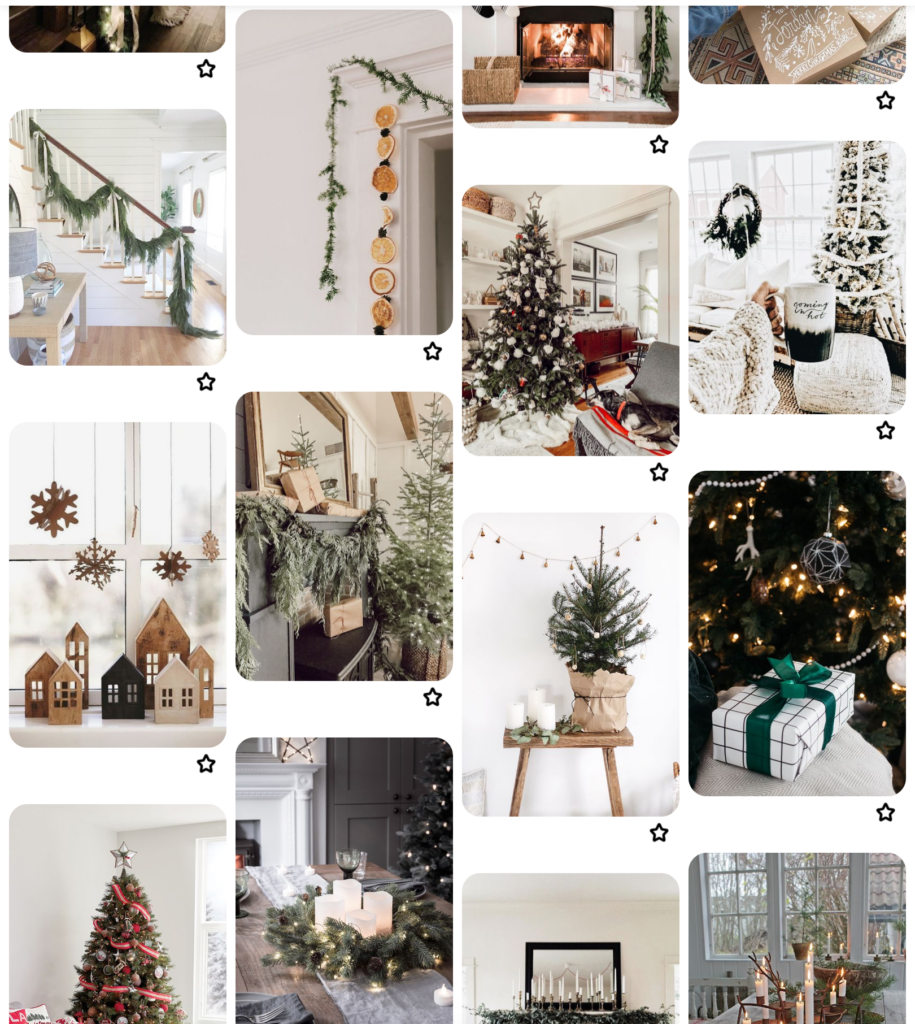
I hope I’ve inspired you to make some decorations by yourself! All my ideas come from inspirations taken on Pinterest. I created a board with other really cute ideas and inspirations 😍
Happy Holidays! 🎁🎄
Jenn xx
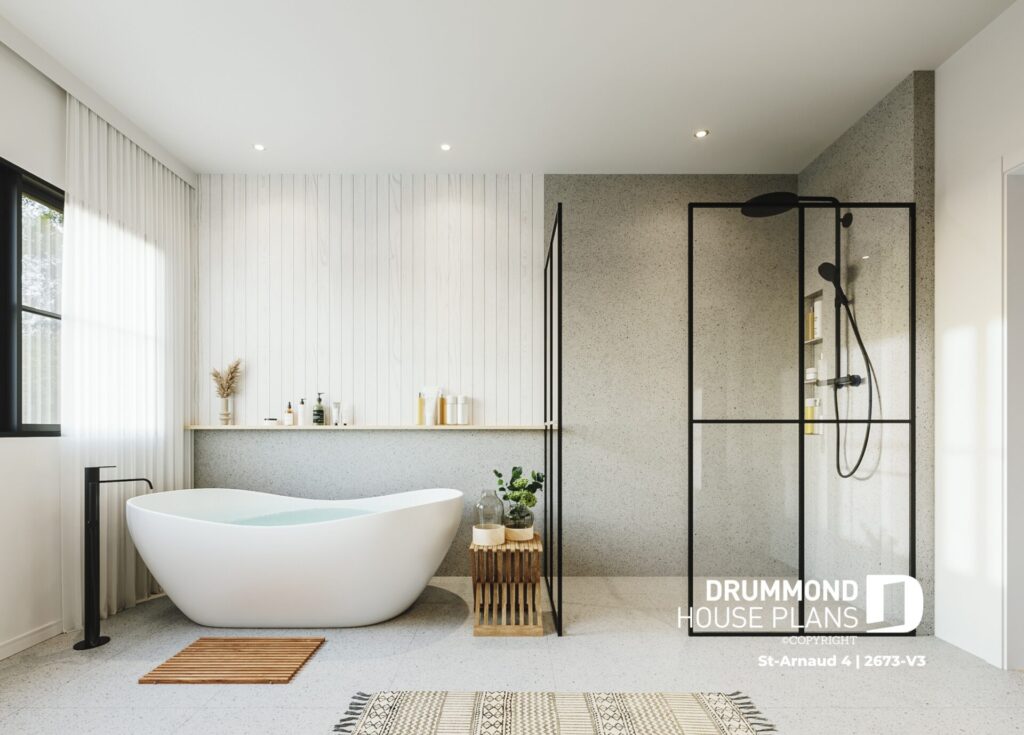
All About The Italian Shower
In this article, you will find everything you need to know about the Italian shower.

What is an Italian shower?
An Italian shower is a type of shower that is very popular in modern homes. It is also known as a walk-in shower or a European shower.
Unlike traditional showers that have a step, a bathtub, or an acrylic base, for example, the Italian shower is flush with the floor, giving it a more elegant and modern look.
Advantages of an Italian shower
The Italian shower often has a central drain, allowing water to flow more easily.
It is also often designed with ceramic or natural stone tiles, giving it a luxurious and elegant appearance.
One of the advantages of an Italian shower is that it can make your bathroom look bigger due to its seamless integration with the main floor.
It also makes it more accessible, as there is no step or bathtub, making it easier and safer to move around. This makes it a popular choice for the elderly, people with reduced mobility, or families with young children.
The Italian shower is also very easy to clean. As there are no corners or crevices where water can stagnate, it is easier to maintain a clean and hygienic shower. Additionally, ceramic or natural stone tiles are often water and stain-resistant, making them more durable and easier to keep clean than traditional plastic or acrylic showers.
Building and cost of an Italian shower
In terms of construction, an Italian shower can be made of ceramic, natural stone, or other materials. It is important to note that installing an Italian shower can be more expensive than a traditional shower due to the need to create a slope for water drainage towards the drain.
Ultimately, choosing an Italian shower depends on your personal preferences in terms of style, functionality, and cost. If you are looking to modernize your bathroom and are willing to invest a little more, an Italian shower could be an excellent choice.
Italian showers are considered more expensive than other types of showers for several reasons. Firstly, designing an Italian shower requires meticulous planning and professional installation. The materials needed to build an Italian shower are often more expensive than those used for other types of showers. Ceramic, stone, or marble tiles are often used for the walls and floor of the shower, and they can cost more than the porcelain or ceramic tiles used in traditional showers.
In addition, Italian showers often require more complex plumbing installation to properly drain the water. This can result in additional costs for installing appropriate conduits and drains. In addition, Italian showers often have additional features such as massage jets and multiple showerheads, which can further increase the total cost.
However, despite their high cost, Italian showers are highly regarded for their elegant appearance and functionality. They can also add value to a home by improving the aesthetics of the bathroom. For those looking to invest in their homes, an Italian shower can be a wise choice, even if it is more expensive than other types of showers.
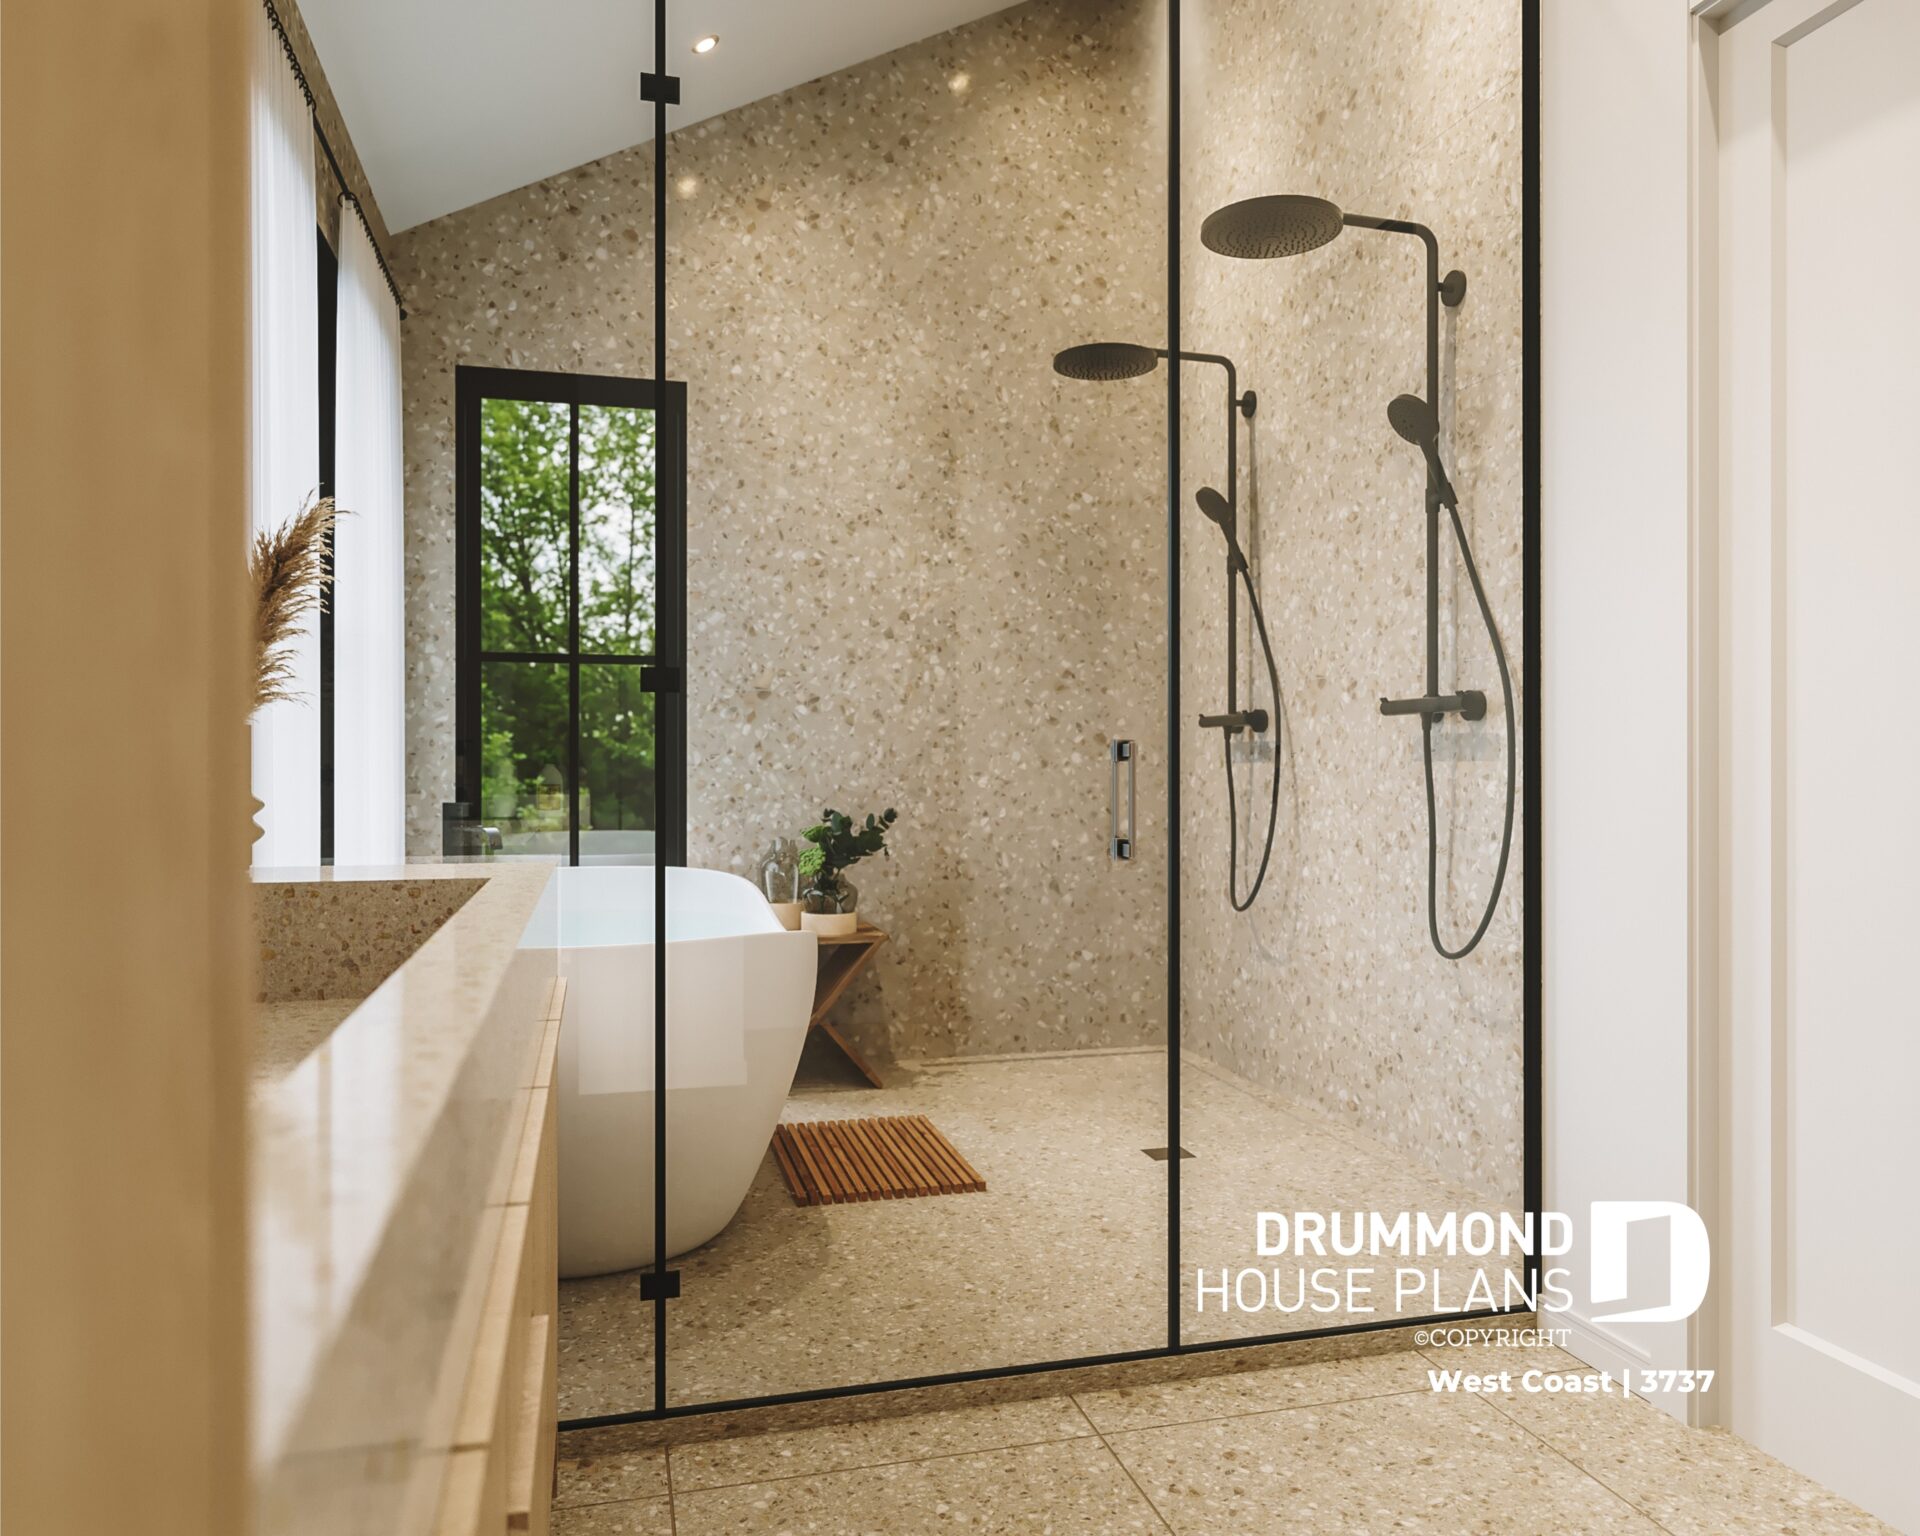
Get inspired by our favorite bathrooms.
7 Tips to Increase the Value of Your Home
If you want to increase the value of your home or your construction, you've come to the right place. If you are building to resell, stay here! Here are some tips for increasing the value of a home.
Add a unique space
A section with a bench is often something that is quick to catch the eye and is greatly appreciated. We can already imagine spending many hours there to create wonderful memories!
A hiding space, a reading corner softly hidden in the house often makes it stand out from others. We give it that little something that makes it impossible to miss.
Add or create rooms that are in demand

Firstly, mudrooms are extremely popular! You enter, leave your personal belongings rapidly, and are on your way. Everything has its place. Speaking of space, there's plenty! You don't want to have to say goodbye to guests crammed into an uncomfortable corner. We want to be able to create a warm and spacious welcome. Having a mudroom section helps to declutter the entrance and leave only the necessary.
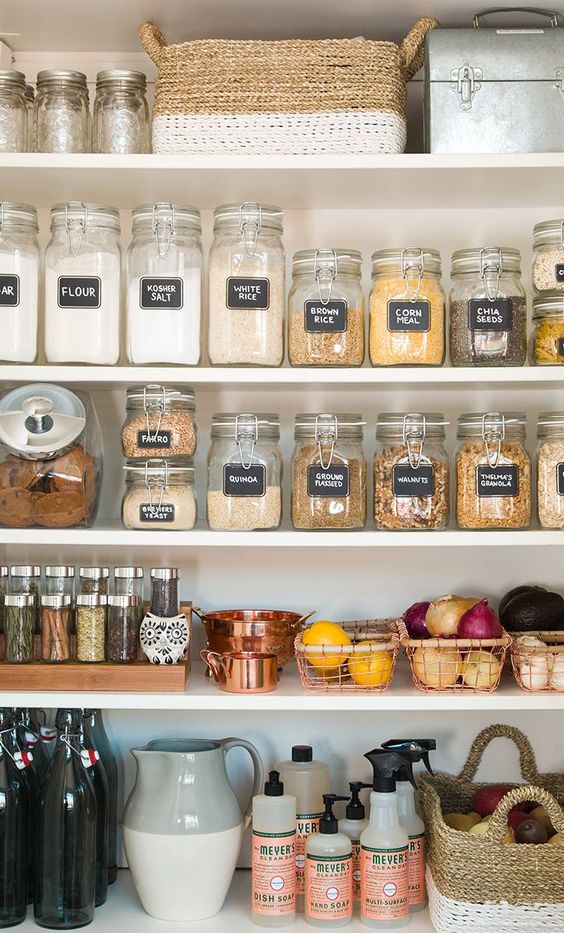
Then there is the pantry. It is important that this area meet our needs. Some accumulate a lot of canned foods; others need space to stock up or to store food for their large family. In all cases, we want space! Having a pantry allows you to organize your food and better view the inventory. As a result, we can also reduce food waste. Bonus: add counters with outlets to hide small appliances and free up the kitchen.
Long story short, we want storage!
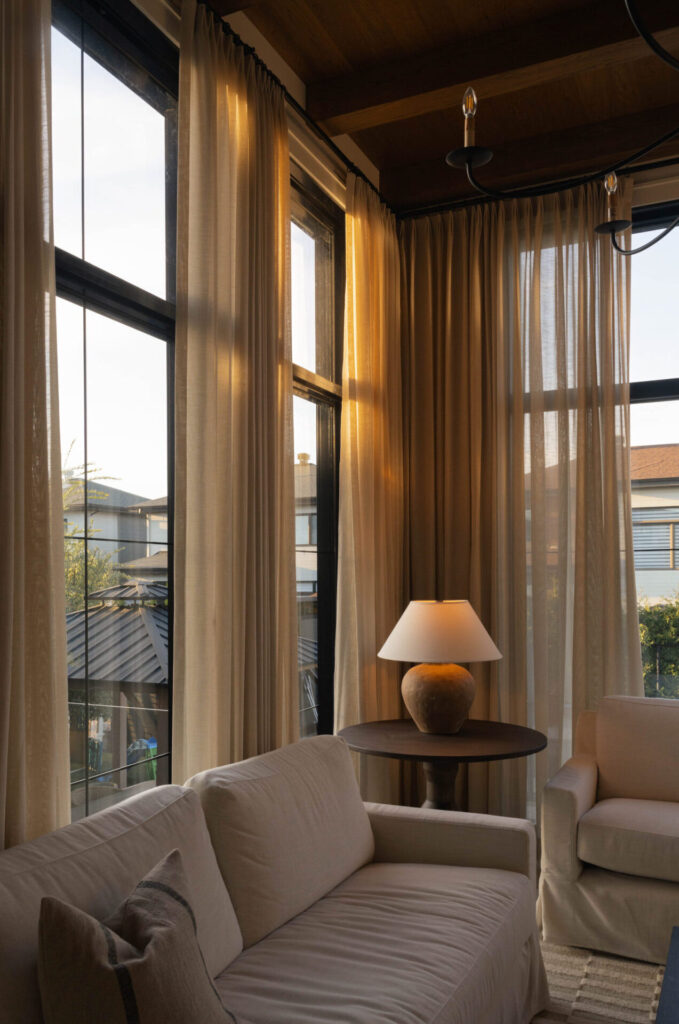
Plan for large windows
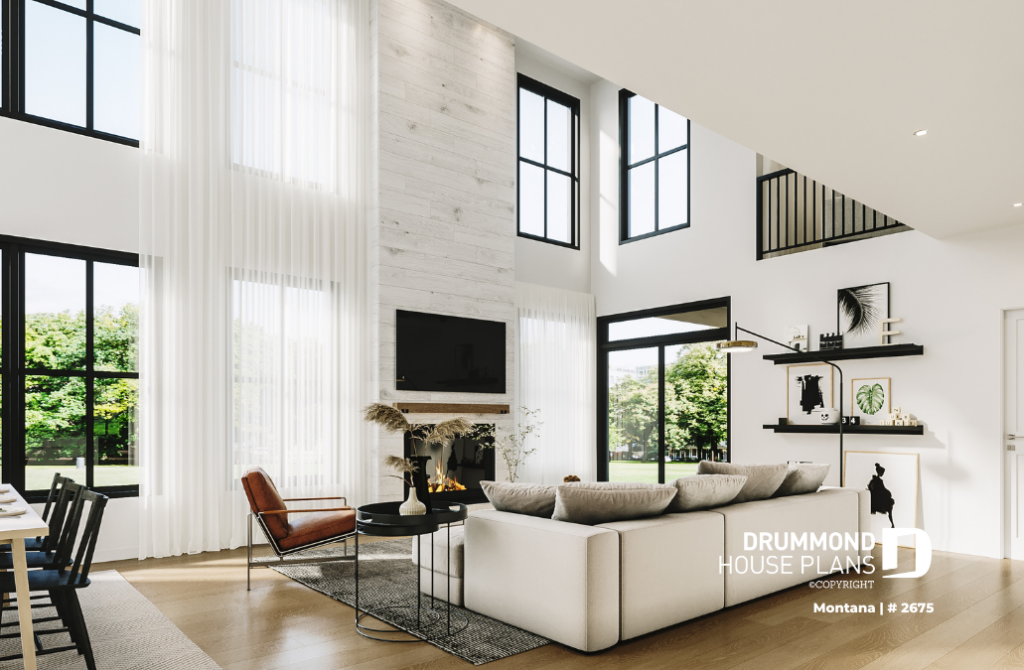
Who doesn't want beautiful natural light? Even if you are located near your neighbors, large curtains are also very trendy! Having beautiful windows gives a grandiose effect to the house. It gives the wow effect that everyone is looking for.
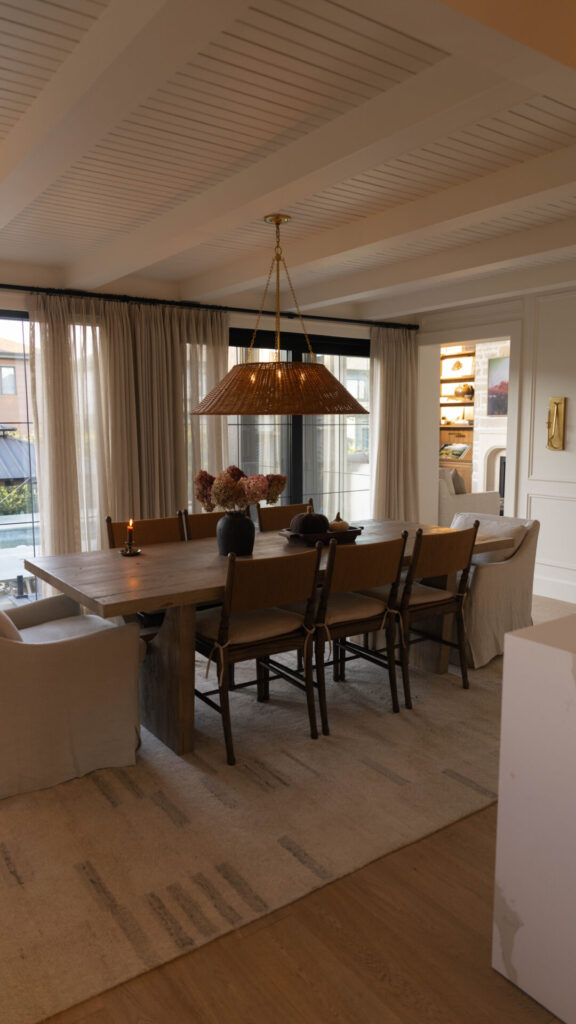
Don't forget the fireplace
Gas, wood, whatever, it adds character to a room. The warm atmosphere that the fireplace gives us makes us want to get together to have nice conversations, read a book, relax. This is an element that can be added, but is more expensive and difficult to add later. Think about it before construction.
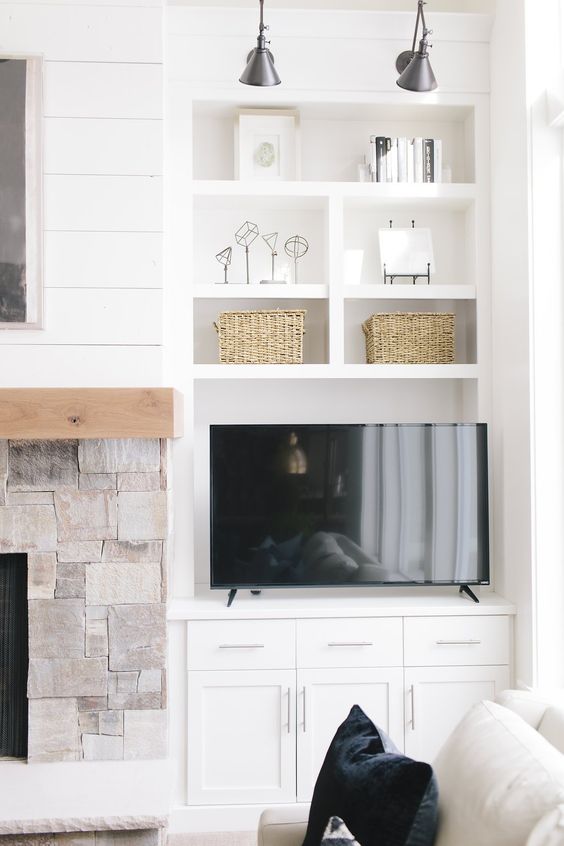
Build some built-in furniture
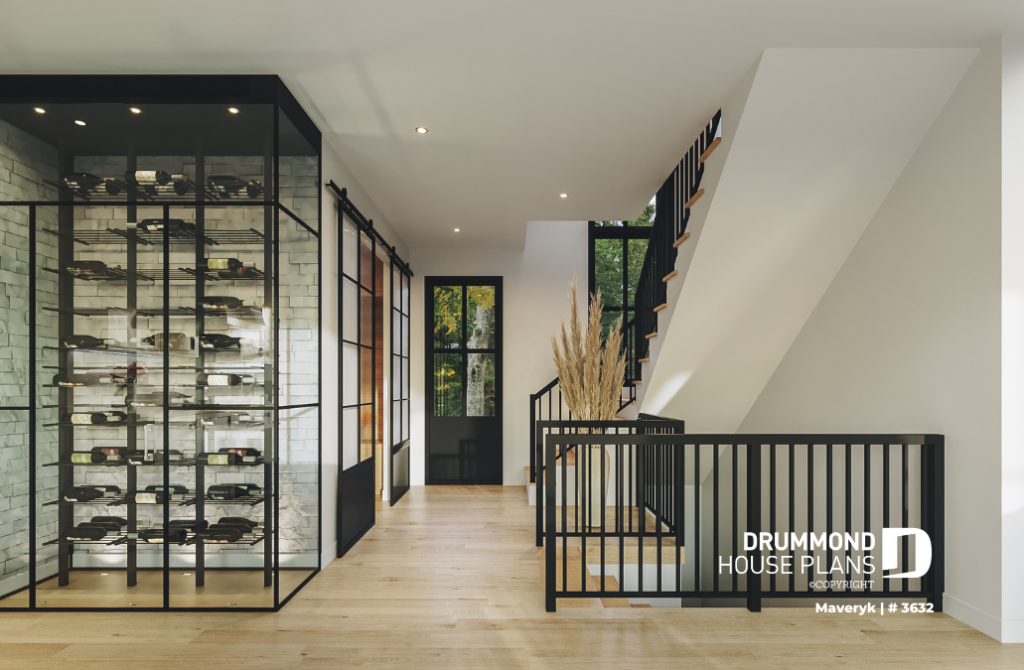
It is part of the structure, of the architecture. It is a distinctive element that gives the impression that everything has been thought of. No need to add a piece of furniture to the decor, it is included in the house. A wine cellar is a type of “add on” that fits well into the structure of your home, just like a built-in tv section or bookcase.
Landscaping
Having bushes, nicely trimmed spaces also help to enhance the overall look of the house. It projects the image of a finished and well-maintained home. It’s welcoming and it makes you feel like you’re already at home. We can already imagine gathering our family and guests for some fresh lemonade on the terrace surrounded by a world of “green” while the children play ball.
Make sure you have a multipurpose room on the ground floor

People sometimes have different needs: office, guest room, workout room, playroom, etc. Having a medium-sized room on the ground floor that gives you the freedom to fit out the room of your choice is a big plus. For some, having a room to practice their hobby or being able to work from home is also non negotiable and necessary. Avoid disappointment with this kind of accessible multifunctional room.
All of these elements will make your home stand out in the neighborhood! To see our houses with distinctive elements, click here.
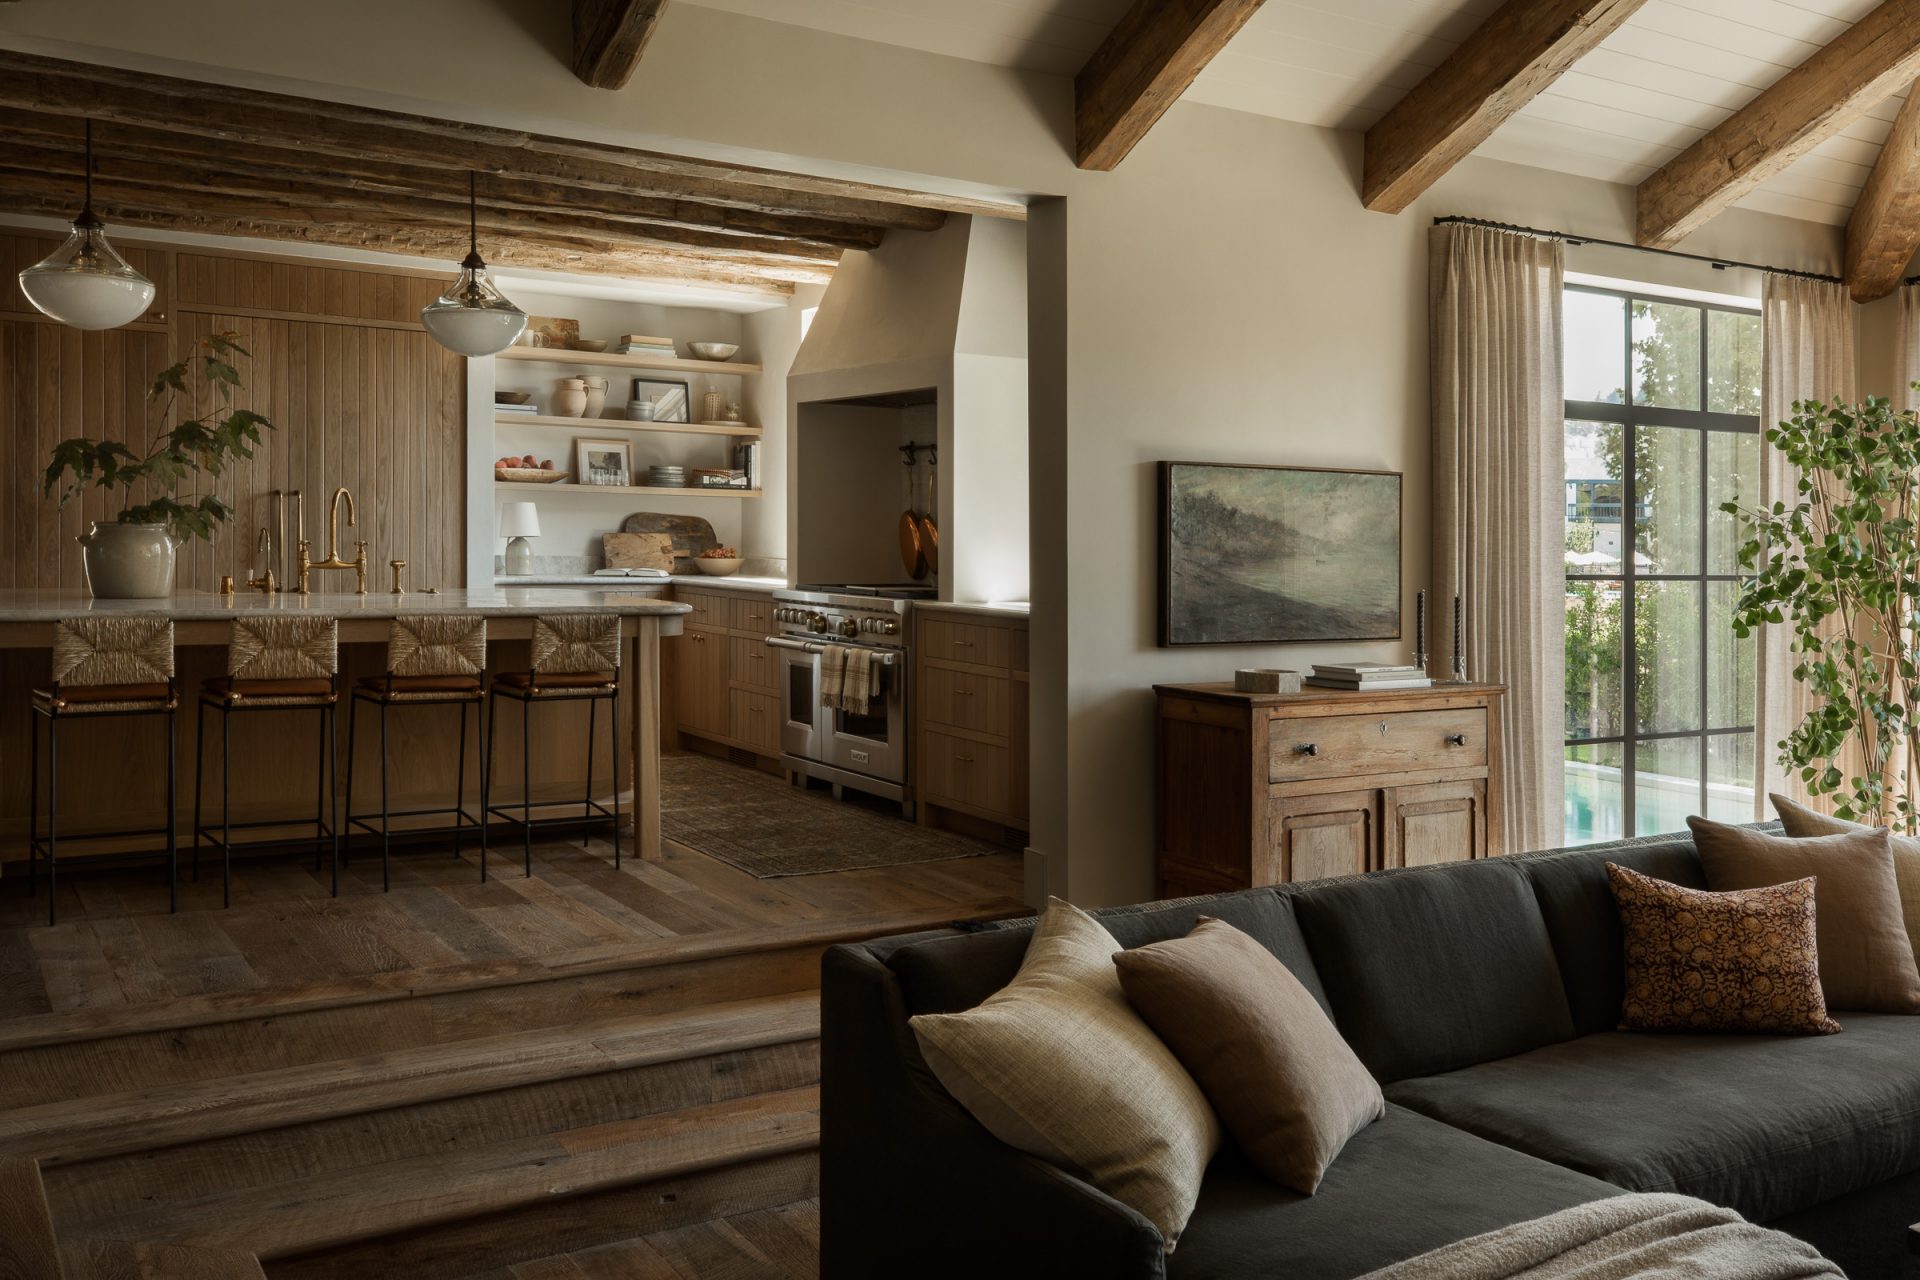
My @amberinteriors favorites
The first thing people who lack inspiration often do is go have a look on Pinterest and yes, this is a good starting point. On the other hand, it can sometimes be interesting to change and have a look at what others are doing and get even more inspired!

One of the accounts that inspires me most is that of @amberinteriors on Instagram.
I'll give you a little wrap up of what/who Amber Interiors actually is. Amber is the actual founder of a blog about design and lifestyle. She then founded the company I am talking about here.
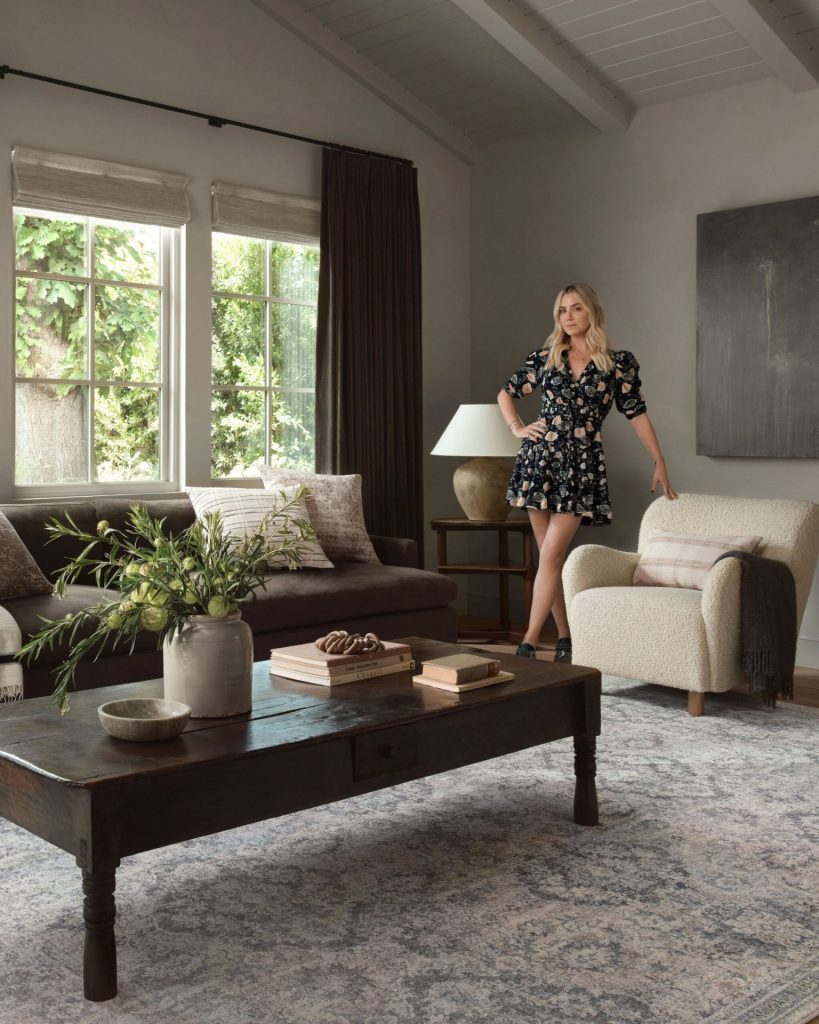
Amber assists customers with their home decoration. She makes great discoveries such as, and for example: furniture, fabrics, and accessories with the perfect textures and colors to complement the different rooms of a house.
So today I’m going to show you a lot of stuff I've been hooked on!
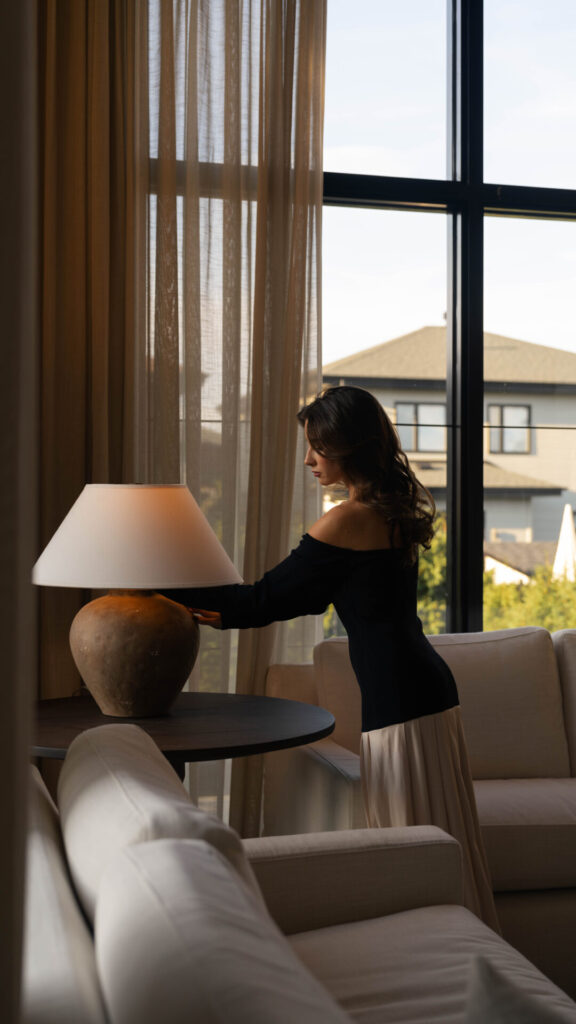
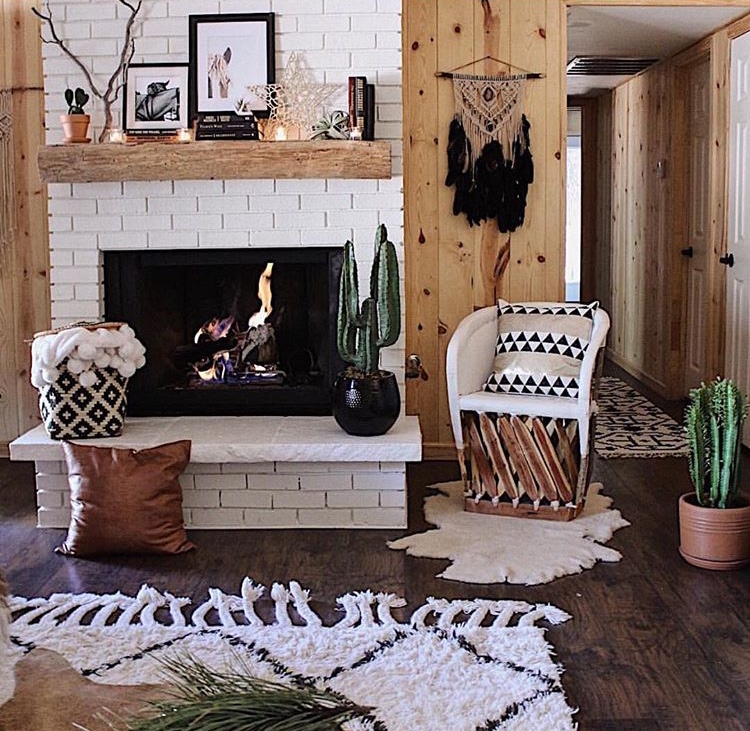
I absolutely love the warm look she manages to give to absolutely all her rooms. She uses natural and warm colors to match all the mixture of textures. It creates a moody sort of atmosphere that makes you want to be cozy and really take care of yourself.
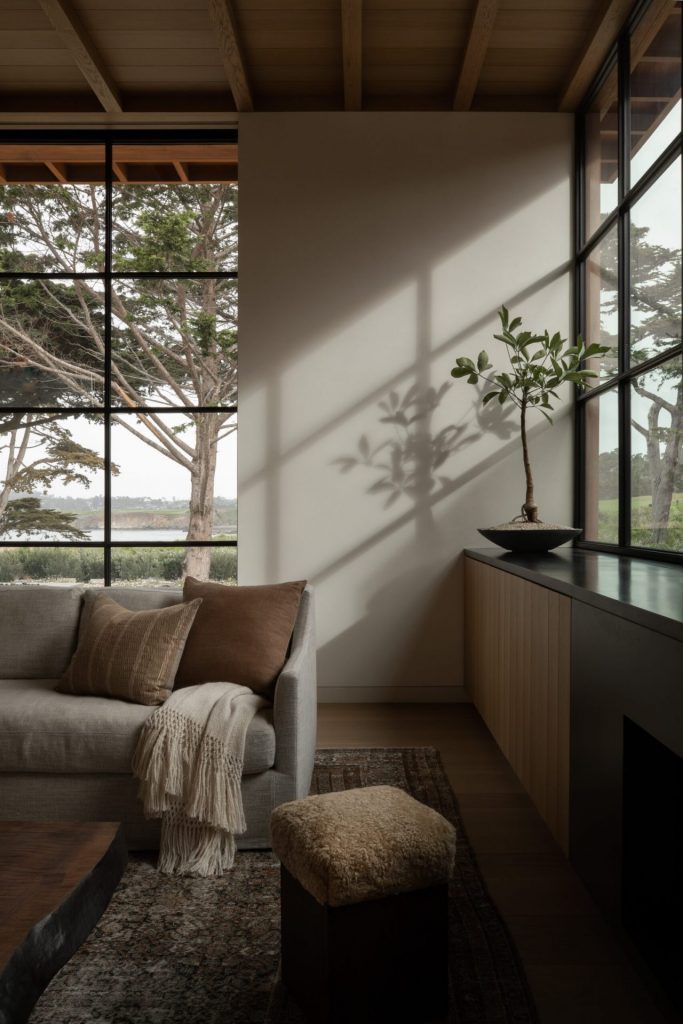
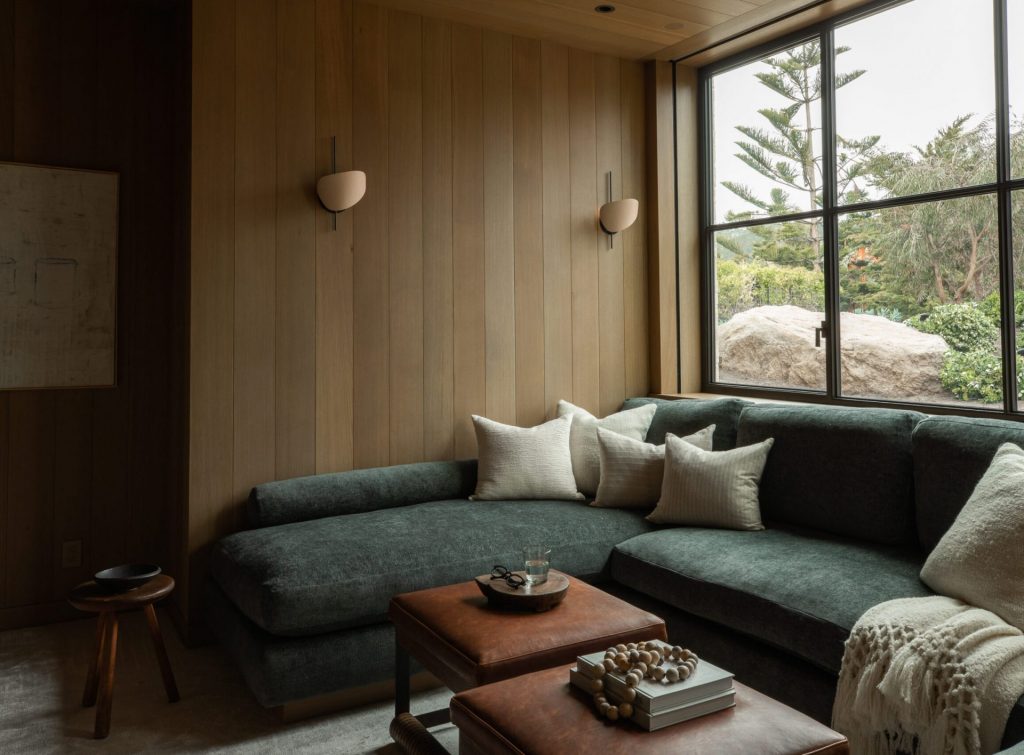
The windows
Amazing! It's minimalist, all the while giving a little more “punch”. And what about the beautiful brightness apart from the fact that I want exactly that in my home! When natural light shines through to leave that kind of shadow, my heart is totally won!
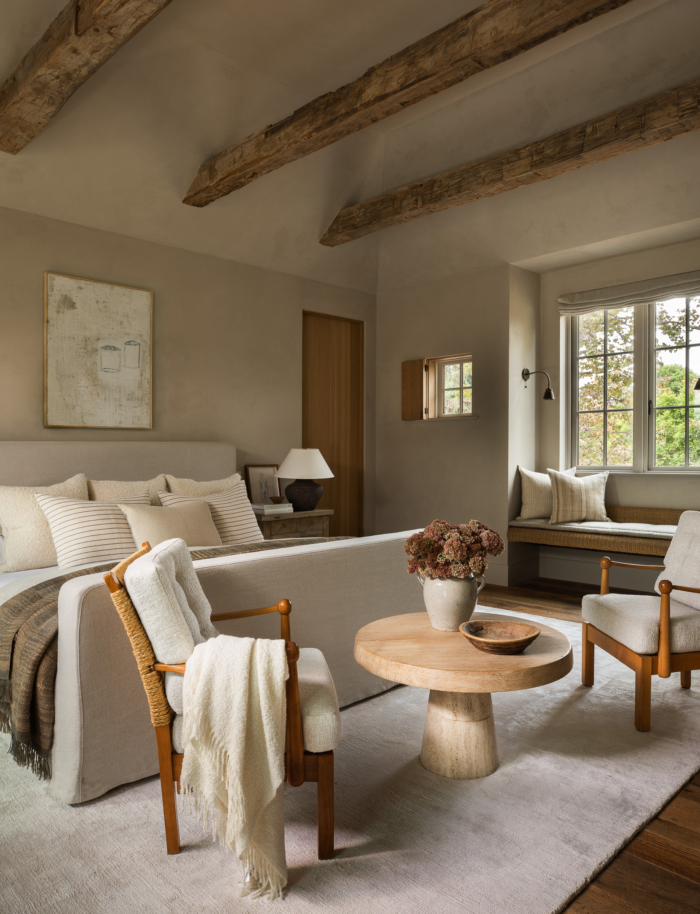
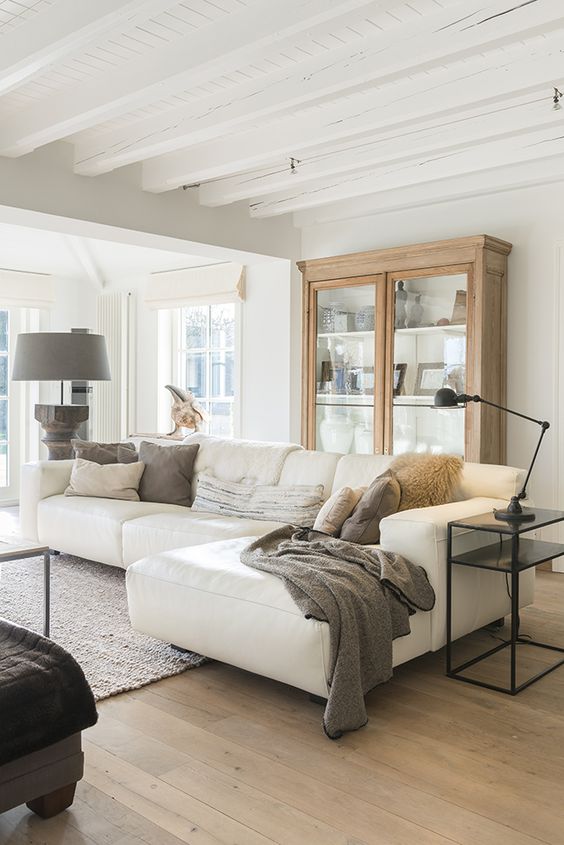
Exposed beams
I wouldn't say it's a “must” with a very high ceiling, but it kind of is! It gives a beautiful natural look and it brings a nice focal point in the room. It also helps to soften up things when the ceilings are very high.
Pssst, let us know if you would like for us to do a DIY blog post on this.
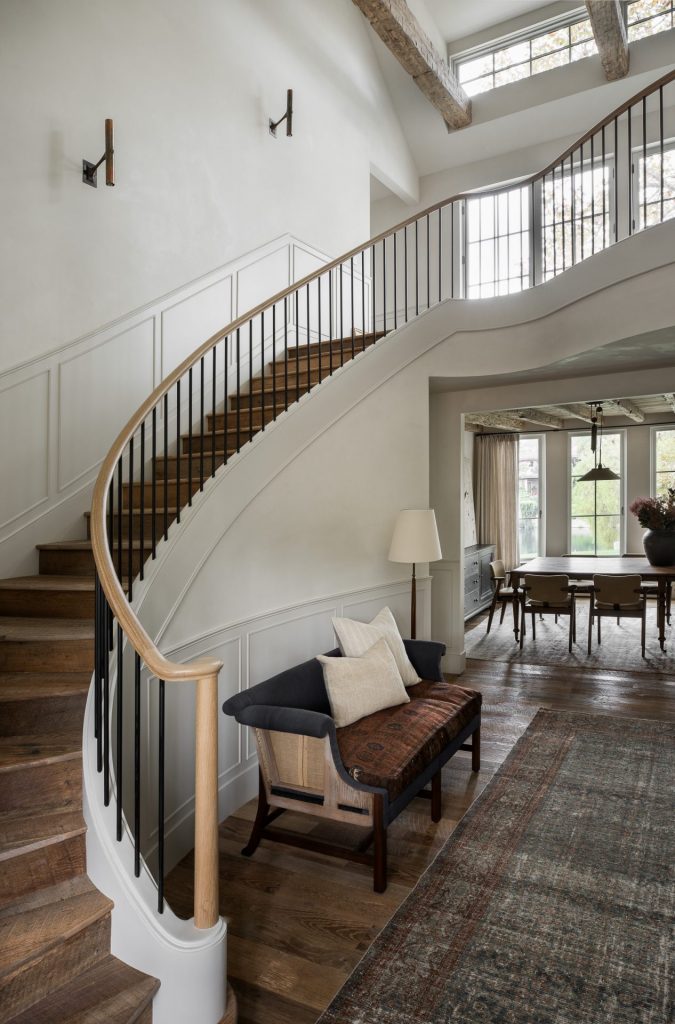
The quarter-turn staircase
This is the kind of staircase where we usually see a princess go down to meet her prince in the movies. In reality, this is where we will see the parents come down with a load of wash (lol), but it is still very beautiful!
The mix of rounded and straight lines here go perfectly well together. As we can also see, making the steps darker is also a great idea to keep the stairs a little safer.
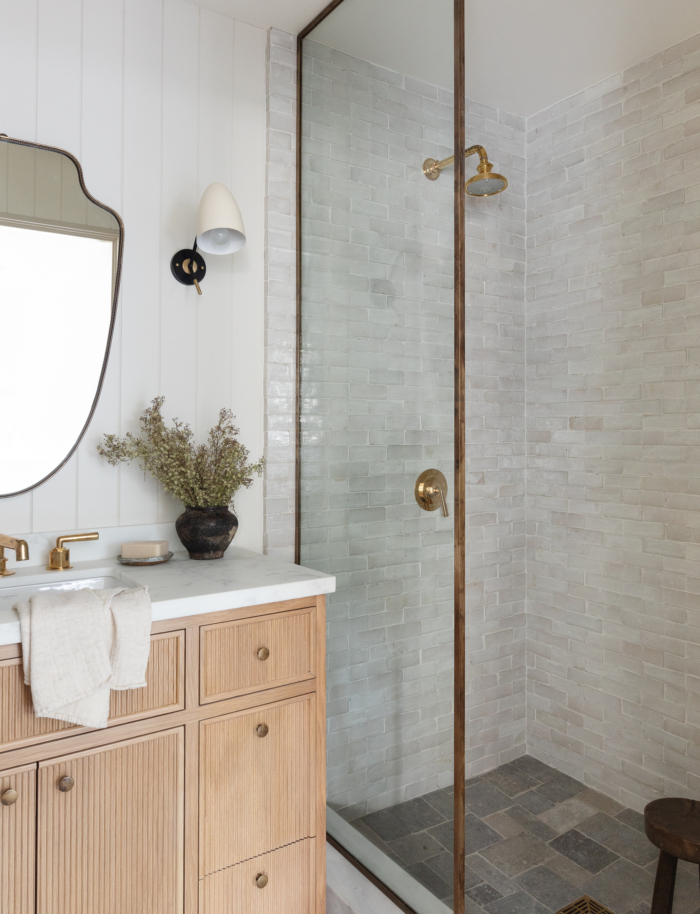
The shower
Brass fittings is a big yes! It's vintage chic. The molding of the shower which is made of copper creates a nice continuity with the other materials and the furniture.
If you want a bathroom that's out of the ordinary, but doesn't take you out of your comfort zone, here it is!
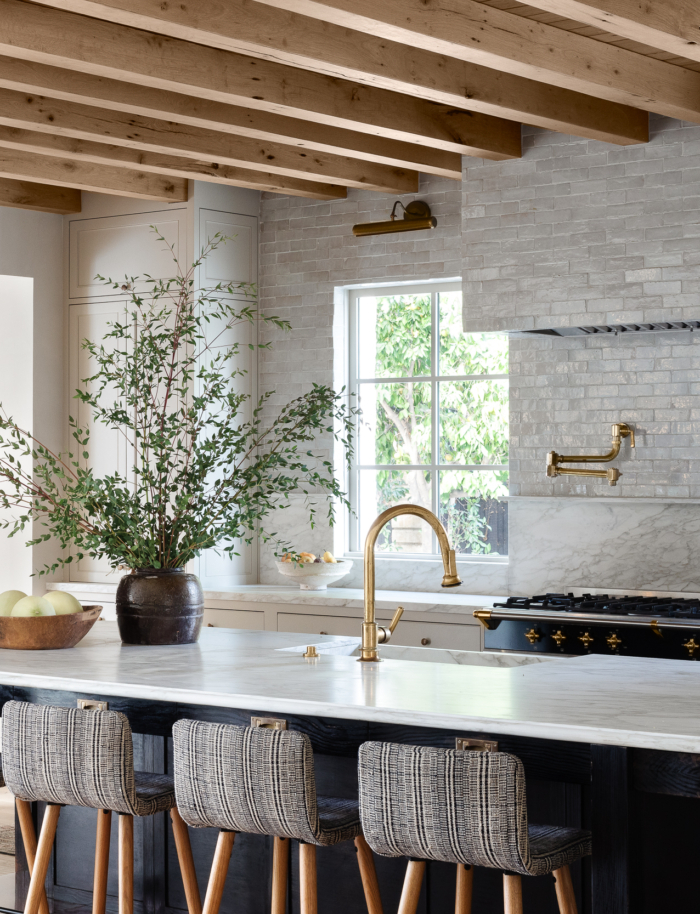
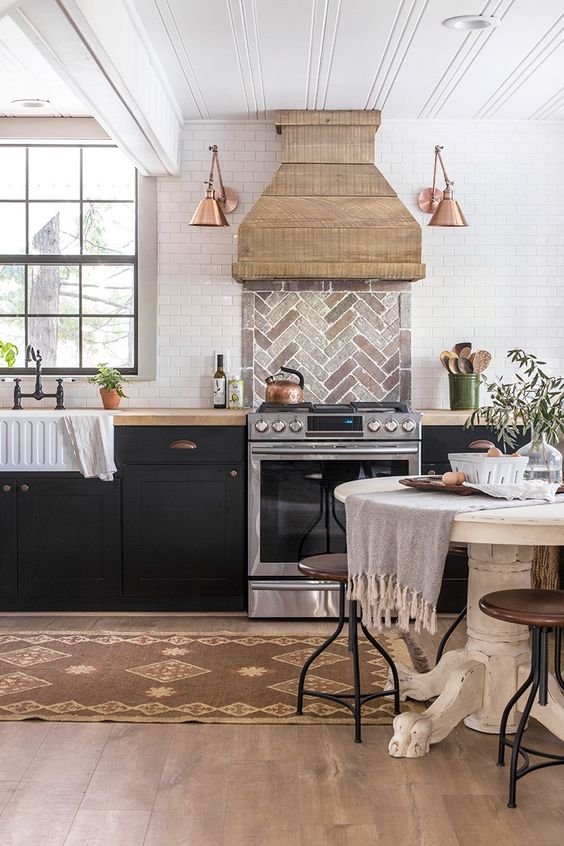
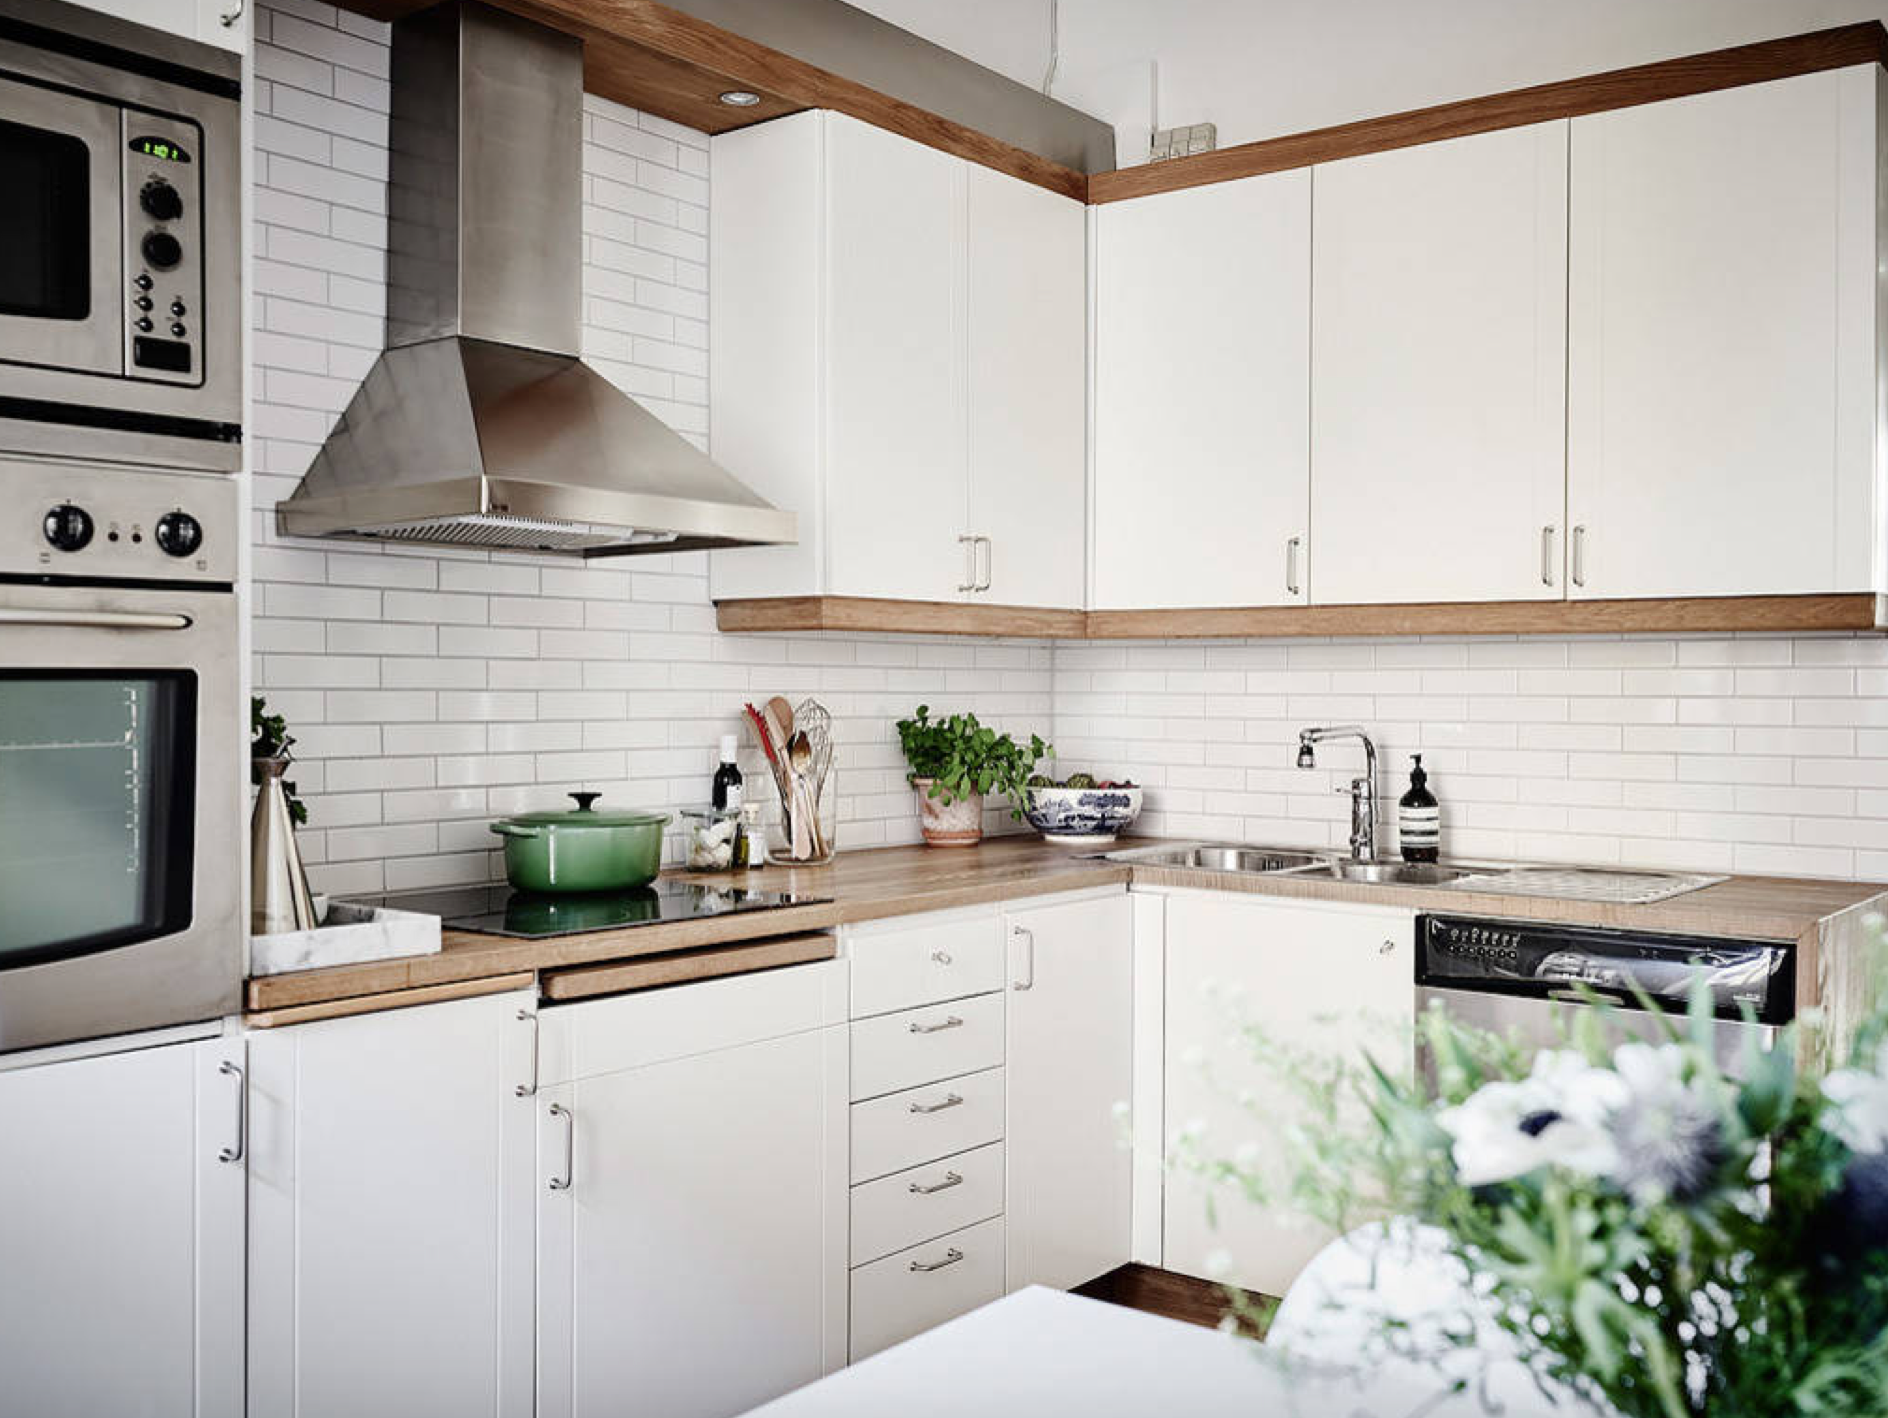
EVERYTHING in this kitchen
The mixture of natural colors, the pale colors, the bluish black and the gold colors are so easy on the eyes! The kitchen has a refined look all the while being functional. It has a little elegant country look that is quite delightful!
The sink, facing the guests might just give my boyfriend the desire to do the dishes a little more often! (lol). A great kitchen that is just so inviting and makes you want to gather around friends and family.
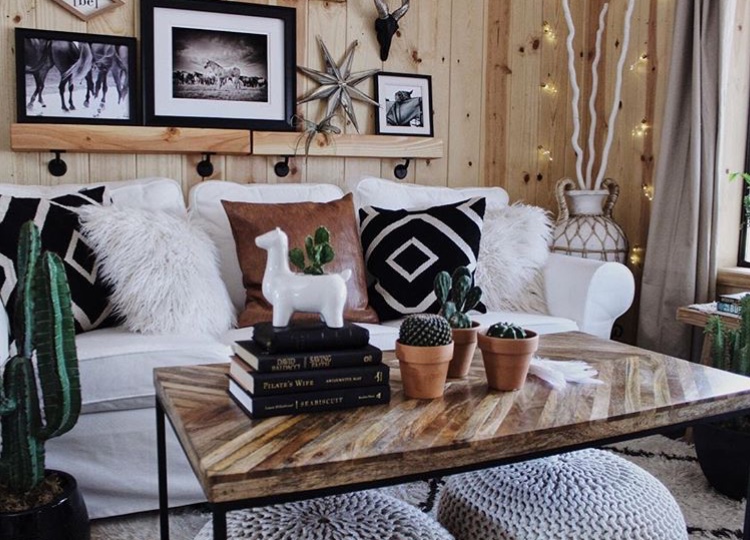
Board and Batten
This wall has several shades of beige gives character to the room while maintaining its soothing atmosphere. This room makes me want binge watch a new series in one day! Honestly, wood paneling adds a nice touch to a usually flat wall. In addition, it’s easy to install if you want to do it yourself!
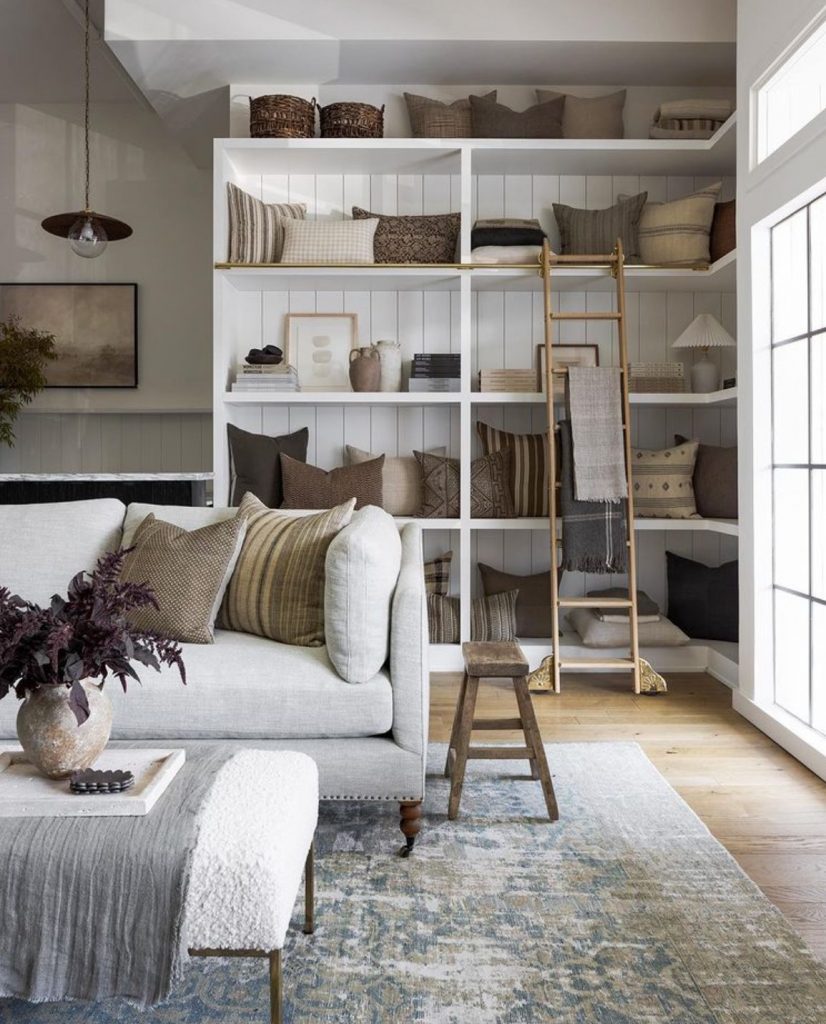
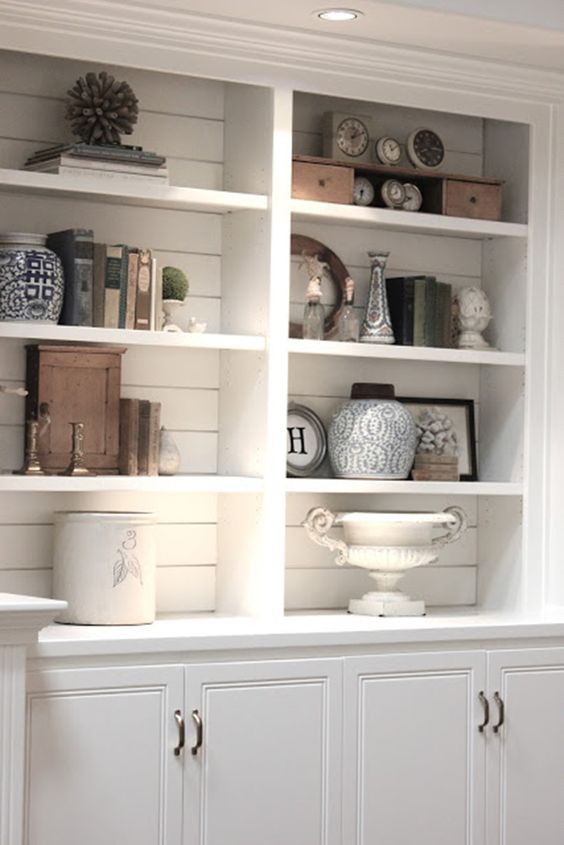
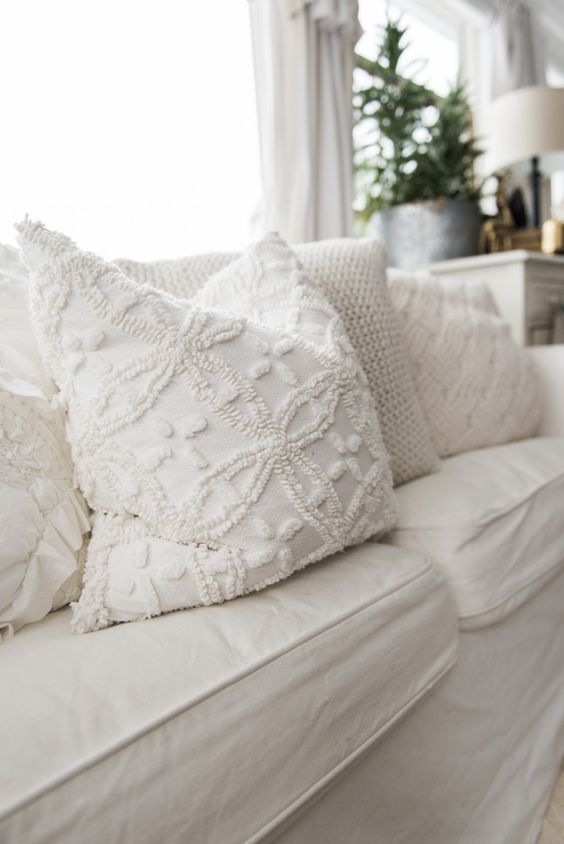
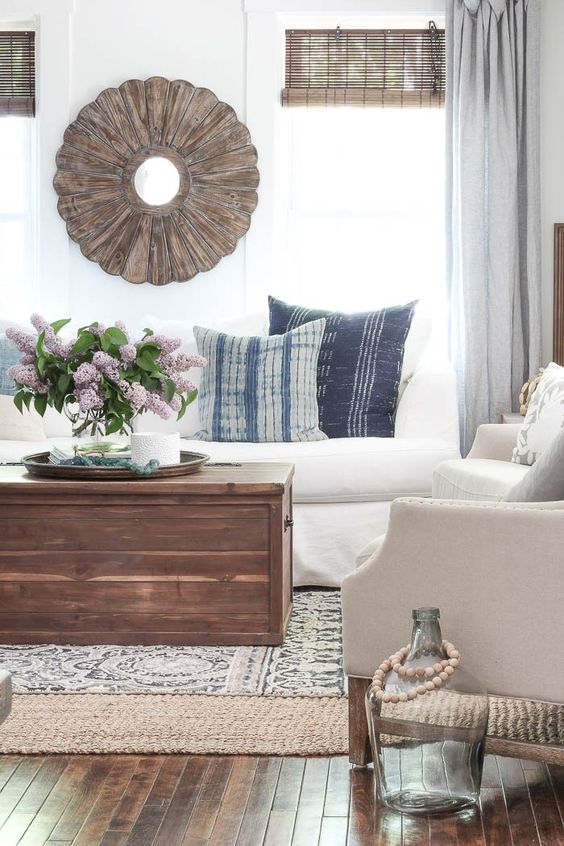
The library
This library filled with cushions, books, vases and even more cushions is definitely a favorite. It's pure genius. There are so many beautiful cushions that we can't put them all on our sofa.
There is an art here of arranging neutral colors that create beautiful harmony. Also, the slatted bottom adds a nice composition to the other patterns and makes everything match well together. The bookcase blends a little into the wall particularly because the colors are identical so as not to emphasize the bookcase.
I'll be back shortly with more inspirational accounts that I like. In the meantime, you can check out our boards on Pinterest to leave room for creativity.

PANTONE COLOR OF THE YEAR 2023
Pantone determines a color trend each year that will be representative of year to come. This color is determined according to several analyzes of current events, world situation, current lifestyles, in short, the environment around us.
Colors make us feel certain emotions and Pantone determines the one we need for the year.
This year’s color is Viva Magenta.

Its name represents a form of celebration after having gone through the past few years. It's "An unconventional color for an unconventional time." Very well said wouldn’t you say?
Viva Magenta is a vivid crimson that tends towards red. It is fearless and thrilling. It represents, among other things, the balance of emotions. It contains the energy and passion of red balanced with the calm and introspection of the color purple.
Here some ways to incorporate Viva Magenta in your home
If you have the audacity, you can paint a whole wall this color or only partially.
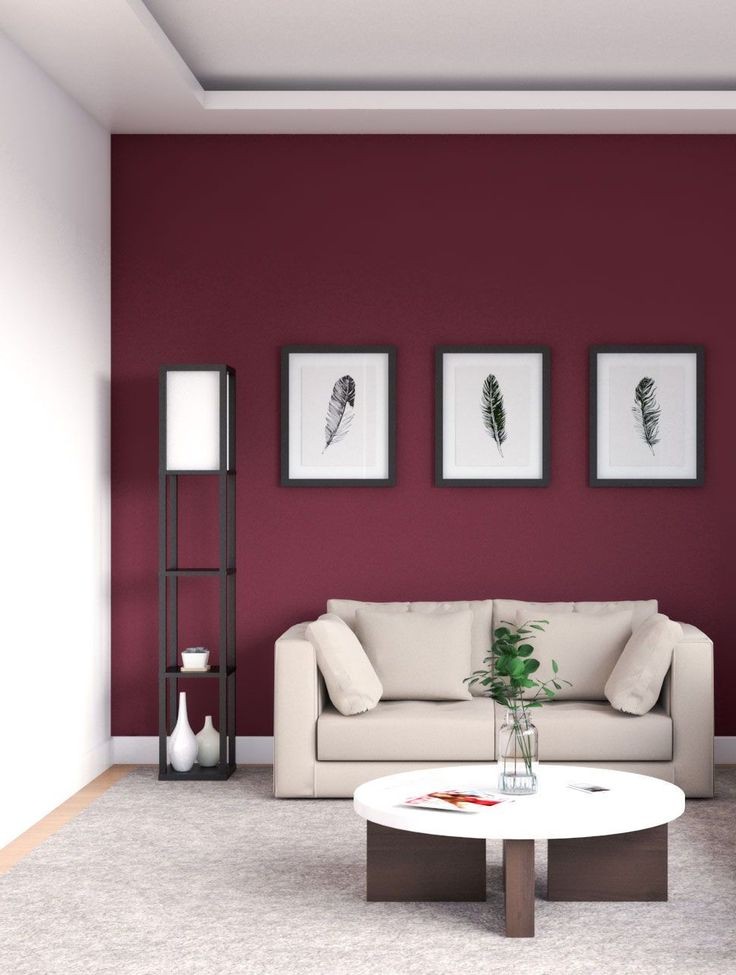
In this guideline, magenta aligns with the return of classic, dark, more moody, detailed decors. It is an ideal color to use both to accentuate, but also as a base color in a room. This color moves us far from a minimalist décor. This color is charged, heavier and darker.
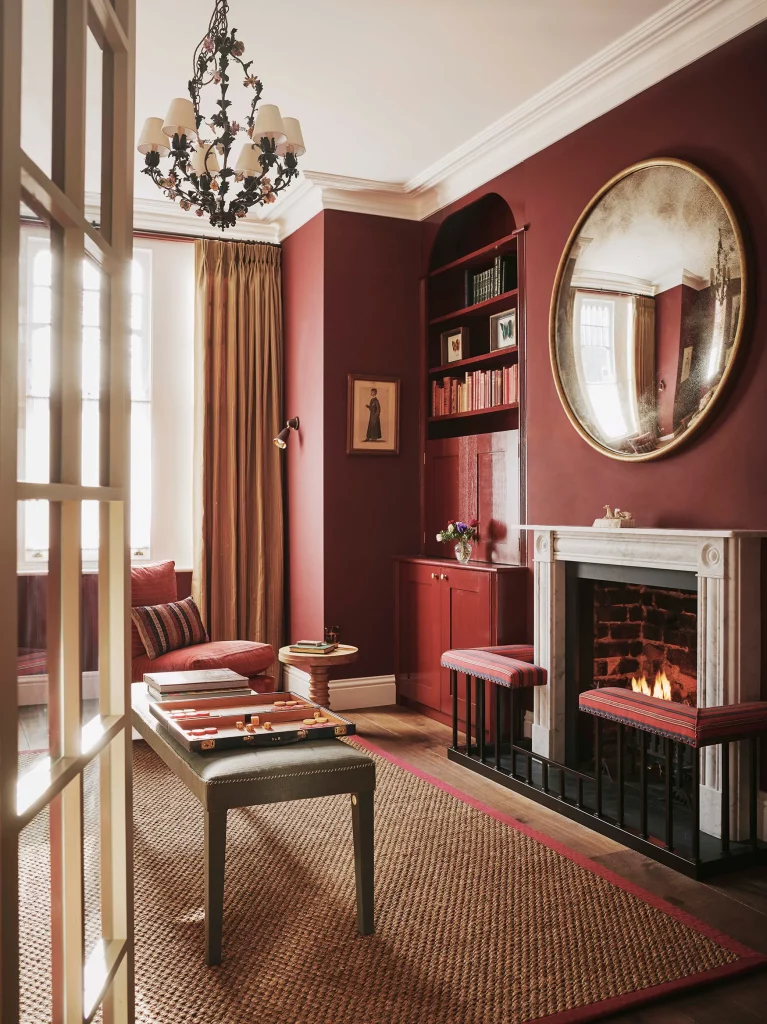
Some may have a preference for this color in the kitchen. It is sure to be the center of attention and focal point of the room.

For those who wish to “play it safe”, accessories are perfect way to emphasize this year’s trendy color. You can play around with rugs, curtains, cushions or chairs. It can also be mixed with several styles.

Be ready to see this color everywhere this year and it’s gorgeous in any setting when paired with neutral colors to balance it all out.
Get inspired with these decoration ideas and add a little “Viva” to your year!
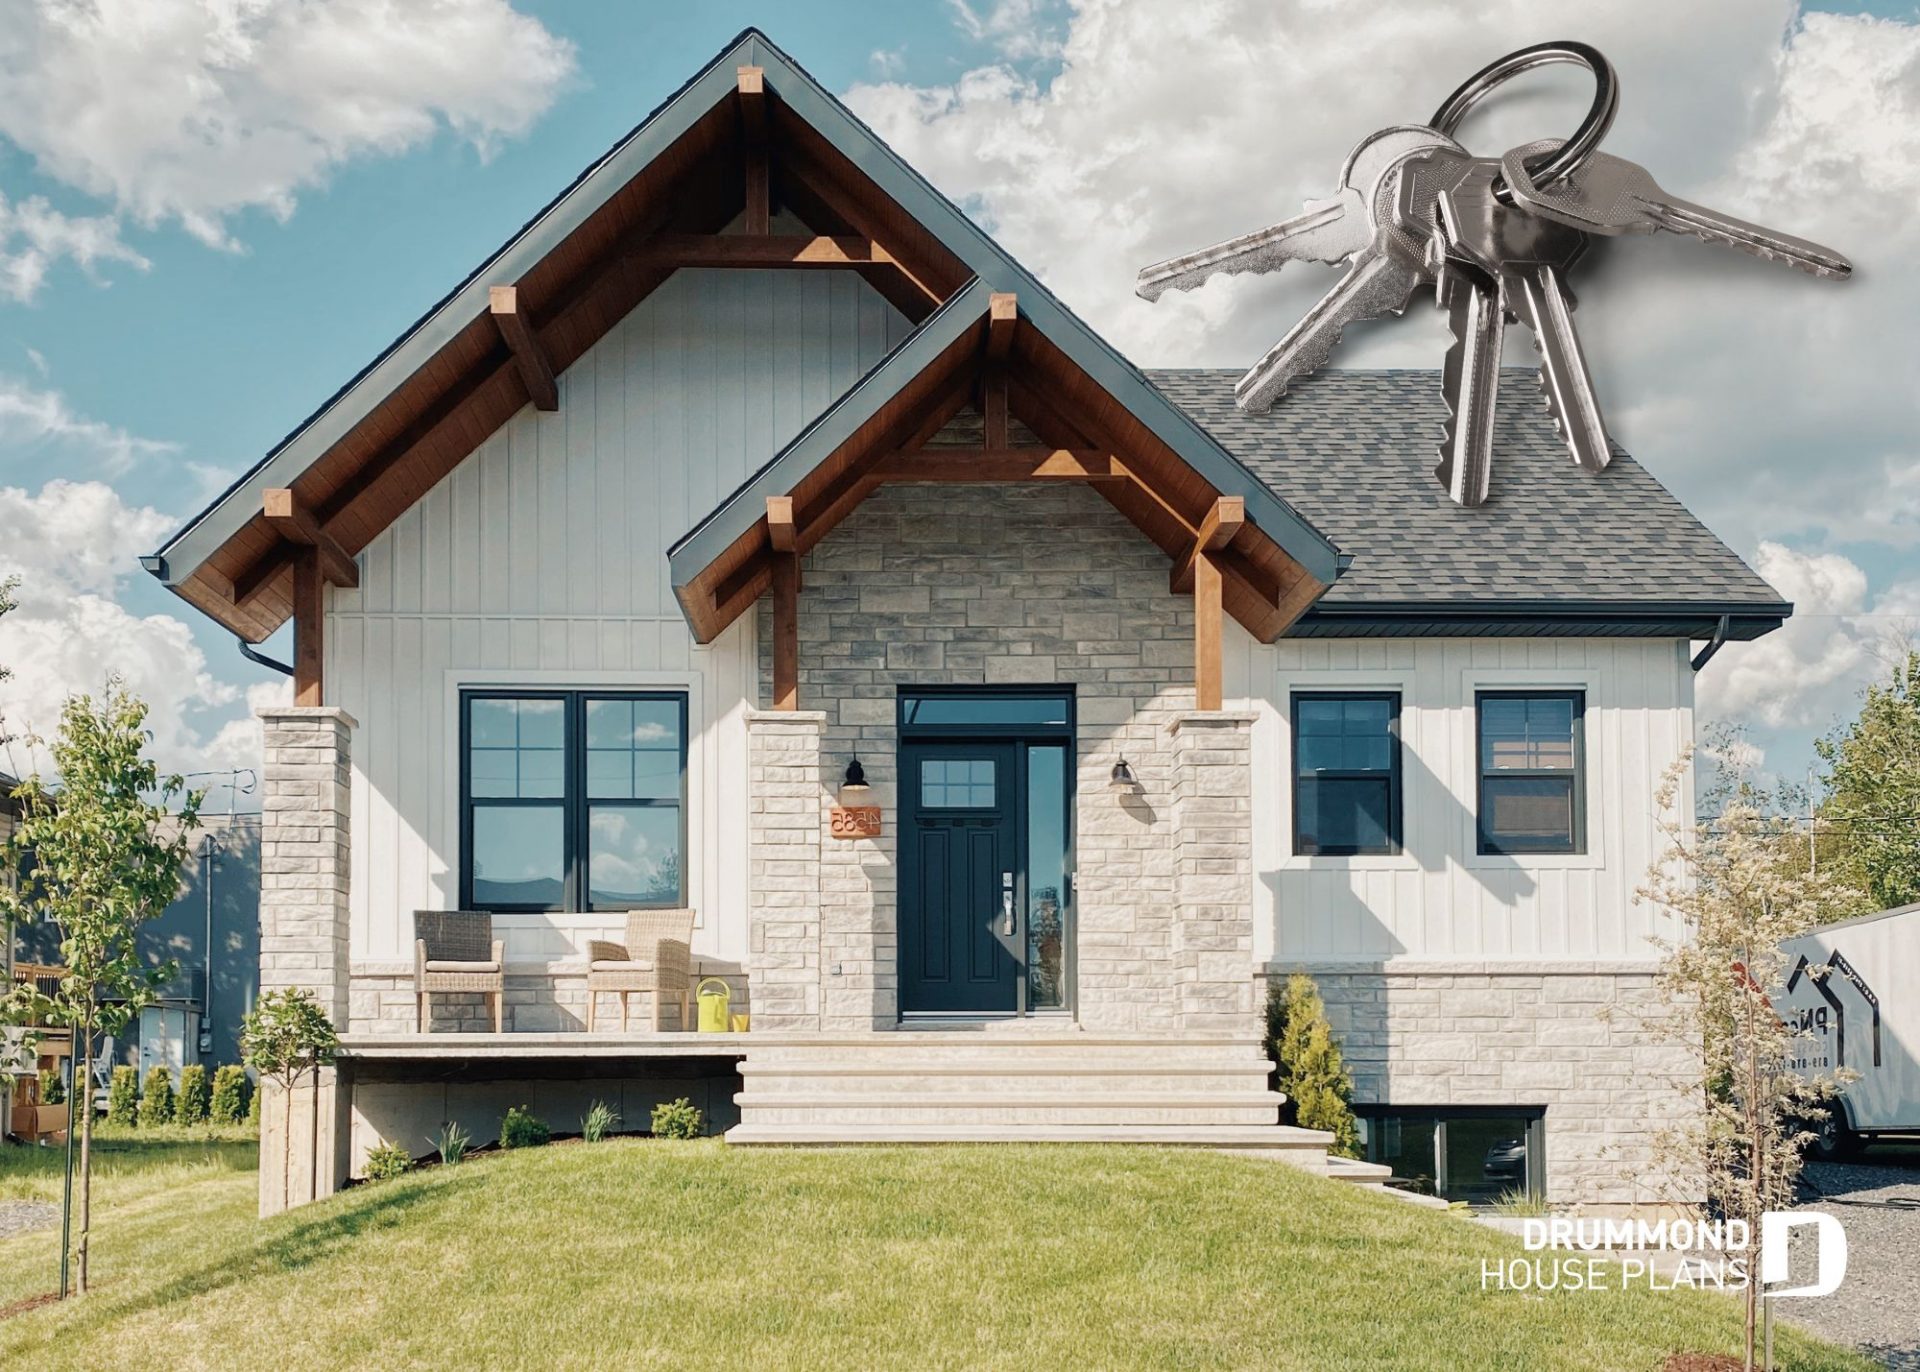
A LITTLE ASSISTANCE FOR FIRST-TIME BUYERS
The construction of a first home is not always accessible and easy for everyone, and even less with the current real estate market. Fortunately, there is a new savings plan making it easier to buy a first home and will be introduced this coming April. This first-time buyer plan is called the CELIAPP.
It's a happy mix between the TFSA and the RRSP
Here is a small table summarizing the advantages of the CELIAPP which are also part of the following plans.
TFSA |
RRSP |
| Reduce taxable income | Reduce taxable income |
| Tax-sheltered return | Tax-sheltered return |
| Tax-free withdrawal | Tax-free withdrawal |
| No need to repay the amount withdrawn | --- |
How much can I contribute?
You are entitled to contribute up to $8,000 per year up to a total of $40,000. The balance is added to the following year. If you contribute $3,000 this year, next year you can contribute $13,000 ($8,000 + $5,000 balance from the previous year). These contributions do not affect your RFSA and RRSP contributions. You can therefore contribute to all 3 at the same time.
You have 15 years after opening the CELIAPP to use it for the purchase of a first home or it will have to be withdrawn. You and your spouse can use your CELIAPP to purchase the same first home.
You can combine the RRSP and the TFSA on the same purchase.
Am I eligible for the CELIAPP?
If you check all of these boxes, you are eligible for the savings plan.
□ Resident of Canada
□ At least 18 years old
□ Less than 71 years old
□ Did not inhabit a home for which you are the owner of in the year of opening of the CELIAPP
□ Has not inhabited a home for which you are the owner in the last 4 years
For even more tips for your construction, contact the office nearest you.
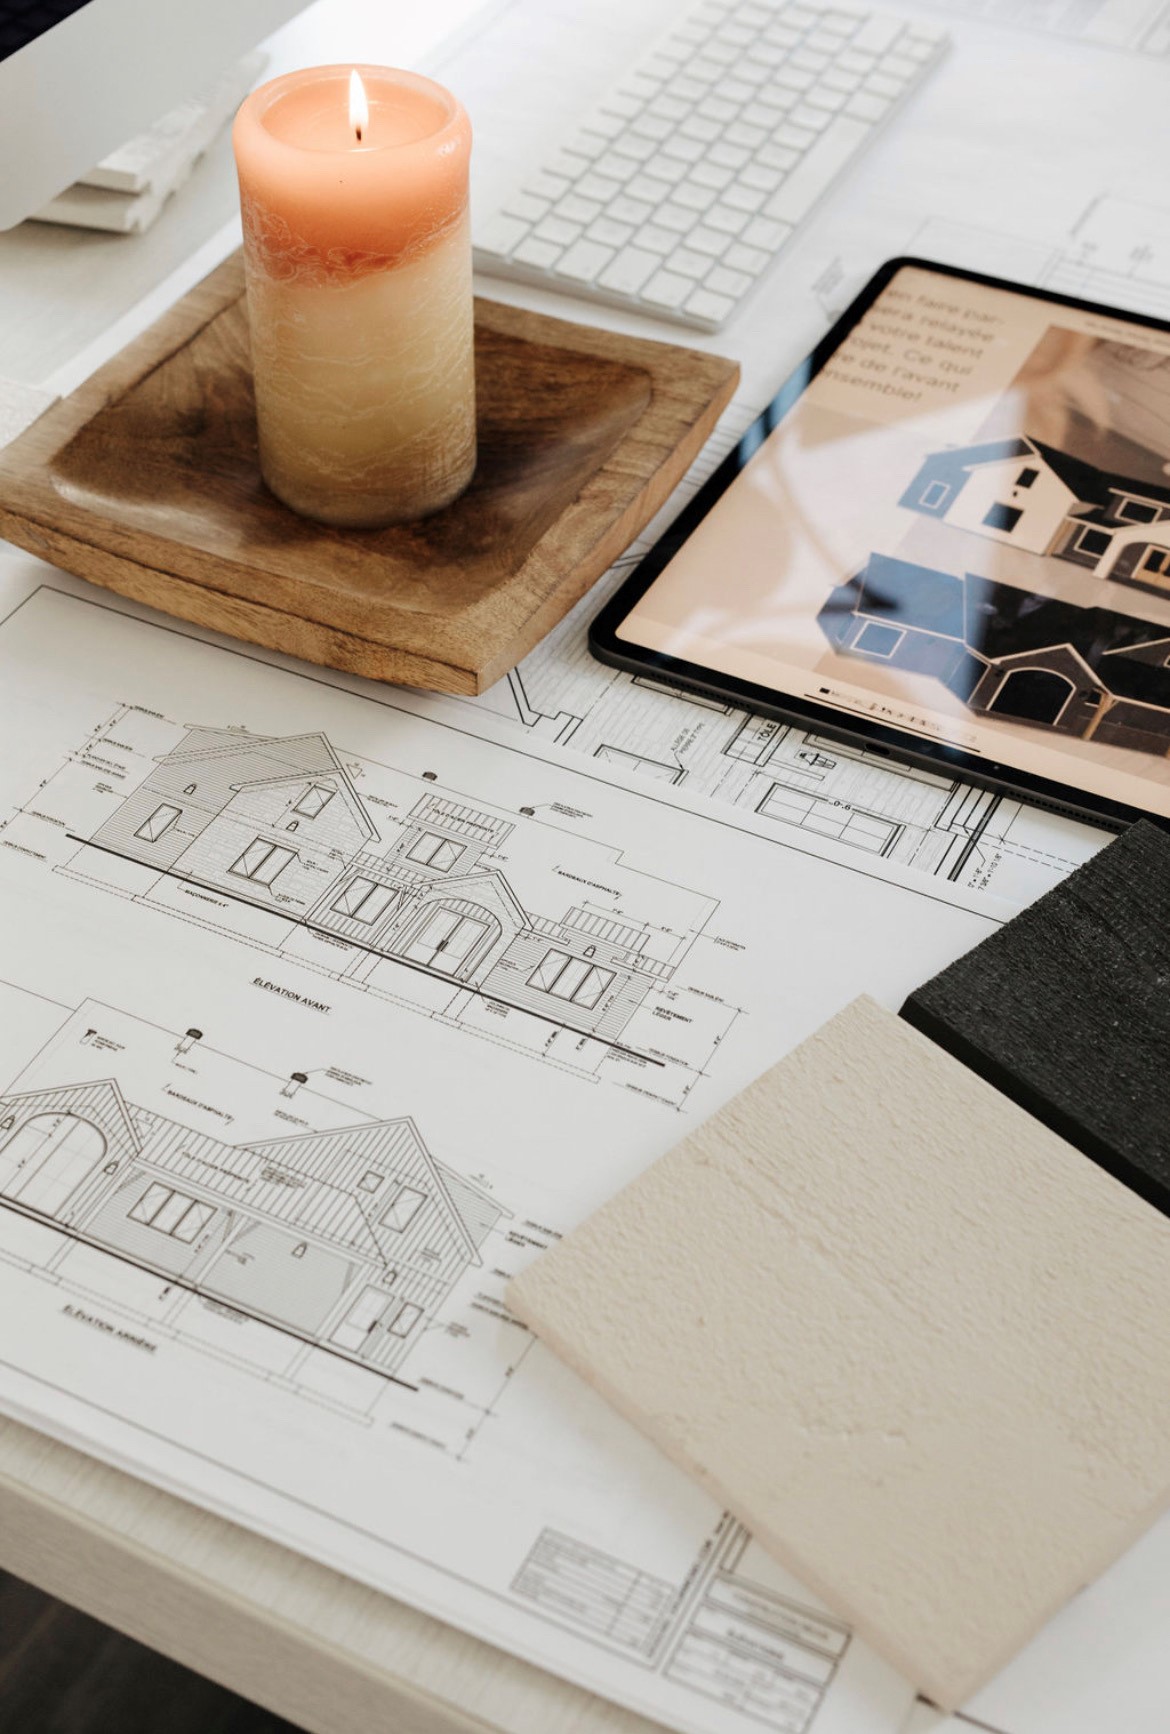
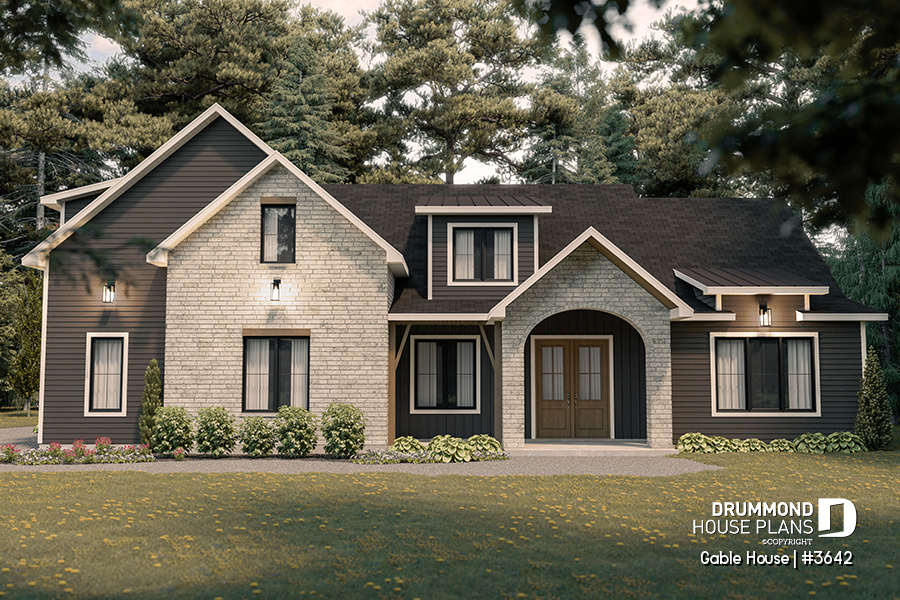
The GABLE HOUSE | Jenn x DrummondHousePlans
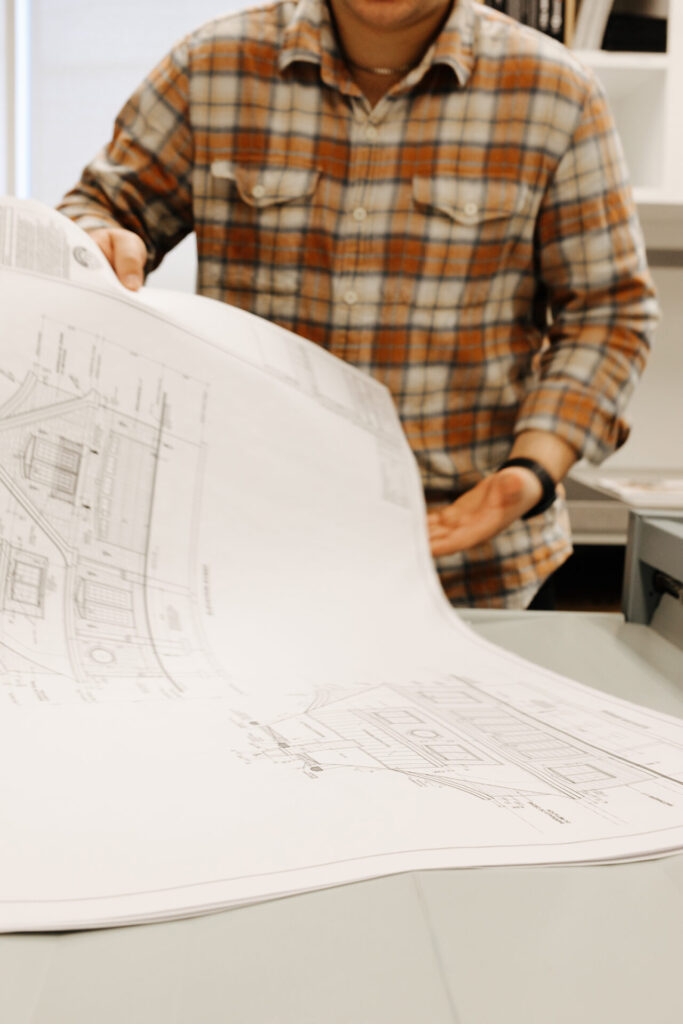
Over the past few weeks, many may have heard of the GABLE HOUSE PROJECT | Jenn x DrummondHousePlans on our social media... It is our pleasure today to introduce you to this beautiful step by step new home construction project!
It's well known, I've always been a FAN of residential architecture and Iove to talk about houses. As the head designer and artistic director at Drummond House Plans and through my Jenn x DrummondHousePlans division, I can use my passion to meet the needs of our customers! But with the GABLE HOUSE PROJECT, I was able to use it to meet my own needs!

You may be asking yourself : what is the GABLE HOUSE PROJECT? The Gable House Project is my (and my husband's) dream home (The Gable House, # 3642) that we are about to build in fall of 2022. However, before we tell you all the details about the project, let's start from the beginning and go back go down memory lane.
Nordika, my first home
A few years ago, I built my first house (Nordika # 6102) with my wonderful husband Kev. It was a small Farmhouse, just the way we like them, and we were just the 2 of us back then! It got so, so much interest after we posted it on the Drummond House Plans website and on my personal Instagram account, I was totally amazed! After tons and tons of questions about the ideal dimensions of a house, our types of doors, our exterior siding, our floors, our decor, name it, we decided to write a blog post to help our customers find their way through it all. To our surprise, we received many beautiful and positive feedback and questions.

My husband Kev, my two puppies, Georges and Alfred and myself spent several great years in our beautiful cozy home! Then, with the imminent birth of our first child, it was time for us to move to a larger family home! The project for a new house was therefore started.
Where did the idea for the Gable House Project come from?
When the time came to think about its design, a huge flash went through my head: why not document in pictures and in writing the construction and all the steps of our new home so that our customers can refer to it on the Drummond House Plans blog? We all know it: it's not always easy to make all the decisions that need to be made when designing our future home ah ah ah! What type of land suits us best? What coatings and colors go together best? Should we choose a hardwood floor or ceramic? Will my laundry room survive my two daily loads? Etc.
In short, these are all questions that are repeatedly asked through our customer service on daily basis! Furthermore, these are questions I also asked myself when designing houses for the Drummond House Plans' home collection.
The mission of the Gable House Project
The mission of the Gable House Project : we want to guide you step by step by presenting our favorite products, construction tips and Quebec companies and partners through our blog and various social media.
Consequently, we have worked very hard on the Drummond House Plans Blog so that you will find many articles dedicated to this project. We will present the materials used and all our partners who will be able to answer your questions even better than us. It will be progressive throughout the construction. We will be adding new rooms, new partners and lots of new content. In other words, I open the doors to my dream home to you: the design of our plan, the budget we have established, the interior design, our partners…
I invite you to follow me on my Instagram page and that of Drummond House Plans to follow this project that makes me so proud! And finally, I have one thing to tell you about this project: it's going to be A-W-E-S-O-M-E!!!

FARMHOUSE PLAN IN PHOTOS!
You like Farmhouse house plans: you talked, we listened! Without further ado, here is the photo / guided tour of one of our “best seller” Farmhouse plans in the affordable “Farmhouse” category, Plan # 6102, also called Nordika.
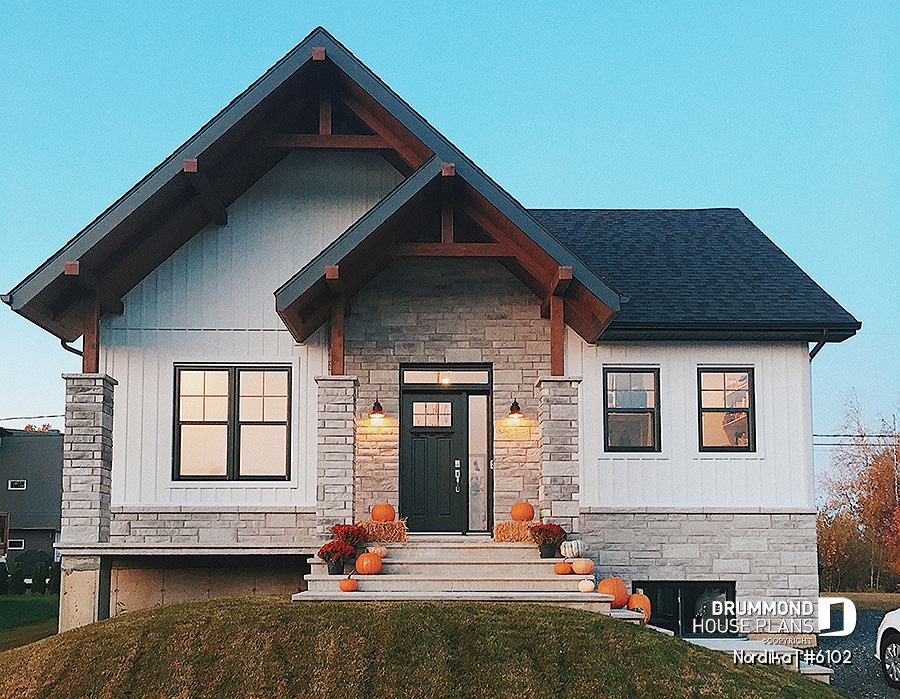
Farmhouse plan #6102 by Drummond House Plans
In this article you will discover ideas for decorating your home, stores that offer affordable Farmhouse decorations as well as a variety of ideas to bring out the best in your indoor living spaces.
Let’s get started… For those of you who didn’t know, my better half and I are the happy owners of the house the photos were taken from below. Built in the summer of 2019, our little Farmhouse plan could not be more welcoming. Here is the almost complete list of accessories from our Nordika, which will surely take you to places where you would not necessarily have thought of to buy some decorative accessories.
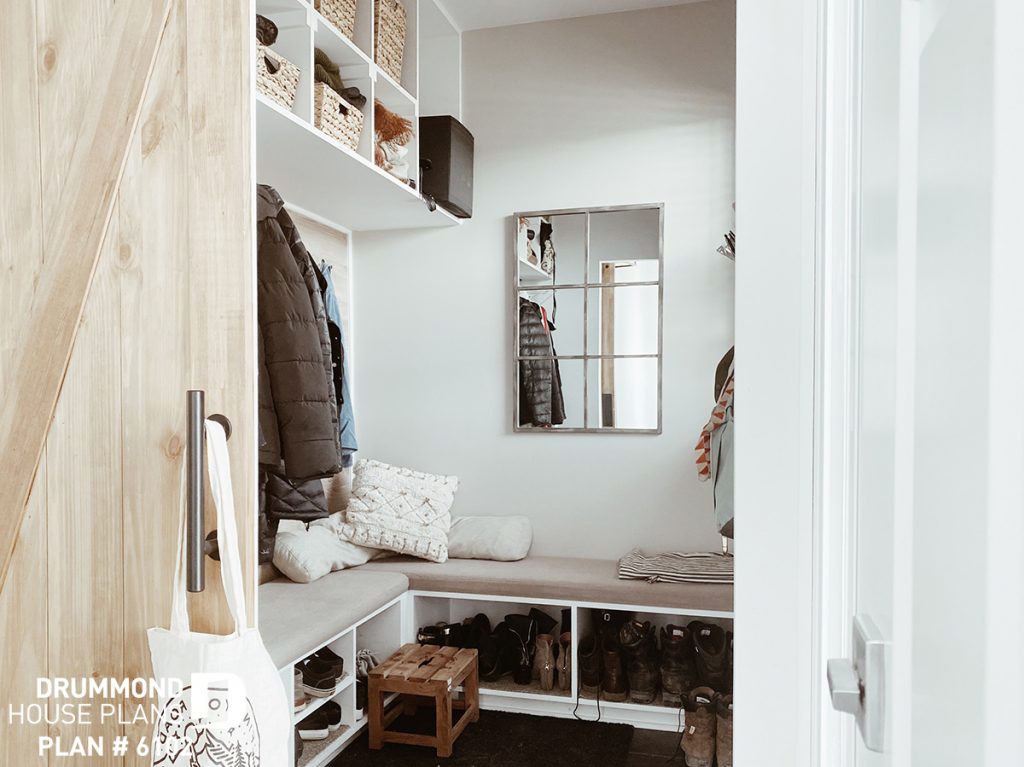
FARMHOUSE PLAN - MAIN ENTRANCE
For us, the entrance had to be as flashy as it was inviting. We wanted our visitors to feel the warm side of our home as soon as they walked through the front door.
In construction, we have slightly modified the entry of the original Farmhouse plan by changing the closet corner for a beautiful large walk in. And I admit that it is really a "game-changer". Today I couldn’t live without my “locker room” (and it is also my dog's favorite sleeping spot!).

2 : Rug / HomeSense
3 : Handle / Wayfair
4 : Sliding barn door / Rona
5 : Lighting / Royaume Luminaire
6 : Book holder / Renaud Bray
7 : Ceramic oil bottle / Walmart
Here is the entrance walk in closet that makes all small families dream. A set of locker style spaces, benches, shelves, hooks and poles. For the pole, we had to be more creative ... We do not find poles that are installed upside down everywhere. Therefore we took the same as item # 66 used in the bathroom, giving it a different purpose. Placed on the reverse, it can thus accommodate several hangers!
+ rattan baskets / Canadiantire
If we continue the tour, here we are in front of the bathroom. For those interested, the model we used for interior doors is the "Craftsman" model. You will probably find some at your interior finishes retailer.

9 : Eucalyptus / Rose Drummond
10 : Candle wax diffuser / Pro Bass
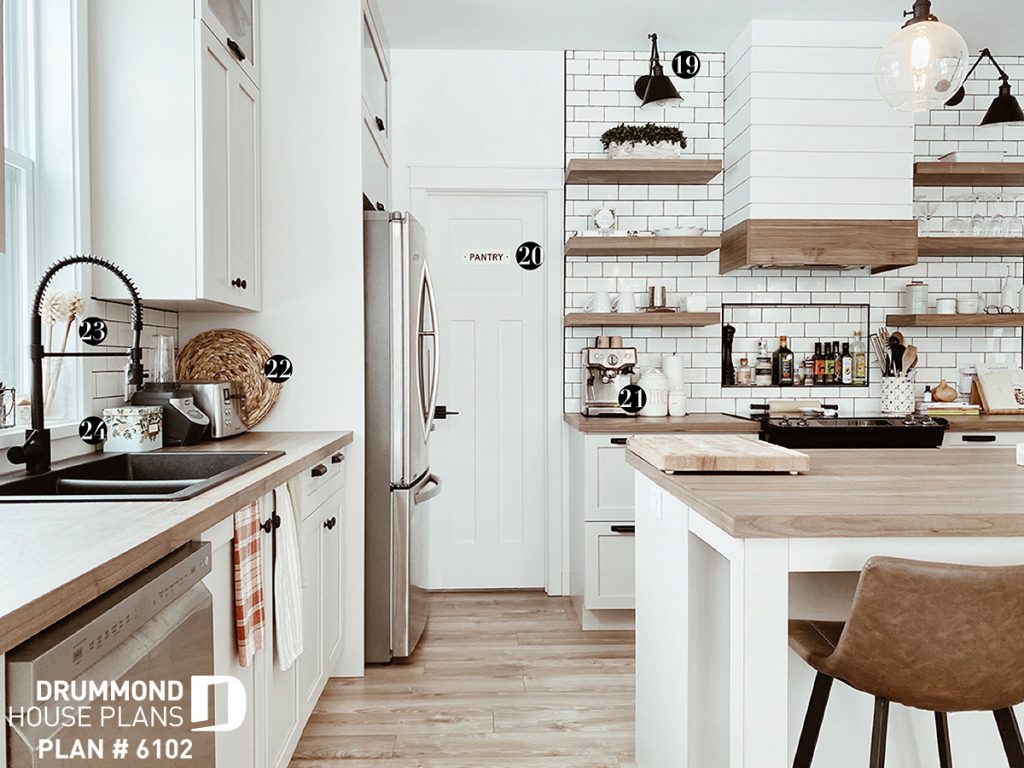
MODERN FARMHOUSE PLAN KITCHEN
In reality, we have built the Farmhouse house plan # 6102 as an "reversed" option from what you see on our website in order to take better advantage of the orientation of our lot and natural light. So that you can better visualize it, I have therefore inverted the photos I took so that they correspond with the floor of plan # 6102 on our website.
Small comment: it is important to think about the orientation of the lot and the sun in order to choose the floor plan that will provide you with the maximum amount of natural light. All our plans are available as a "reverse" option and can also be modified in one of our regional offices or online.
One of the small changes that were made in the kitchen were to put the sink under the window and then change the layout of the fridge and oven.
One of my favorite elements of the kitchen in our Farmhouse house is the built-in behind the oven. I love it! So practical and at the same time it adds a little decorative touch with oils and spices. Another aspect that I like about our large kitchen is the huge island that opens onto the living room and the dining room.
RECENT ARTICLE FROM OUR BLOG THAT MAY INTEREST YOU:
White subway tiles for the kitche (s’ouvre dans un nouvel onglet)">n>

12 : Utensil holder / HomeSense
13 : Rolling pin / Target
14 : Rug / Ambiance Simone
15 : Kitchen ware collection / HomeSense
16 : Floral / Magnolia Market
17 : Frame / Walmart
18 : Tea storage / Home Goods
BUT ... what I like most, honestly this time :), is our stove hood. Surprisingly, no it’s not more expensive to make a built-in hood, contrary to what everyone believed (including me). Obviously, it goes without saying that is will depend on the materials you will use ... But it is pretty much the same seeing as we save a lot of money to start with (since it is not exposed with the stainless chimney) . We just balance the cost with the wood, etc. to make the base.
20 : Sign / Magnolia Market
21 : Coffee machine / Doyon Després
22 : Rattan plater / Target
23 : Wooden dish brush / Les mauvaises herbes
24 : Recipe boxe / Ambiance Simone
FARMHOUSE PLAN: KITCHEN + DINING
I am very satisfied with the choices we made for the kitchen of our Farmhouse house. The laminate counter was a perfect choice and quite economical. The layout of the pantry is ideal. In my opinion, we don't need to have a view of the street… I prefer to have a view of the backyard. This is why I opted for a pantry in front to have more space in our living space located in the back.
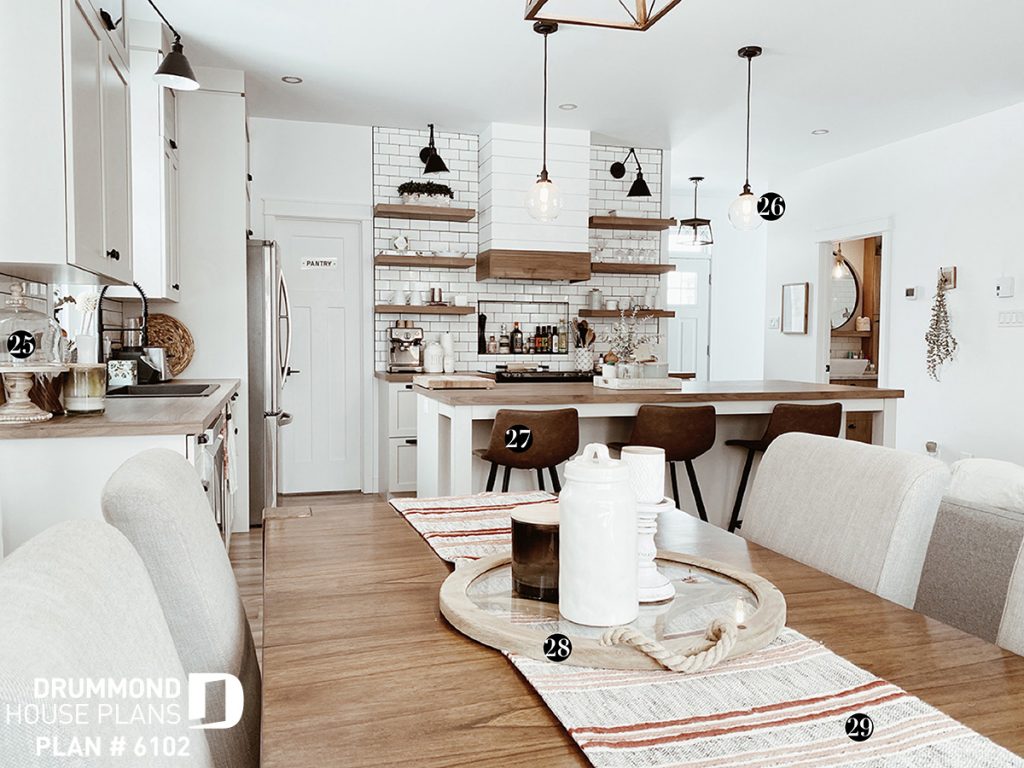
26 : Lighting / Amazon
27 : Bar stool / Bouclair
28 : Platter / Boutique Déco Design – Laferté
29 : Table throw / HomeSense
LIVING + DINING
I really like the fact that our living room and dining room are open to each other. For us it is practical since we often eat / snack while listening to our favorite TV series.
What I like most about this open space is the arrangement is the window setting. The fact that our windows are simple, large but not too large, allows you to add touches of home-style Farmhouse decor here and there. Having had too large windows I would have been limited in the layout of the space in order to be able to put the decorations that I wanted so much to add (frame and mirror).
Choosing the floor plan is always difficult. But sincerely, I RECOMMEND that you choose the laminated type of flooring that we have chosen. With a dog, the floor is often covered with hair and dirt. The pale color combined with a slight veining perfectly camouflage the small traces that it can leave behind (clumps of hair, half-crunchy treats, saliva from old toys, traces of wet paws). In addition, we see no traces of clawmarks, big "must"!
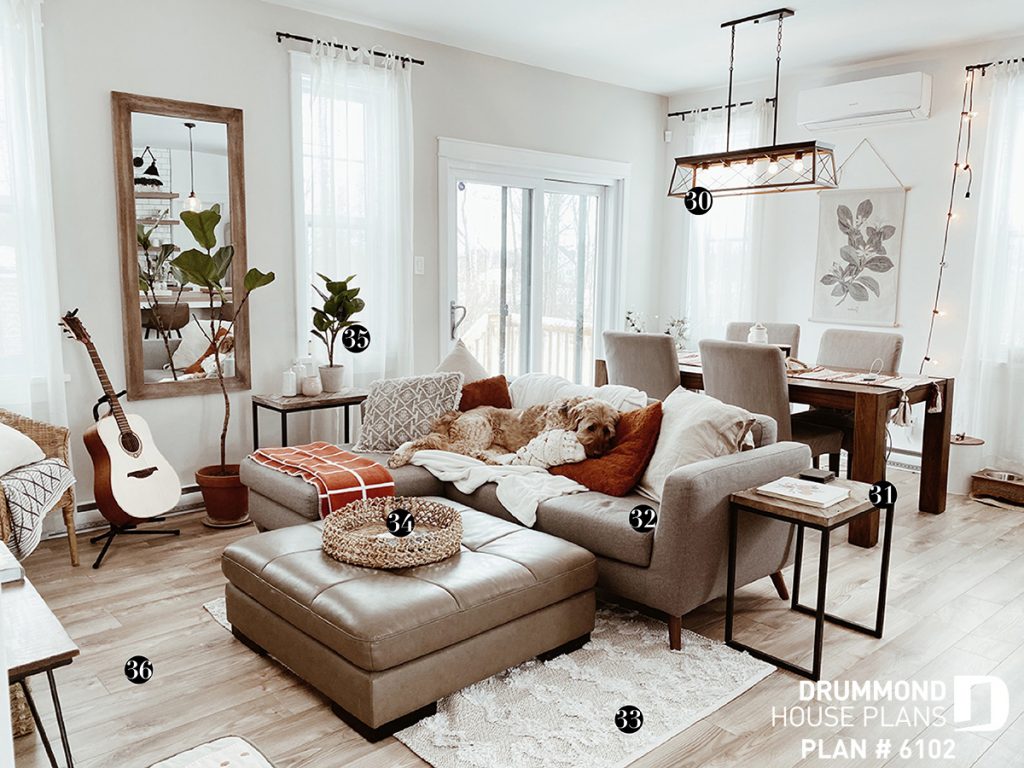
31 : Side coffee table / HomeSense
32 : Sofa / Structube
33 :Rug / Simons
34 : Platter / HomeSense
35 : Floral / Target
36 : Wood flooring / BMR
FARMHOUSE PLAN LIVING ROOM
Many will likely be familiar with the term "ship lap", made famous by the very talented designer Joana Gaines from the HGTV show Fixer Upper. For those who are not, it is actually the wall behind the television. A very simple wall to make. Let me explain: we used our leftover baseboards (we had ordered extra or we would have run out of them), then we put them down and nailed them one by one, leaving the space of a big nail between each of them . The nail holes were simply filled with a hole filler, then sanded and painted. It makes such a difference in our living room. I would put it everywhere in my Farmhouse plan if it was only up to me!
Little anecdote ... You may notice that the couch and the ottoman are not the same ... It is that we had a little technical problem when we moved into our new house. Our old couch was too big for the living room, it seemed oversized. So we chose a new couch and until we find the perfect ottoman, we keep the old one. We do what we can ?
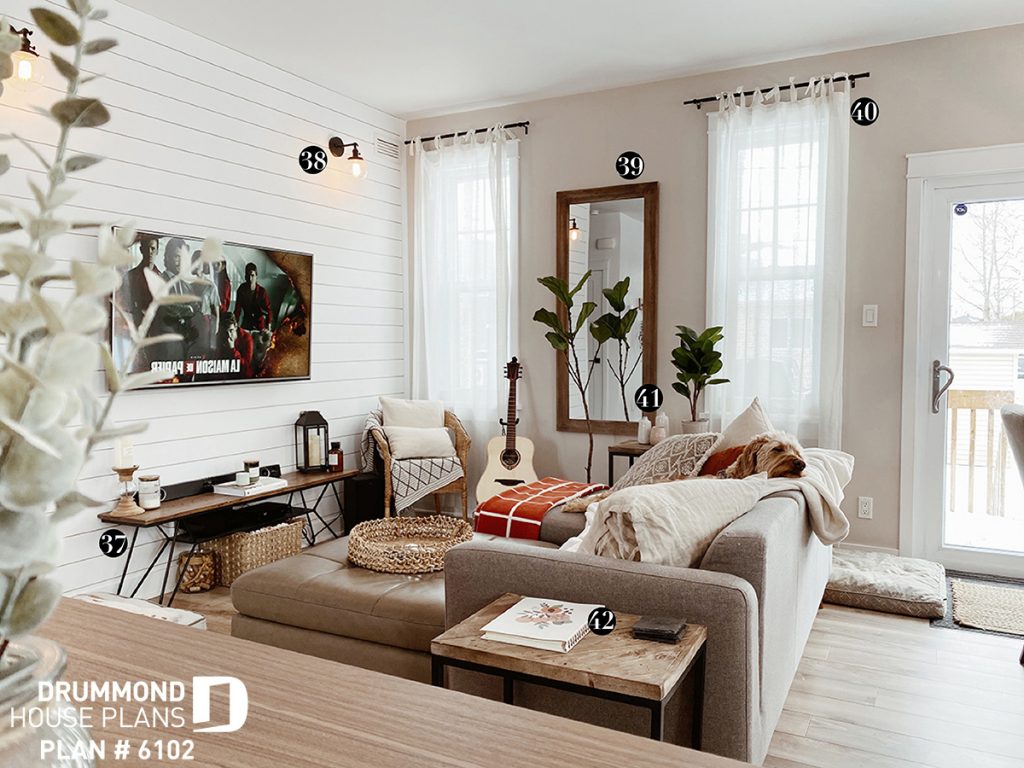
38 : Lighting / Amazon
39 : Miror / Walmart
40 : Curtains / Bouclair
41 : Vases / Magnolia Market
42 : Agenda / Trois fois par jour
FARMHOUSE DECORATION
For this section, I will not use term "WE" because it is really more "I" ... Ha! Ha!
I was just walking around Rona's to buy some supplies for my boyfriend, when I heard a subtile whisper, "Pssst Jennnnnn". I turned around and they were there, on sale for $ 5, and I just had to adopt them ... Who would have thought that simple decorative wooden shelves would have made me spend countless dollars and time. But they were worth it and still are!
A tip for you: if you like wooden shelves and have a space in the house that allows you to install them and you are looking for ideas: type "built-in shelves" in Pinterest and create a board for find THE decorations that suit you. When you go shopping, don’t buy all of a sudden, trust me you’re going to get tired. A little corner like that must be made with time and love. If you only knew how often I change the location of the decorations ...
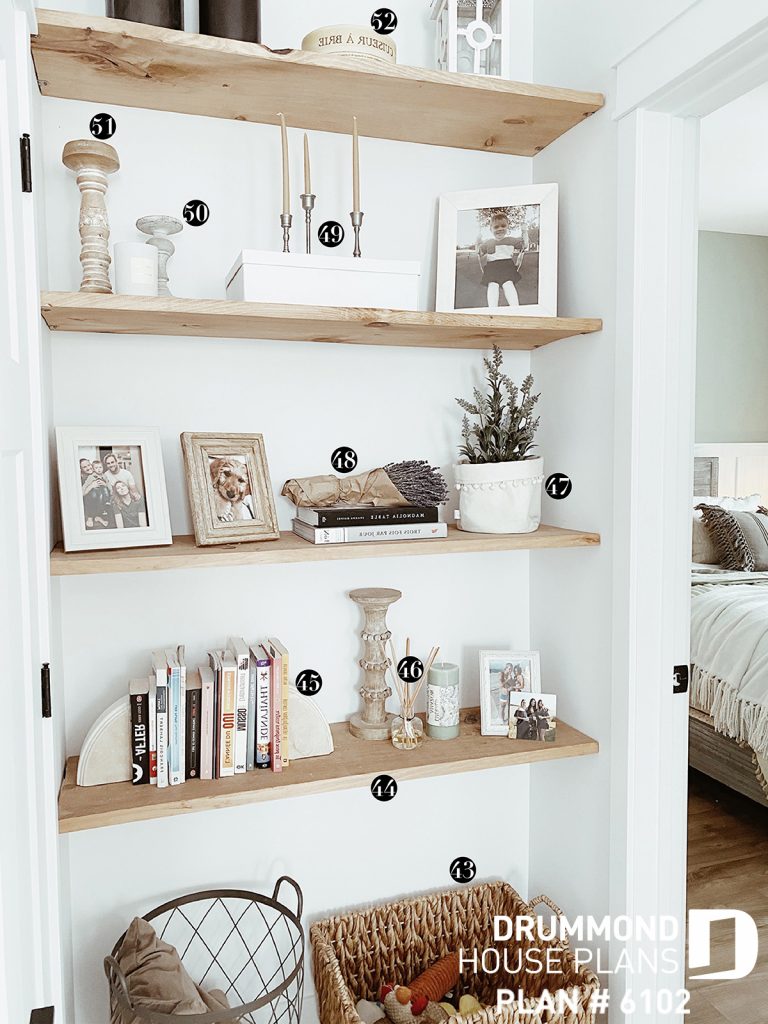
44 : Shelves / Rona
45 : Book end / Target
46 : Diffuser / Ambiance Simone
47 : Small basket + lavender / À la maison co. + HomeSense
48 : Lavender / Jean Talon Market in Montreal
49 : Candleholder + candles / Target
50 : Candleholder / CPC
51 : Candleholder / TJ Max
52 : Brie cooker / Renaud Bray
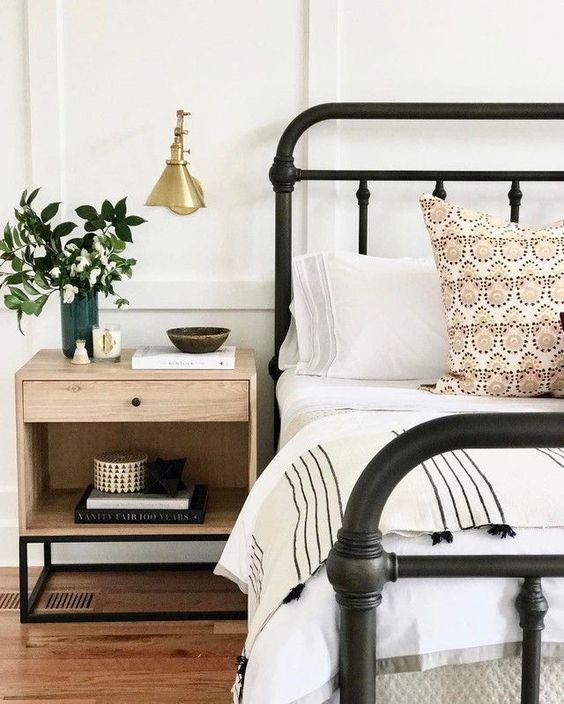
BEDROOM
We now arrive to the bedroom, the only one on the main floor. The most cozy place in the house. A half wall of "board and batten" to give a "Farmhouse" look, a pole stretched to its maximum to extend the curtains as much as possible to give an effect of “grandeur” to the window then a small green-gray eucalyptus in color on my walls.
When we moved, I initially chose a nice little ceiling light for our room. But over time, I found that a key was missing. Something was missing to make the room even cozier than it was. Then, during another one of my strolls at Rona's, I saw this little bamboo dome and I just knew it would be perfect. I knew it was the missing element in the room. Good thing because we will need a ceiling light in the basement soon. If I had to add something, it would be a carpet. We had one before ... Before we had a dog.
Many people ask us if it bothers us to have just a room on the ground floor? And to be honest not so much not. It allowed us to have so much larger living spaces upstairs. We don't have any children yet, and even if it is in the plans, we would do the same… We are already planning to move to the basement in the bedroom next to that of the baby and thus convert our bedroom upstairs office / nap corner for the baby.
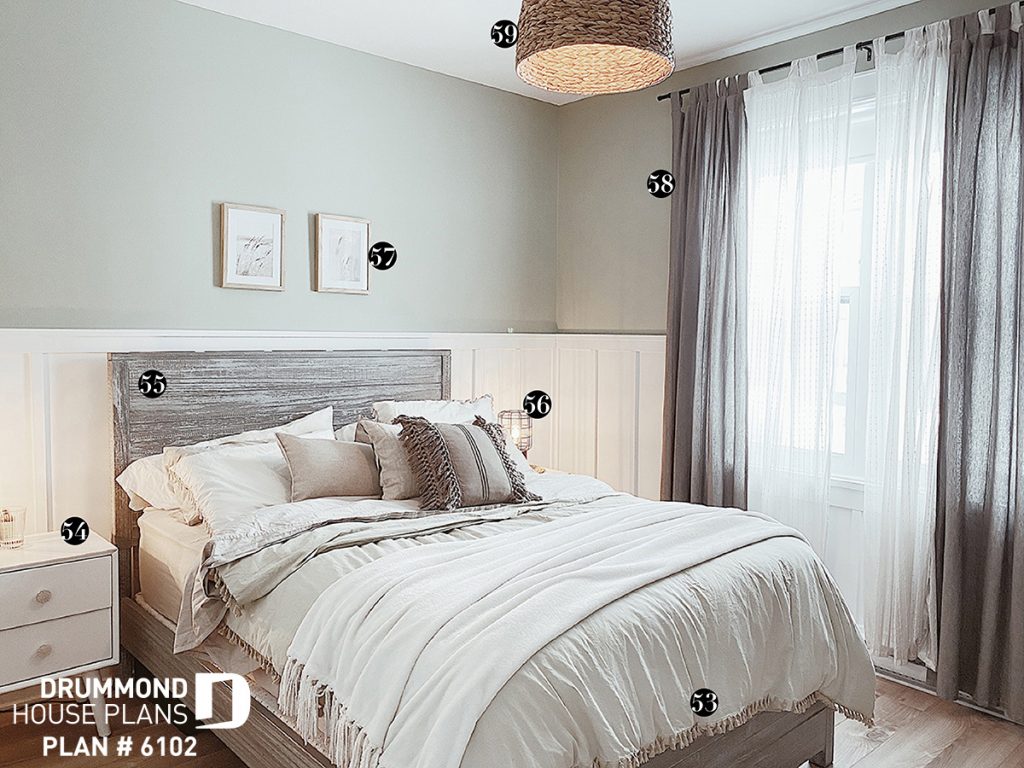
54 : Side bed table / Wayfair
55 : Bed frame / Wayfair
56 : Table lampe / Bouclair (article indisponible)
57 : Frames / Hobby Lobby
58 : Curtains / Ikea
59 : Lighting / Rona
BATHROOM
Our bathroom is really perfect for us. The laundry chute has completely changed our lives for the better. I am in love with our black taps, it gives a modern feel to our farmhouse style home.
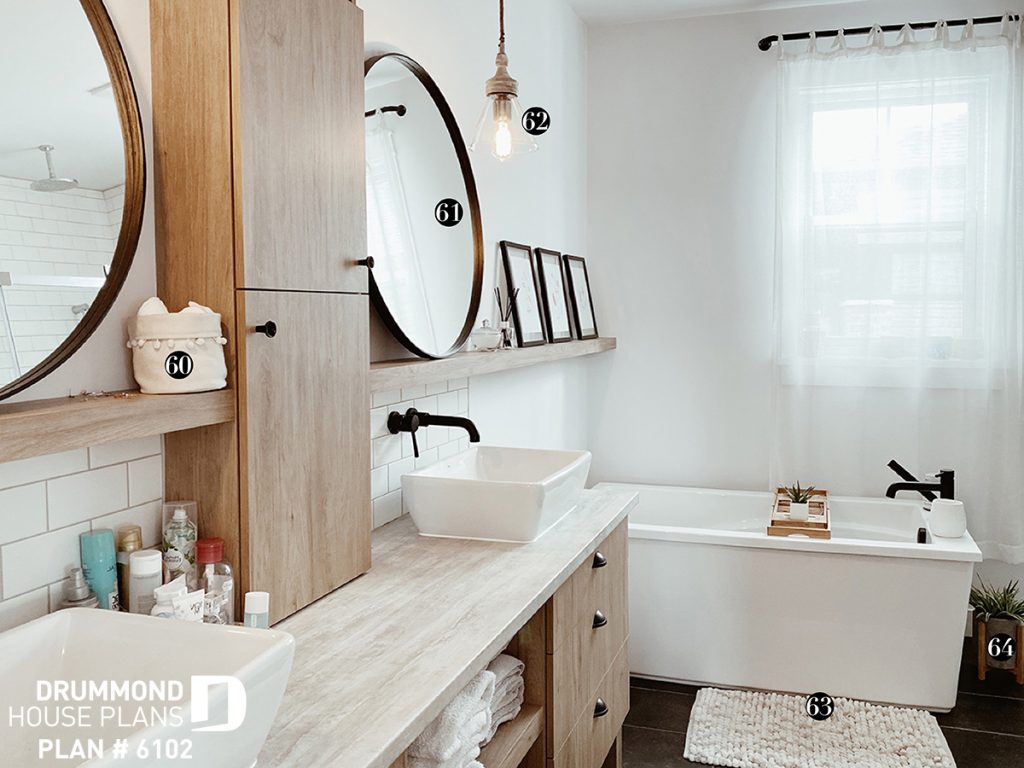
61 : Miror / Bouclair
62 : Lighting / HomeSense
63 : Bath rug / Linen chest
64 : Floral / Structube
What I like about our bathroom is that you never see the toilet, it is well hidden between the shower and the wall.
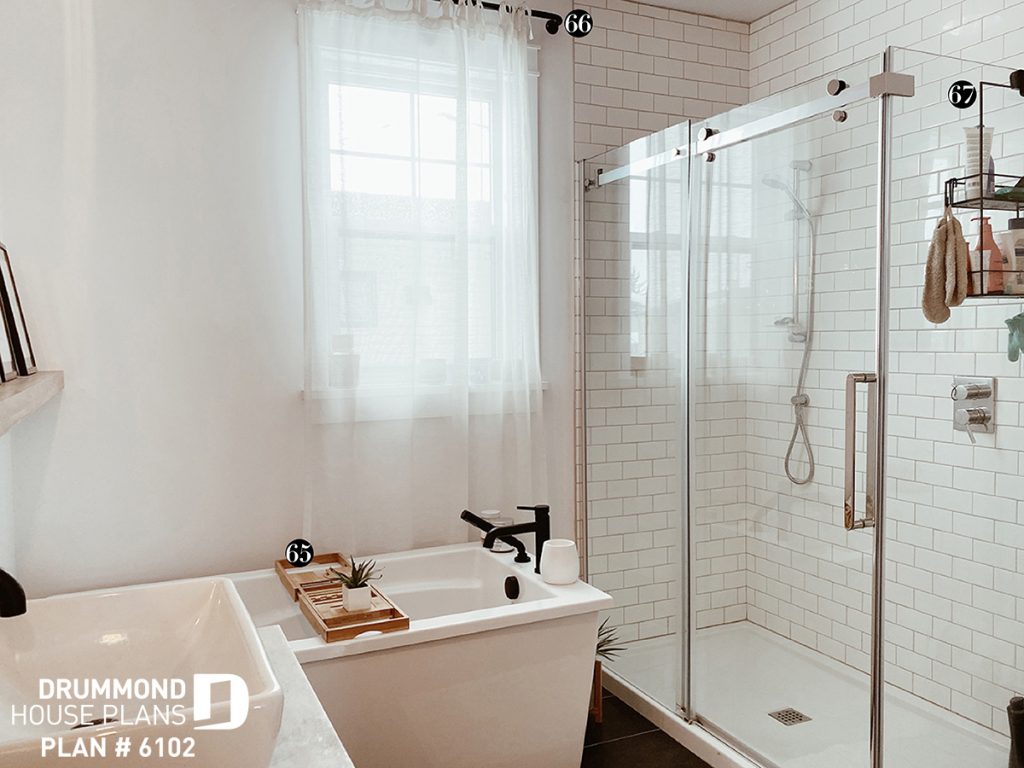
66 : Rod / Bouclair
67 : Storage / Zone Maison
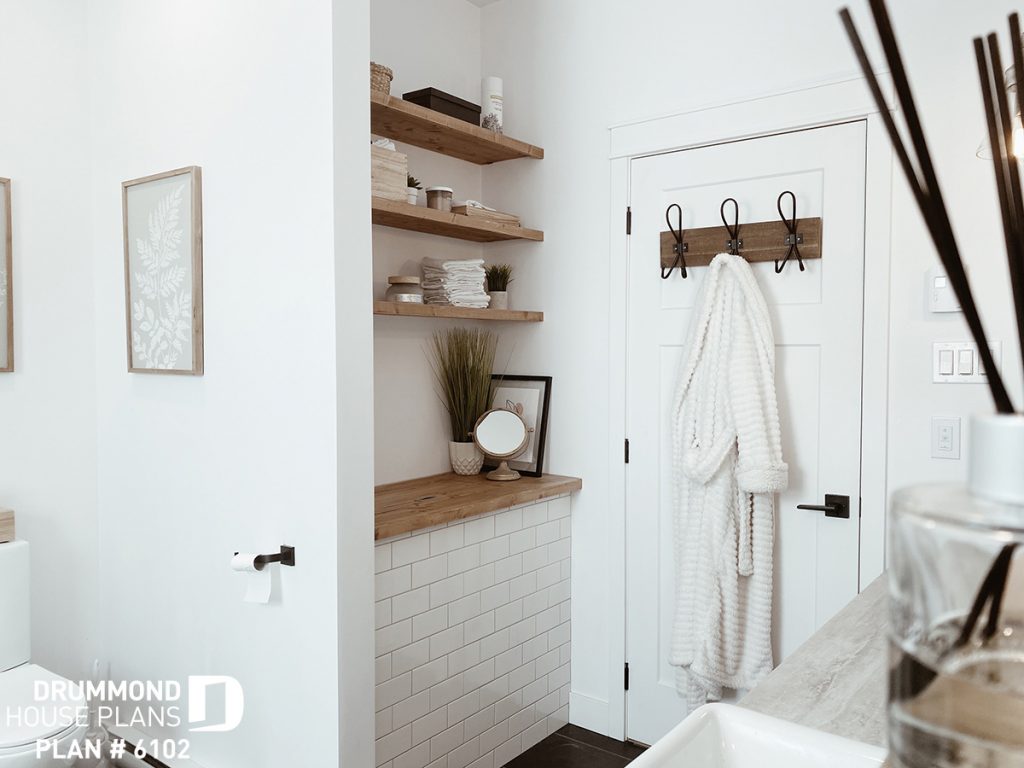
When the time comes and we are parents, the shelf + counter (on the picture below) of the laundry chute will eventually become a baby changing table.
WALK-IN PANTRY
Last but not least, if you have been here!
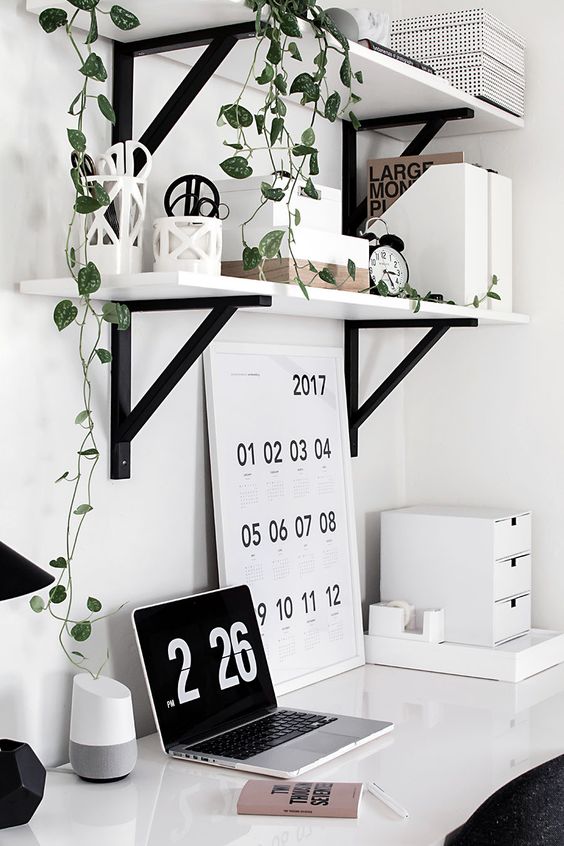
As I explained above, the pantry overlooks the street, so it was essential to put a blind in order to avoid passers-by seeing the content of our pantry...
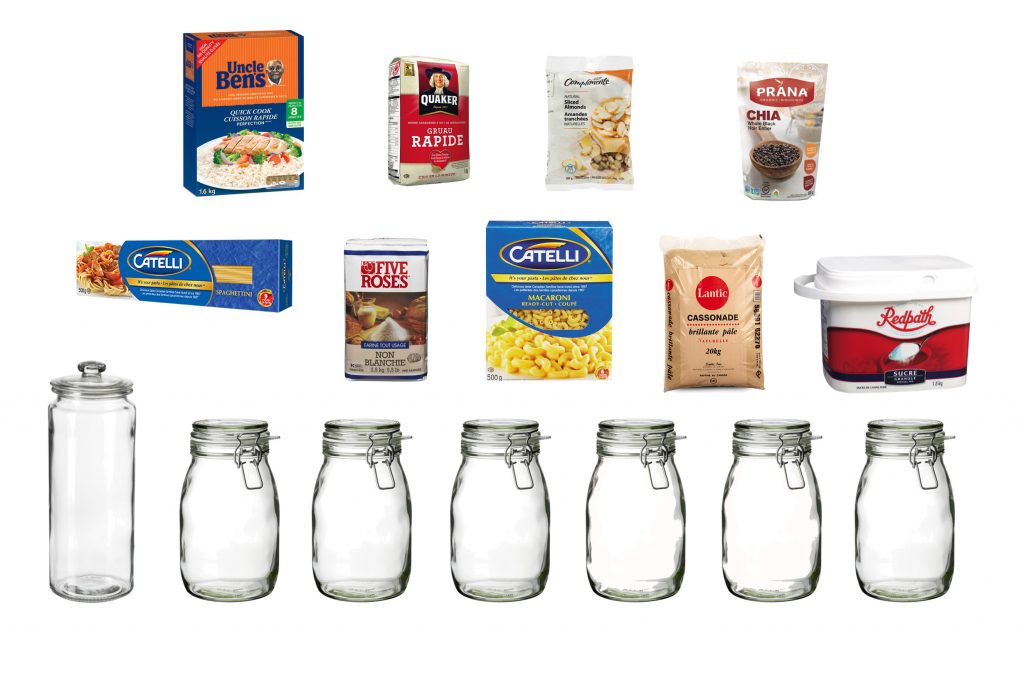
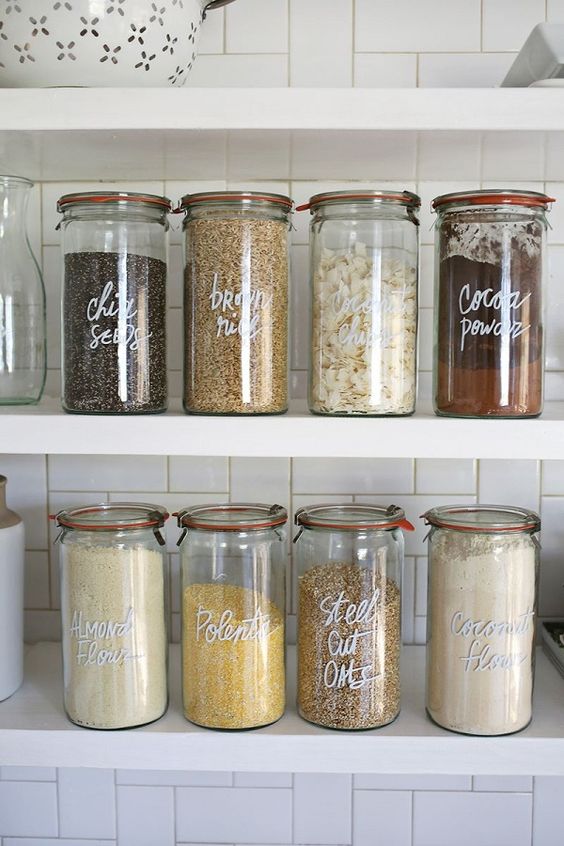
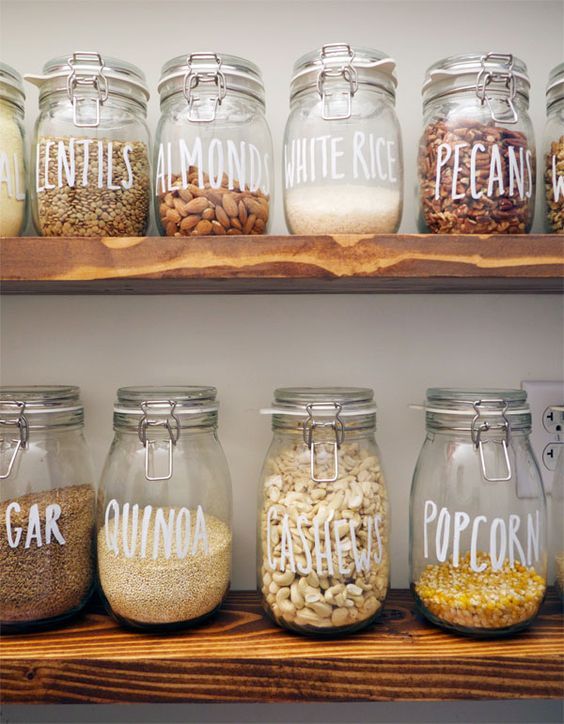
Lately, I have found such satisfying pleasure in putting my spices in small jars, it seems that I feel more eco-friendly. In addition, I recently found the perfect labeling machine to name it all. That helps to stop putting powdered cloves instead of nutmeg in my muffins.
Our kitchen looks bigger thanks to our pantry. We were able to put shelves and decorations. So yes, opt for a pantry if you can !!!

69 : Canister / Ikea
70 : Labeling / Trois fois par jour
Hoping that you found inspiration for your decoration projects, renovations and / or new construction in this article.
Check out our Farmhouse house plans here>
Several versions of the Nordika plan above are available on our site, see here>
Cottage style decorations: ideas to revamp your space
Your cottage is the perfect place to experiment with different textures, furniture, colors and materials that you would not necessarily try at home. Cottage decoration must be serene, peaceful. You want to announce to the world that you are finally in your haven of peace. Allow yourself to transform your space into something as comfortable as possible, full of cushions, carpets and wooden accessories.
In this article you will discover more than 25 ideas and pictures of decorations for your cottage to better help you with your project, as well as a list of my favorite decoration stores :-).
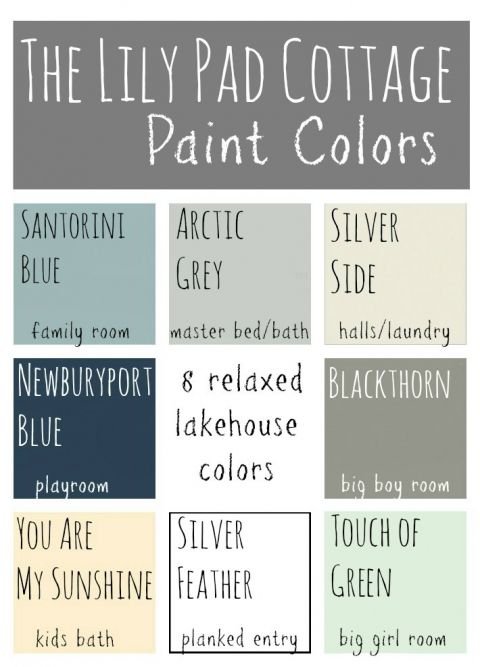
A FEW COLORS
Here are some relaxing colors, warm and ideal for the remodeling and decoration of your cottage.
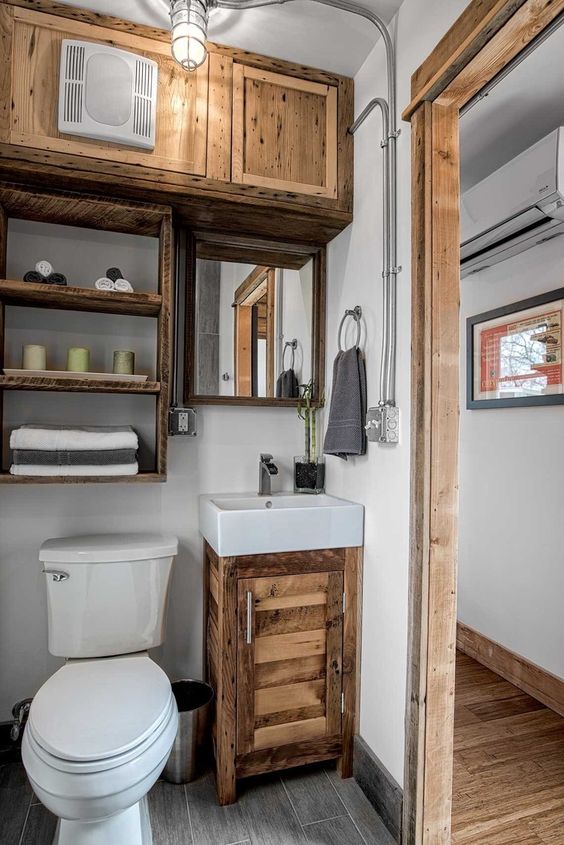
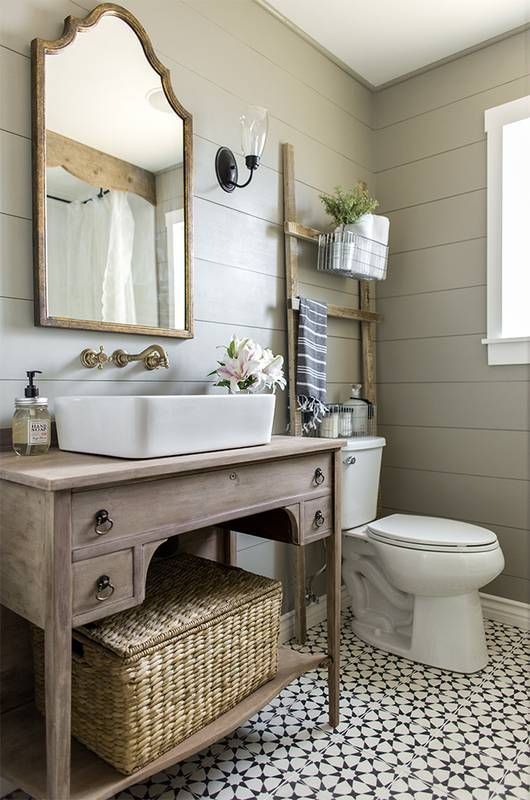
THE COTTAGE BATHROOM
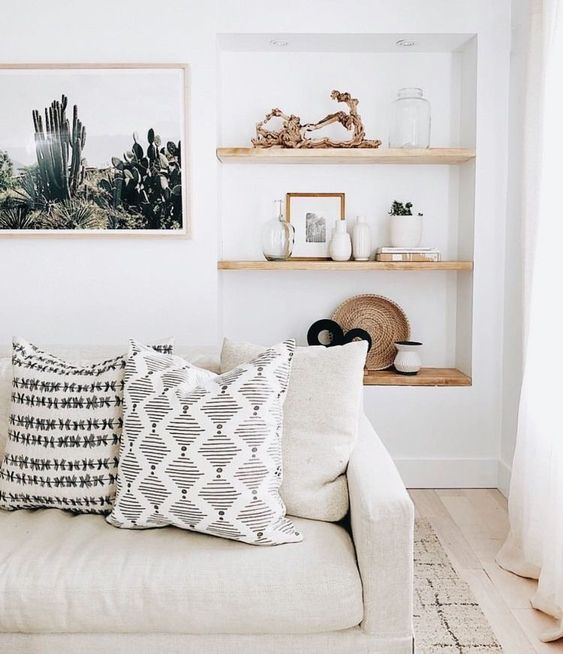
Here are some bathroom ideas for your cottage. By mixing rustic style materials all the while keeping a warm simplicity, you could very well refer to the colors above for the decoration of this room.


BEDROOM “COTTAGE” STYLE ACCESSORIES
Decoration for cottages including wood, warm textures, greenery, linen fabrics, wool and carpets. All accessories that will warm up the atmosphere of your bedroom.


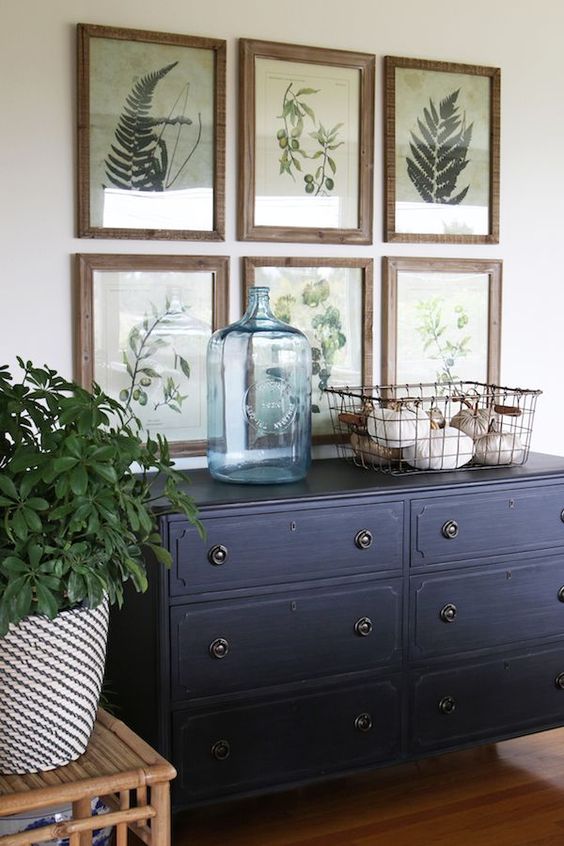
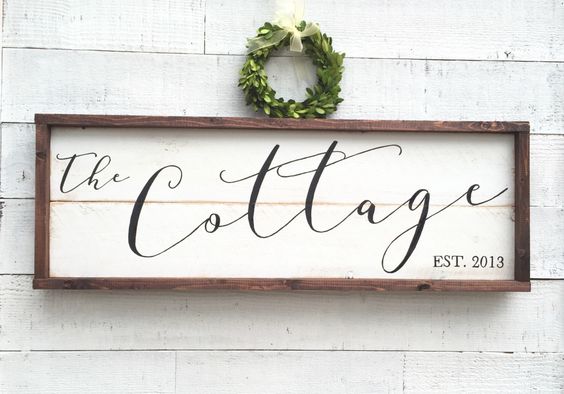
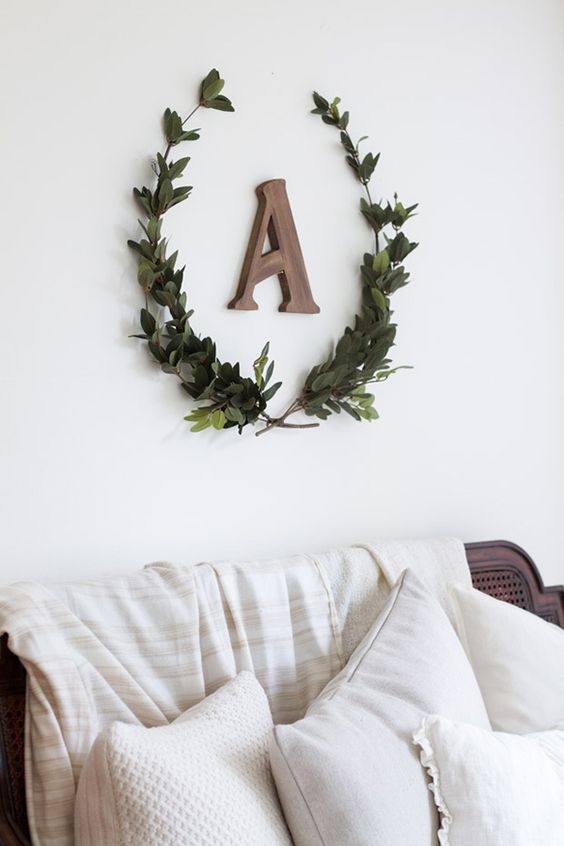
HOW WILL YOU ACCESSORIZE YOU COTTAGE WALLS AND FURNITURE?
Here are some simple cottage decorating ideas to exhibit in your shelves or even or other tables or furniture you may have. Decorate your finest furniture with small frames, plants, lights, candles (tons and tons of candles), jars, books and more.


GREAT COTTAGE KITCHEN DECORATION IDEAS
It’s important to dare what you would not at home, especially in the kitchen. Choose raw natural materials and decorations that are out of the ordinary. Opt for retro, massive and faded accessories reminiscent of rustic style, but do not forget create too much clutter in your layout choices.


YOUR COMFORT ABOVE ALL!
We have finally arrived to my favorite section ... The stuffed toys, throws, cushions, poufs, etc. Normally, you will go to Winners, Bouclair, Ikea and others to find your decorations. However, here are some of my suggestions from my favorite stores in terms of cushions and cottage decor: The Ivory Gull, The Wolfnest, Urban Outfitters, Anthropology, Structube, International Threads Co., Magnolia Market.

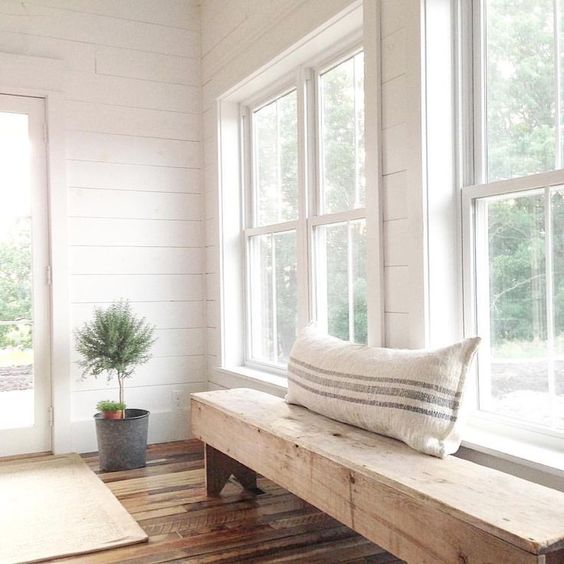
EXTERIOR
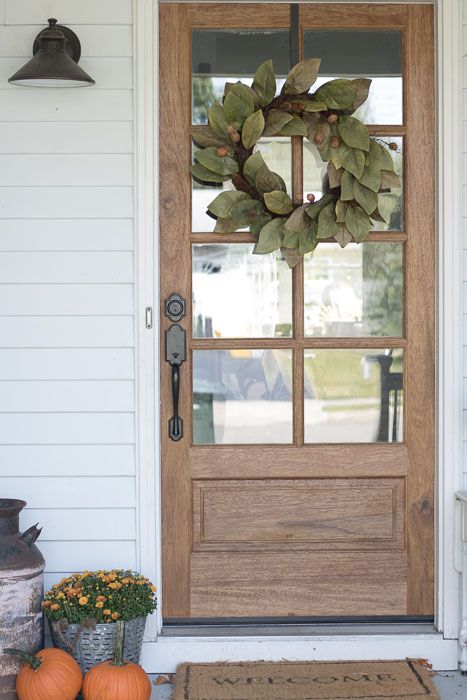
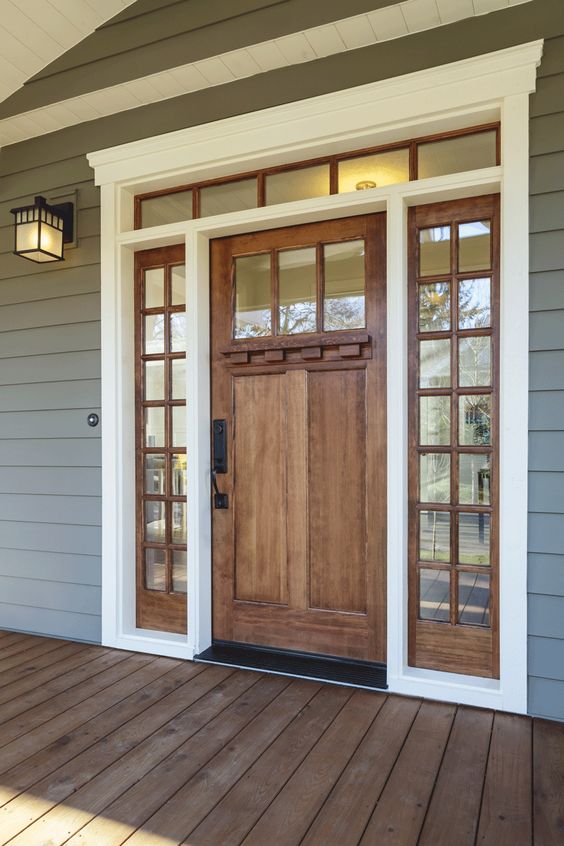
YOUR ENTRANCE

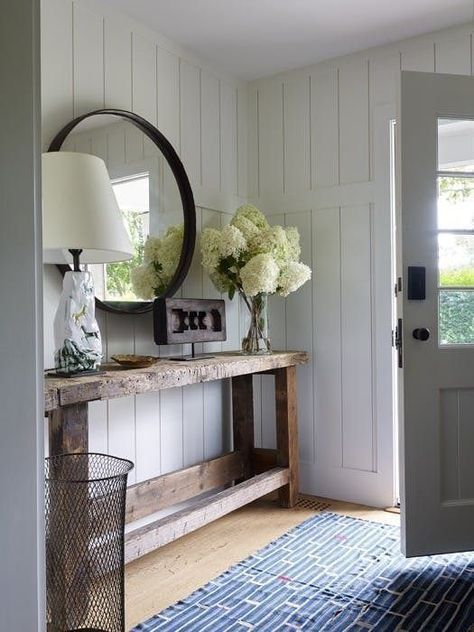
PERSONALIZE YOUR DECOR
All the images in this article are coming from various sources on Pinterest. You can follow us on Pinterest here: https://www.pinterest.ca/drummondplans/

Christmas Decorations for 2018: Great ideas for your guests this year
When we know we are inviting guests for Christmas, we are inclined to always want to offer the best and welcome them in a warm and festive atmosphere. However, we all know that decorating for Christmas in 2018 can be expensive…
You will discover in this article very simple Christmas decorations that are not too expensive and that will offer the warm holiday decor that you are looking for. A few candles, creative ideas, your craftiness and you are good to go!
CHRISTMAS DECORATIONS: CENTERPIECE
In 2018, beauty = simplicity. So to achieve a warm and well balanced decor it means you need to diversify your material choices in quantities, colors and textures. A good idea for the centerpiece is to have a mix of natural accessories mixed in with Christmas colors. For example, making your own under dish from logs or drying twigs of wood ... Take inspiration from the images below to create an atmosphere that is unique to you!


DECORATE STAIRS
Traditionally, ornamenting the stairs is a must at Christmas. We put garlands, candles, lanterns, bows ... We find everything for Christmas decorations in stores like Winners / HomeSense. HomeSense is a must for country style and unique decorations! Many other retailers also offer unique types of decorations ... Like Magnolia Market, H & M Home, Simons, Wayfair, Zara Home ... J (my favorites ...)
ORIGINAL GARLANDS
There are so many ideas of beautiful garlands to do for the holidays! In my opinion, Pinterest is your best friend when it comes to finding ideas to decorate your house but without neglecting your own creative talents! ... Just take the time to visit us on Pinterest, you will find everything to revamp your home.


CHRISTMAS DECORATIONS WITH CANDLES
Who does not like candles? I’m personally very fond of them!. Especially those from Bath and Body Works (Mahogany Teakwood). When it comes time to combine candles and decor, it's a yes! Not only for their irresistible smells, they also managed to create cozy and relaxing atmospheres. Isn’t this what we are all trying to achieve during the Holidays right? That and being accompanied by a good cup of wine! Normally I would suggest that you buy your candles at Winners, but seeing as it’s so fun and crafty to do your own, I rather suggest that you let your creative juices flow and guide you to either to your own or create an amazing arrangement!


RESTRICTED SPACE AND CHRISTMAS DECORATIONS
When the space won't allow you to have a Christmas tree... You try your best to make it cozy.


Have a look at my article « Shopping tips and inspiration for the photos I use in my article » if you wonder where I like to shop for ideas!!
Read a house plan : do you know how ? Discover how with these simple tricks.
How to read a floor plan ? You are looking for a house plan on our website but have trouble grasping all the details presented on our floors layouts? Let us help you read a floor plan so that nothing escapes you! Whether for ceiling types, types of interior and exterior doors such as sliding doors, patio doors, garden doors and French doors, window formats used such as single, double and triple, the location of the fireplace one is present, wall thickness standards of interior and exterior walls, and much more!
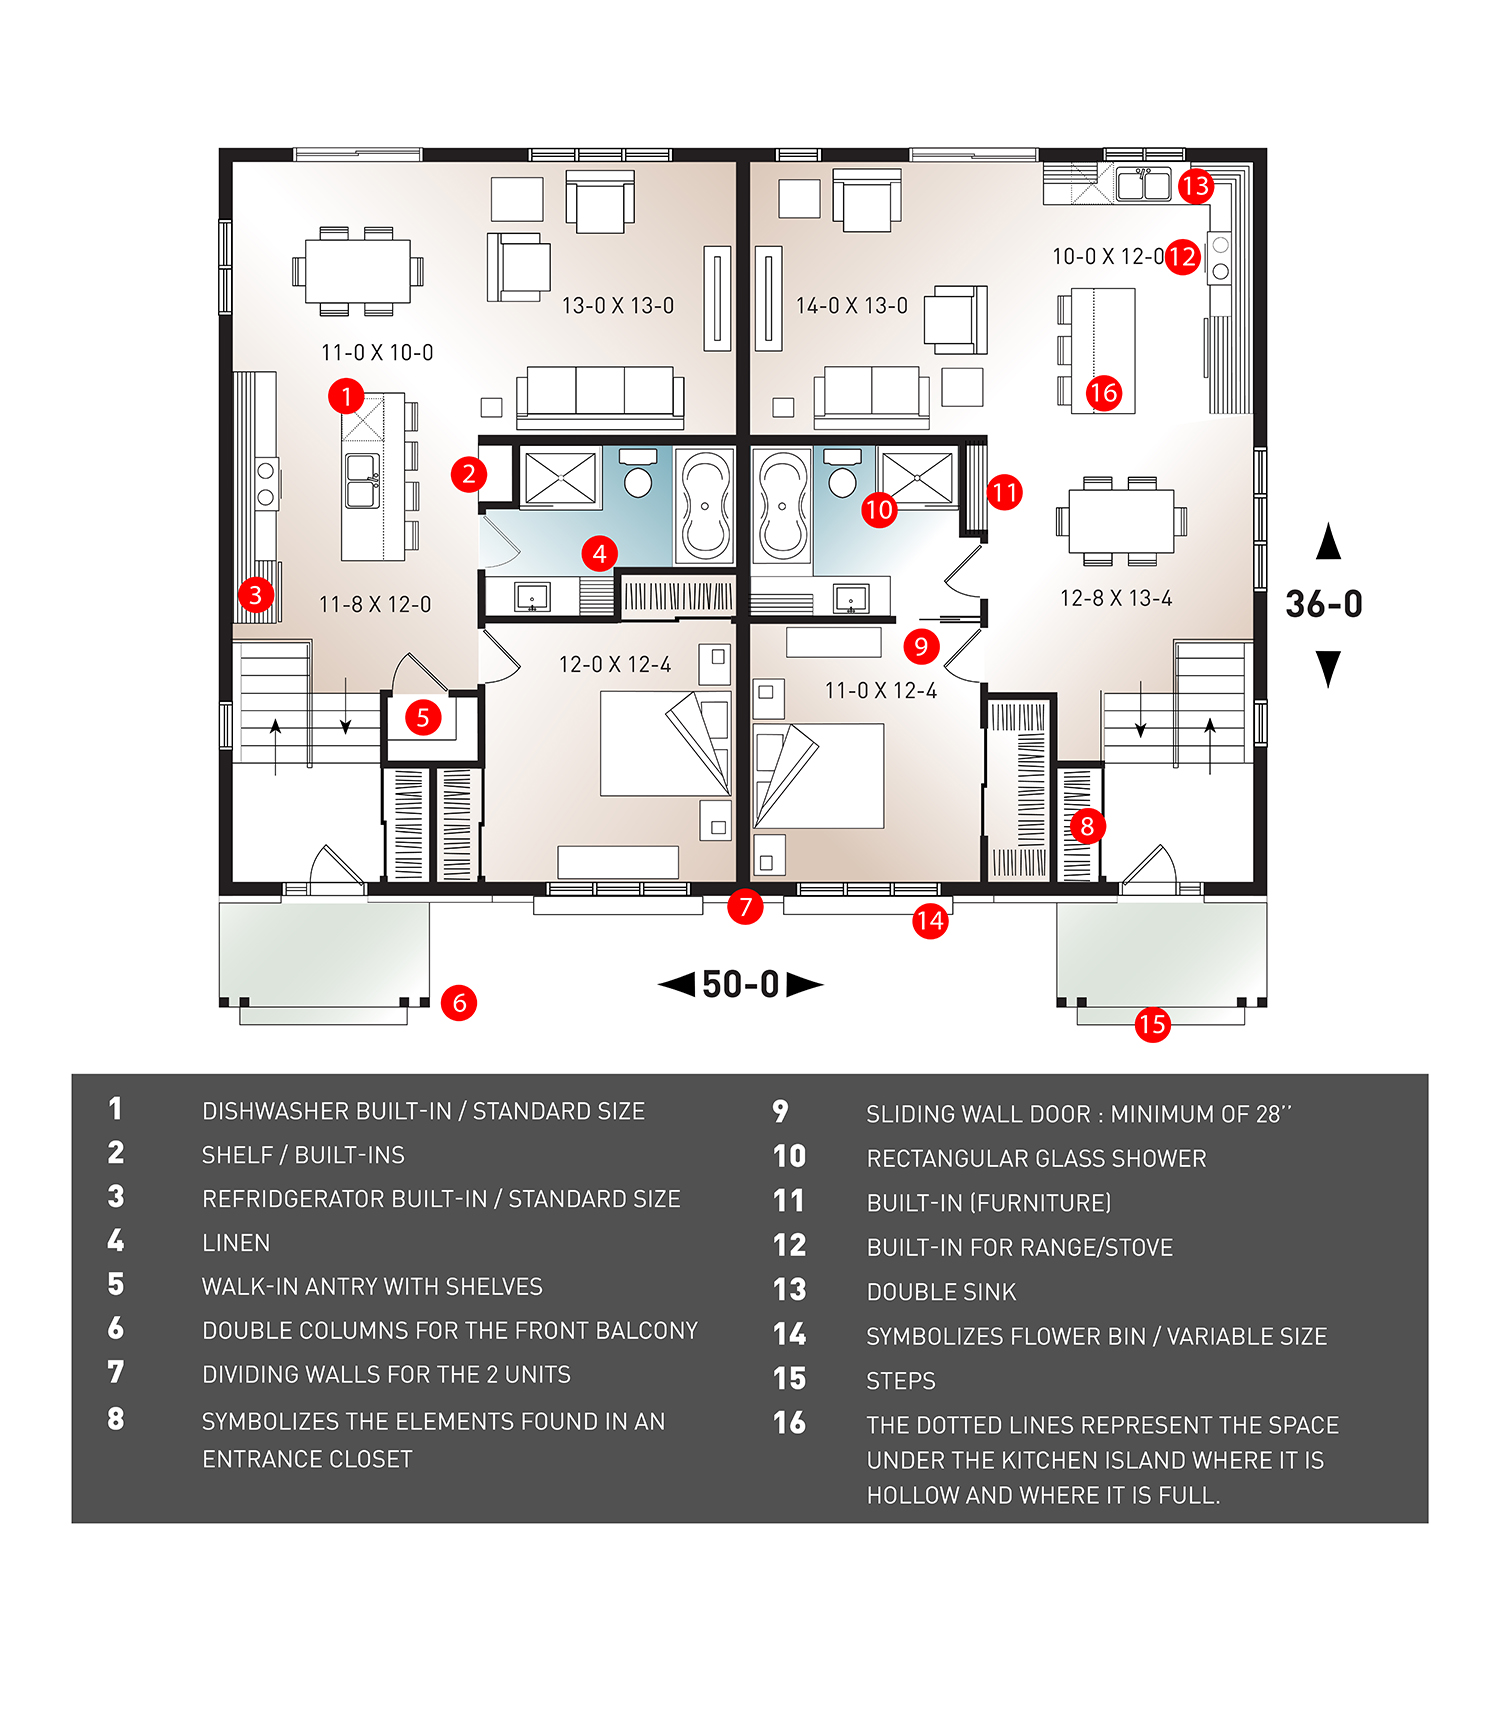
READ A HOUSE PLAN : NOT THAT COMPLICATED
The floor plan outlined above has several typical elements that you can find on the majority of our floor plans. To better understand the spaces and features provided for each plan, it is important to know how to read it properly. If you like the floor plan above and wish to see the house to which it belongs, see here!
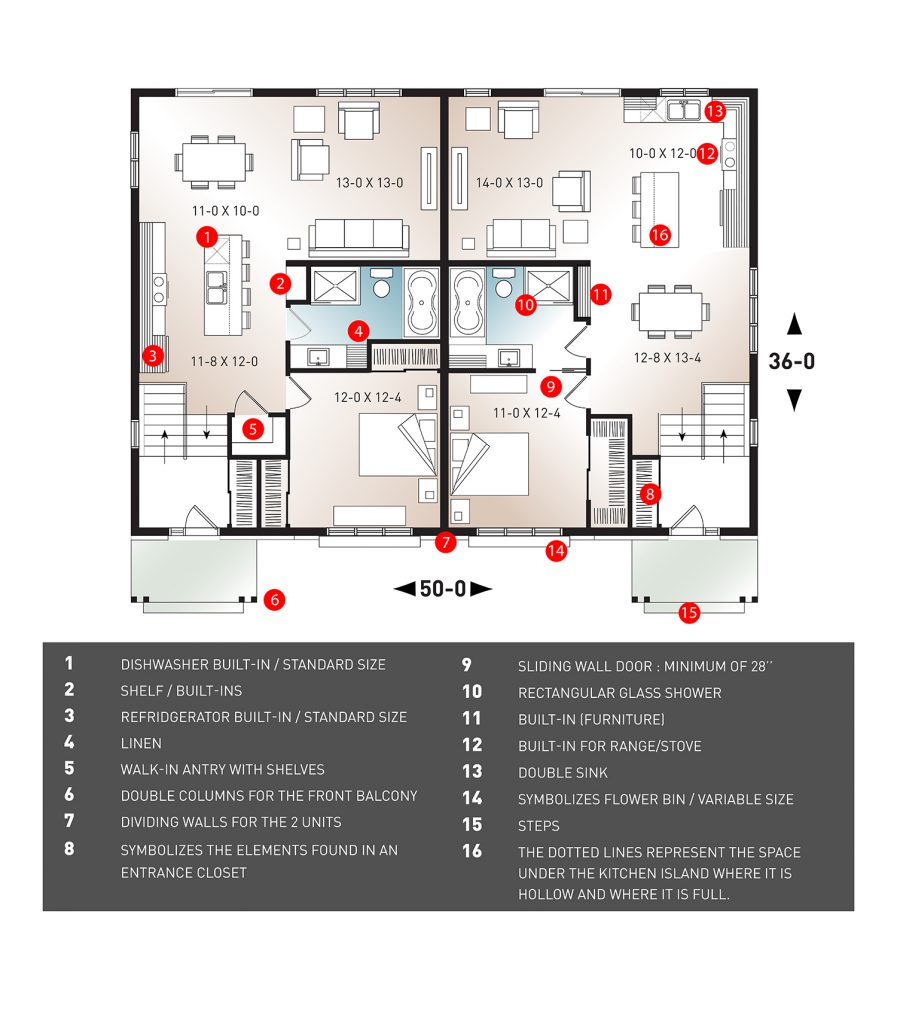
UNDERSTANDING A HOUSE PLAN
Recently at Drummond House Plans, you will notice the updating of some of our older plans that are still very popular. We want to offer a standard color code to all our home plans to help our customers better understand them. So here are the new colors that will help you differentiate the various living spaces that are in your plan or future home!
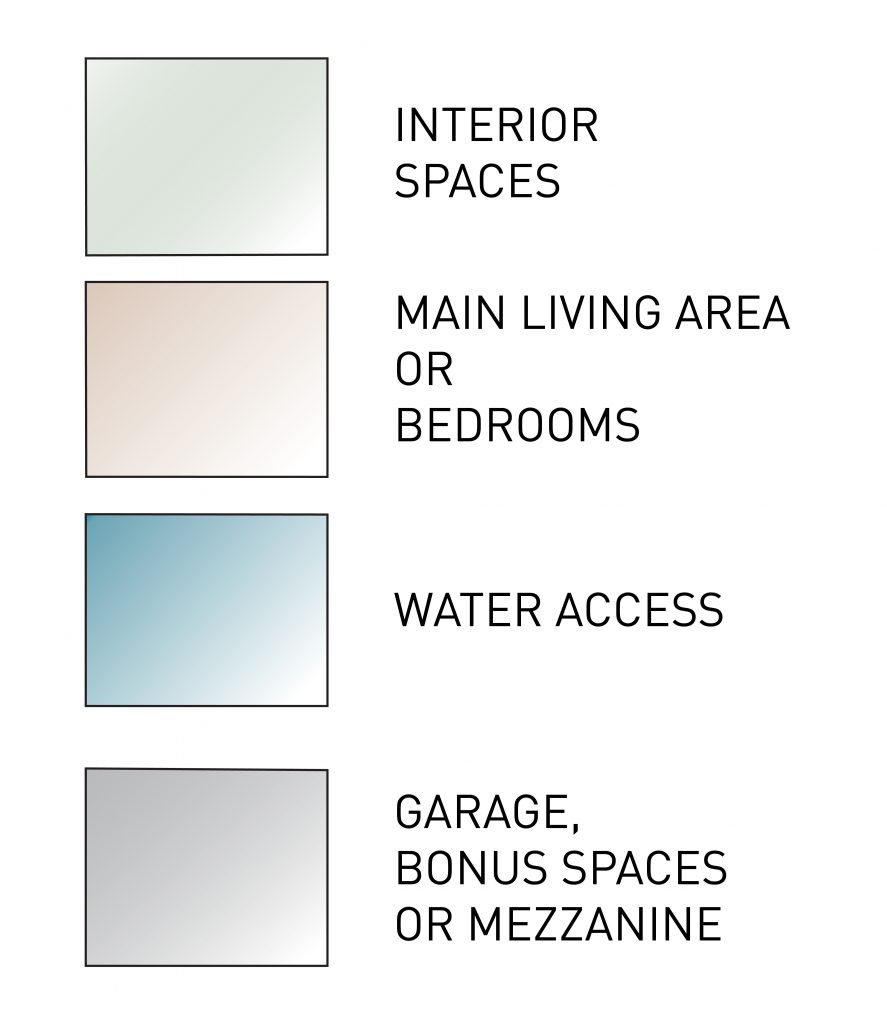
Read a house plan to help you find your way around!
Among the interesting amenities you will find in our house and cottage floor plans, there is the dotted indication of special ceiling types such as "vaulted" or "cathedral slope" as appropriate. The fireplaces are indicated, as well as the types of window provided (double, triple, etc.). In addition, indications such as the minimum width of the doors of the different rooms are provided in the complete plan that you will receive for the construction of your home. A picture is worth a thousand words so take a look at the glossary above and you will become an expert in floor plan reading too!
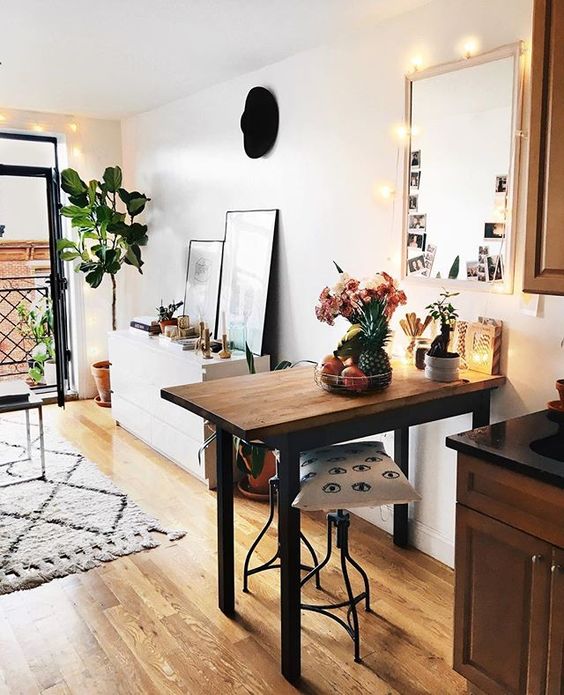
Affordable DIY decoration ideas for your first home
Are you in the process of moving into your new home or apartment soon? Or perhaps you are simply looking to do a little remodeling to your existing living space? Like many of us, we often have remodeling “cravings” but not necessarily the budget to do so. The good news is that you will find a variety of affordable DIY ideas for redecorating and storage at very convenient prices. The best news of all is that you can all do it yourself!
Do it yourself decorating, or as we like to say affordable DIY, is more and more popular. DIY projects are perfect for those who wish to get a little crafty. They are also great for those looking to reorganize or embellish student headquarters for example or even small apartments without having to spend a fortune.
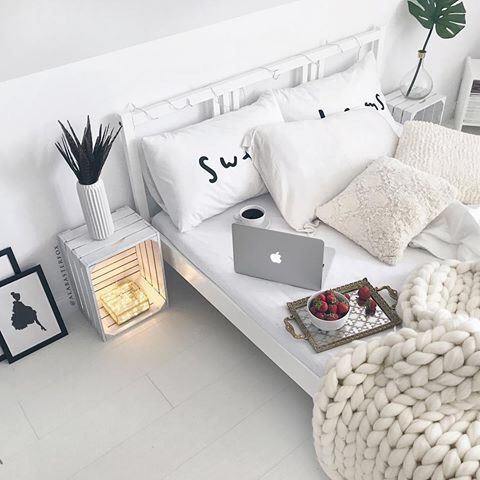
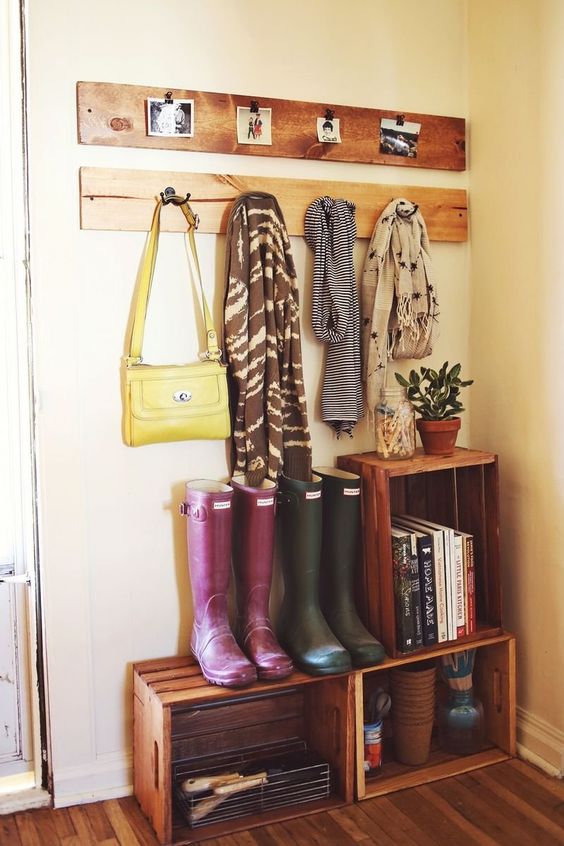
Wooden Crates
Having also become very popular, wooden crates are in big demand. In addition to being practical and affordable, they offer great furniture possibilities such as piling them up to make a nightstand, or a small shelf that can even be fixed to a wall. They are very practical and offer non expensive extra storage.
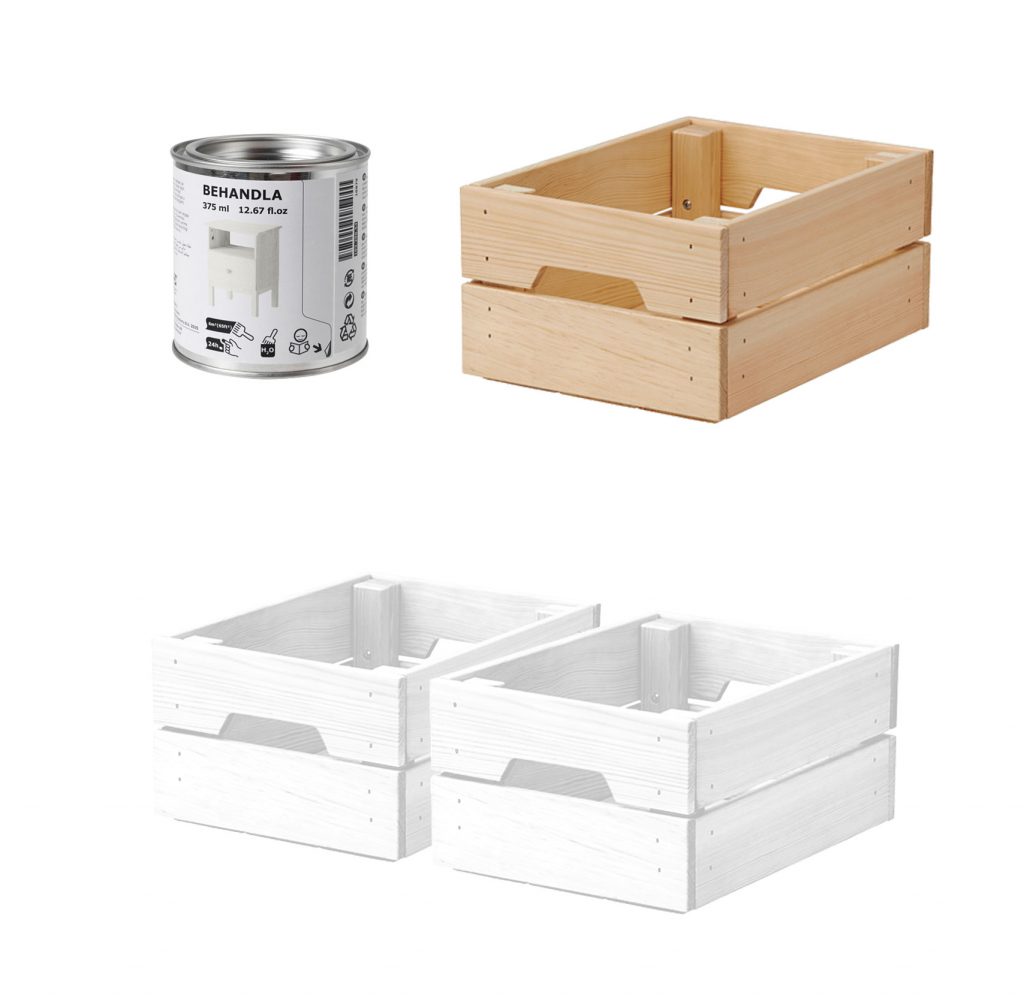
Wooden crates, Ikea $14 / Paint, Ikea $6.99


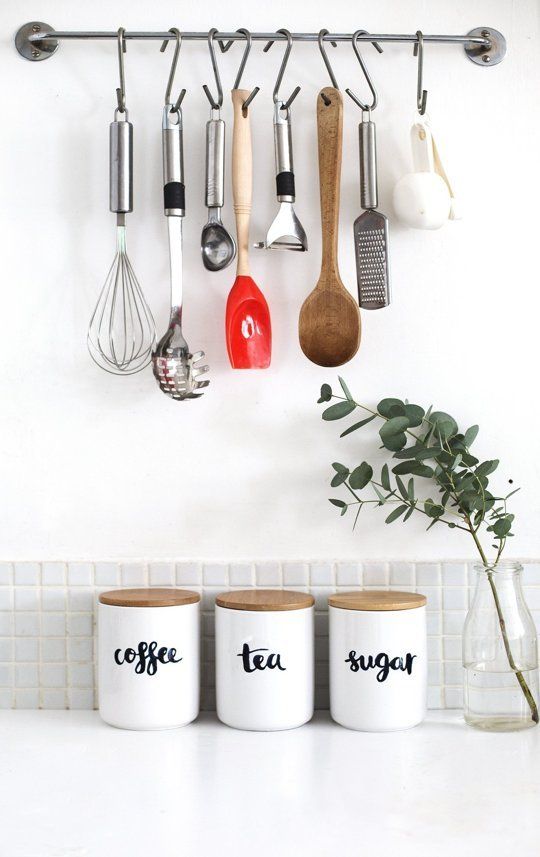
Affordable DIY Kitchen decoration and reorganisation
Here is a remarkable idea to add a decorative touch to your kitchen
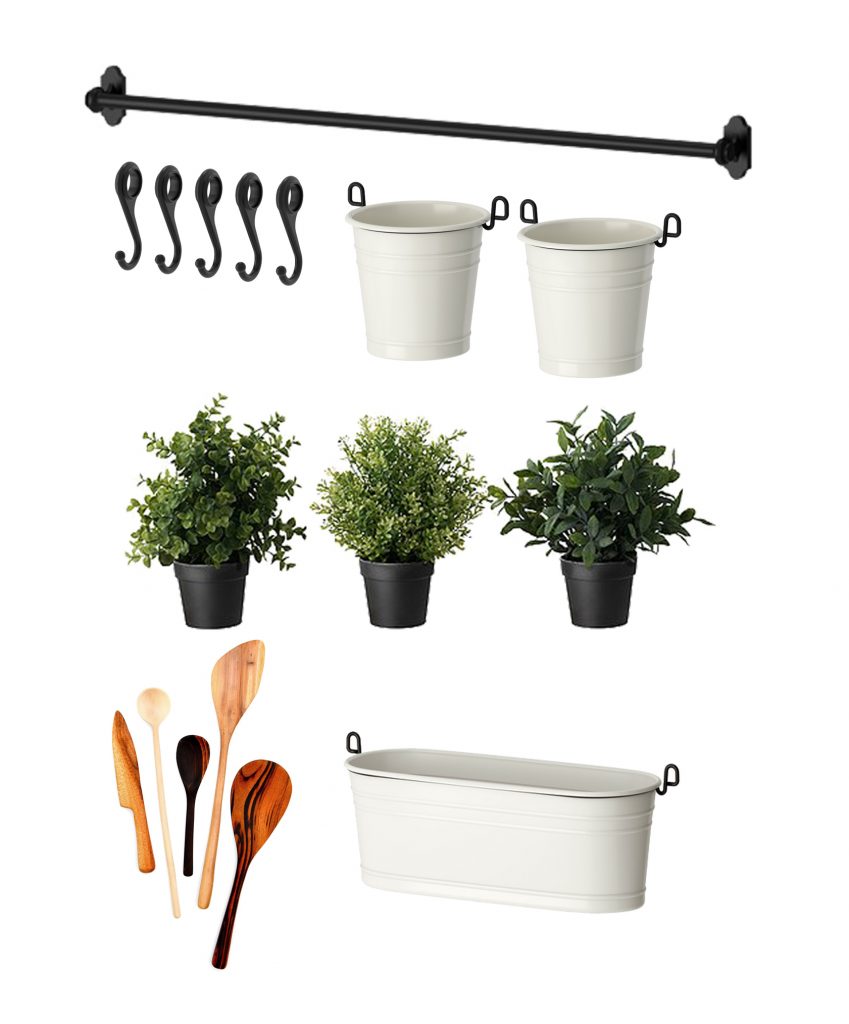
Support bar, Ikea $9.99 / Hook, Ikea $4.99 / Spice rack (white), Ikea $14.99 / Strainer (white), Ikea $6.99 / Artificial plants, Ikea $6.99 / Wooden utensil, Leif

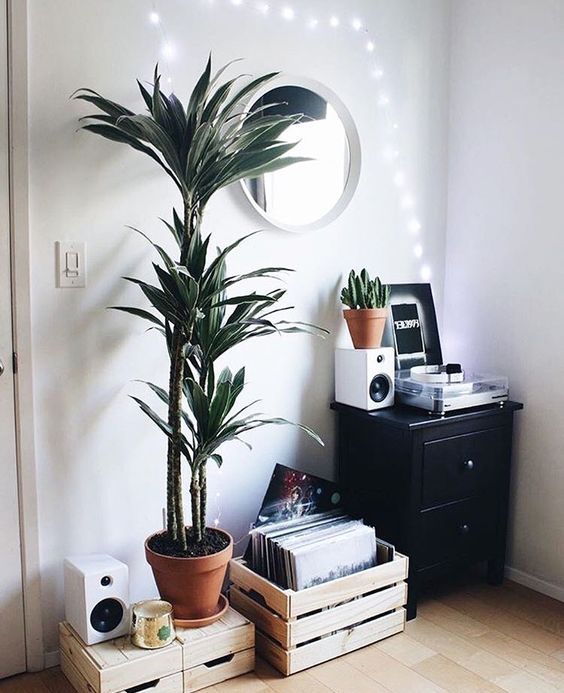
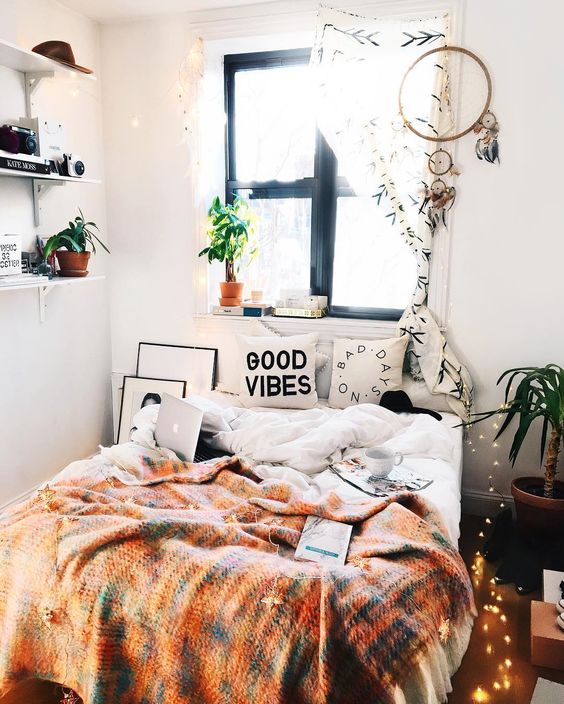
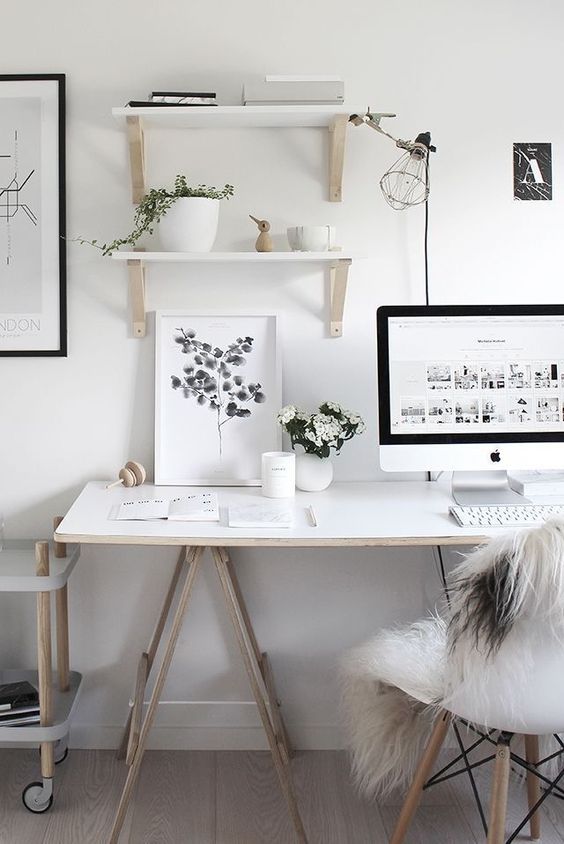
Adding warmth to you living space: indoor mini lights
In addition to being inexpensive, these little lights add a warm and cozy ambiance that gives the impression of being in a totally new room! An investment of more or less $12 and you’ve given a completely different feel to the room.
![]()
Clear mini lights, Canadian Tire $9.99 / Screw hooks, Canadian Tire $0.99
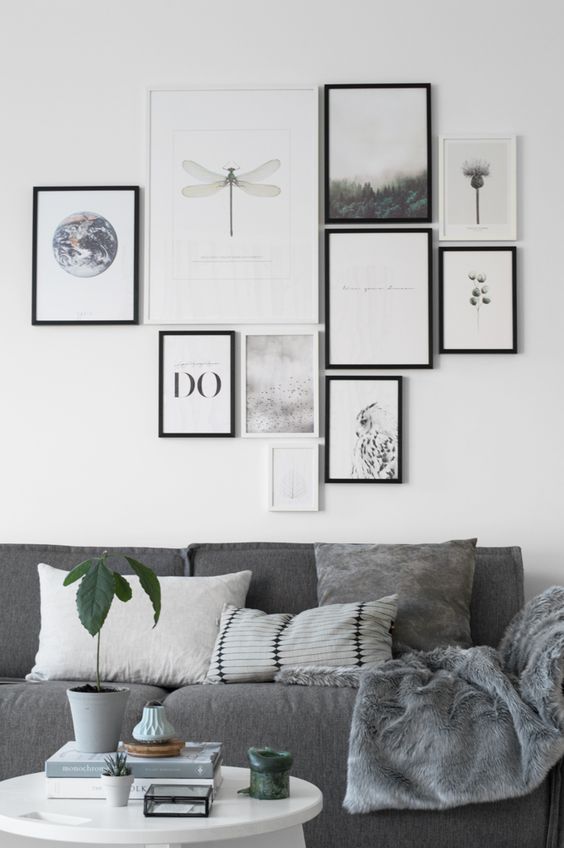
Affordable DIY decoration ideas with frames
This is a really great idea and so simple! All you need to do is go out and buy a few frames, print or purchase a few of your favorite images or illustrations, add them to your frames and bingo! This idea is sure to add some color and life and to your apartment. Here are some ideas to inspire you.

Set of 6 frames, Walmart $9 / Illustrations, Society 6

Wall storage
These simple wall shelves will be sure to create a trendy look in any room. A $40 well spent and as a bonus will help you to better organize your personal belongings.
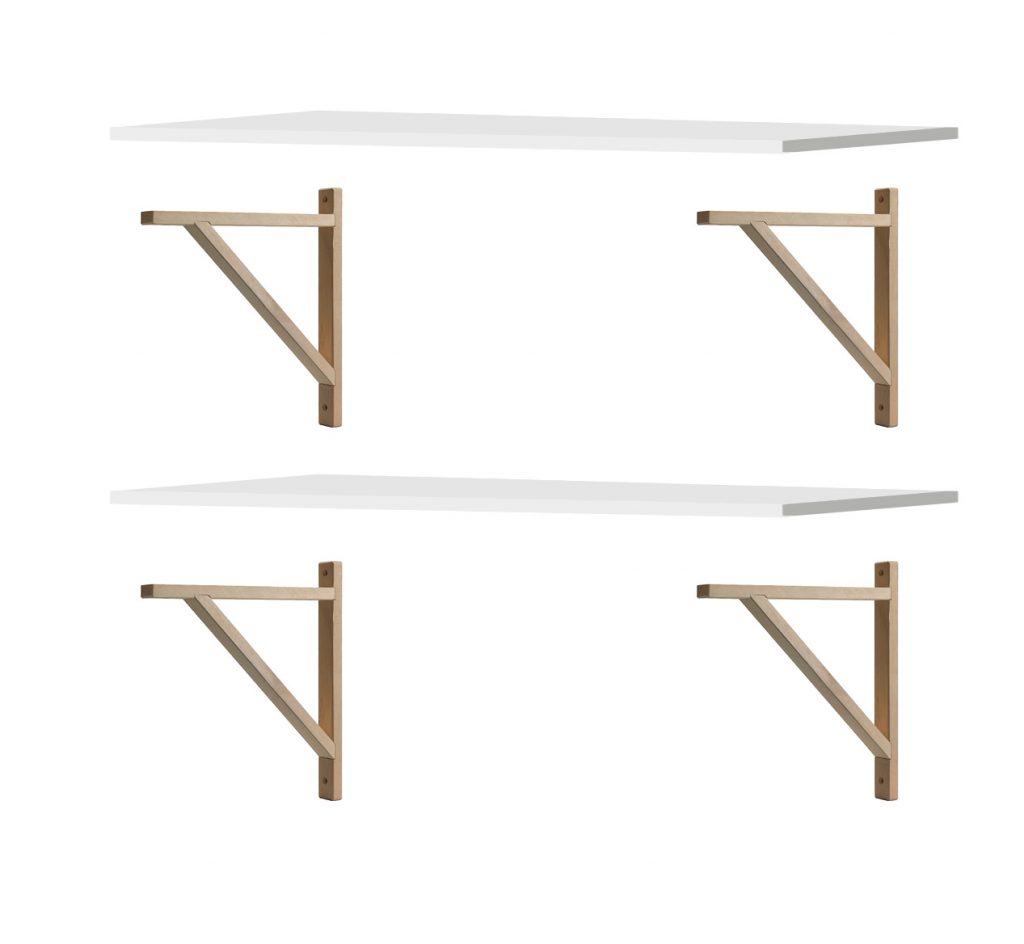
White shelf, Ikea $9.99 / Console (??), Ikea $2.50
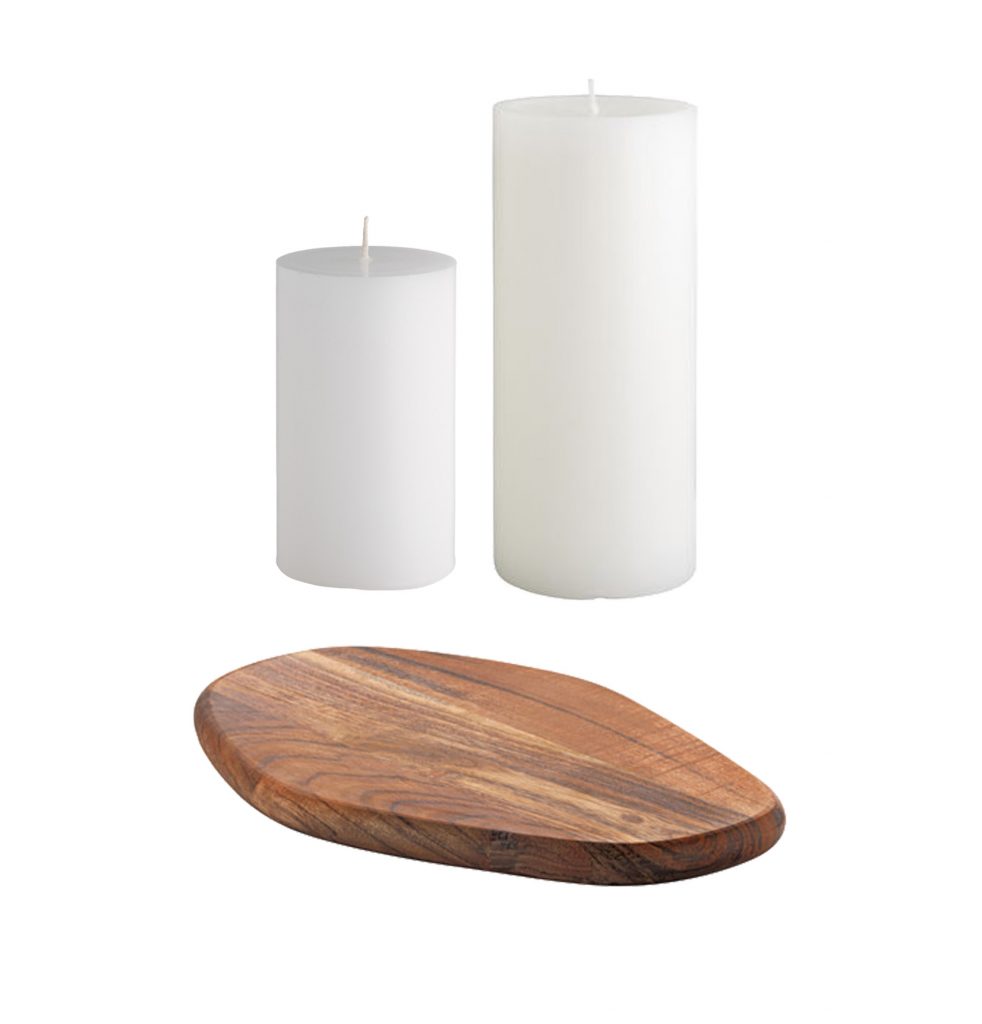
Cutting board, Ikea $9 / White candles, Dollorama $3
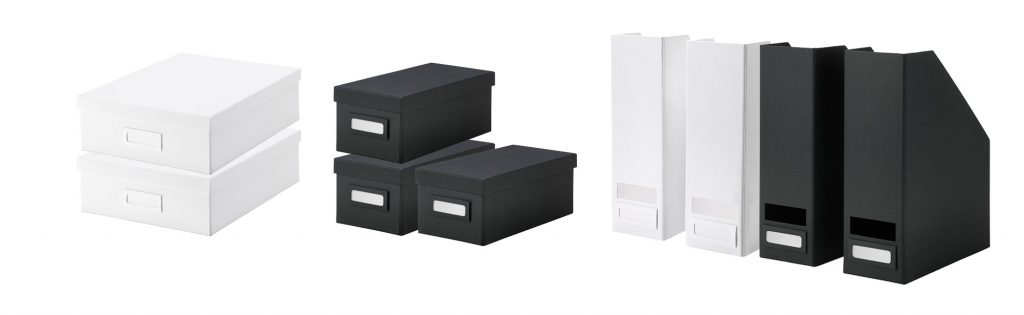
Medium white box, Ikea $3.99 / Small black box, Ikea $2.99 / Magasine holder, Ikea $5.99
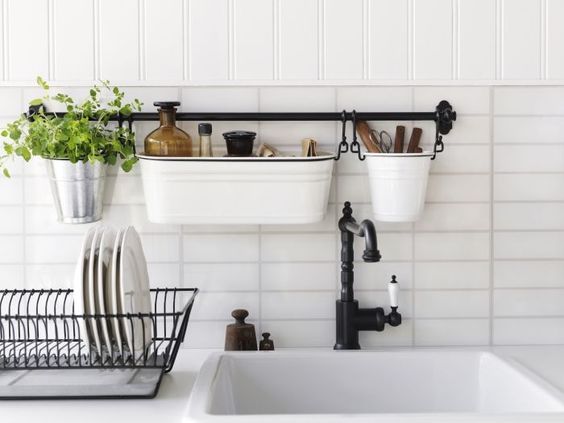
Organize and decorate
I am sure that all of you have a few of the items shown below. It’s now up to you to organize your kitchen and give it a stylish environment, as well as an organized feel that you will enjoy for under $40. Let me give you a few pointers to help and encourage you to straighten out those pesky cupboards…
AFFORDABLE DIY CANDLES : Making your own candles
Here is one of my favorite DIY projects! Candles can be very expensive and we often pay way too much for them. Why not spend an afternoon making your own? All you will need is a double boiler, a few vases and cube wax. Personally I love making my own. It’s super simple and it makes me appreciate my candles even more!


Pots, glasses, vases, / $2 - $6 at Ikea and Walmart / Candle wax, Michaels $15 - $20
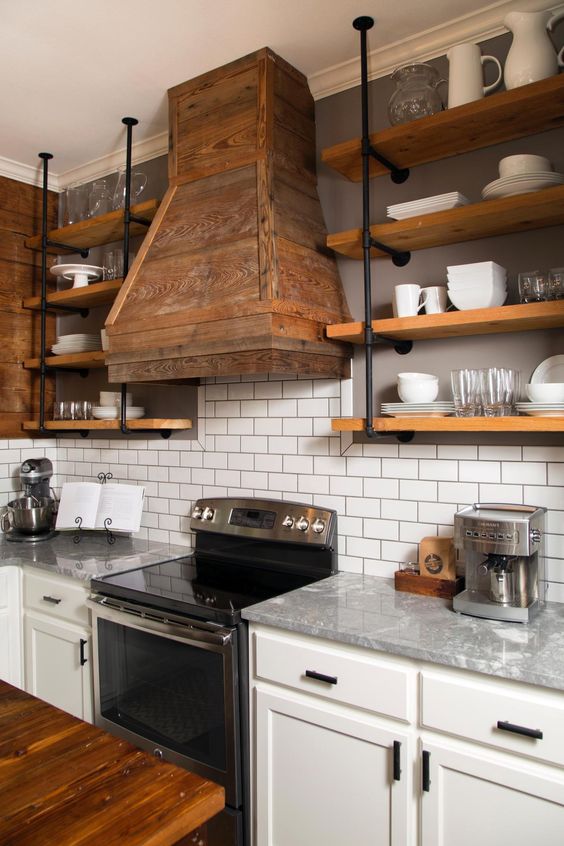
White subway tiles for the kitchen : 15 backsplash ideas
Are you searching for inspirational new kitchen ideas and are favoring white? Choosing white is color that is assured to always a sure value! Choosing white for the paint, furniture, backsplash and more will allow for stylish and timeless fashion. In this article you will discover 15 kitchen ideas with white subway style tiles for the kitchen backsplashes. This white metro tile trend is in fact a rectangular subway style that reminds us of the famous major city Subways in the beginning of the 20th century.
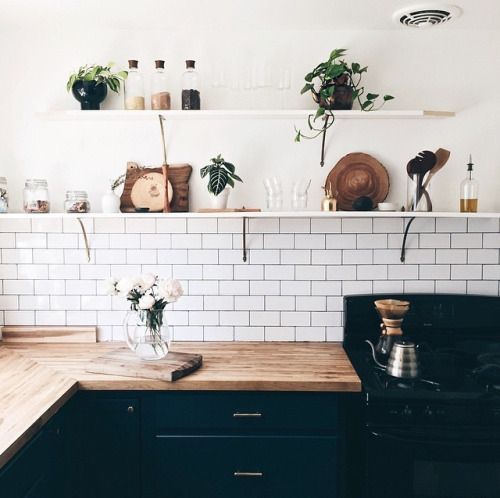
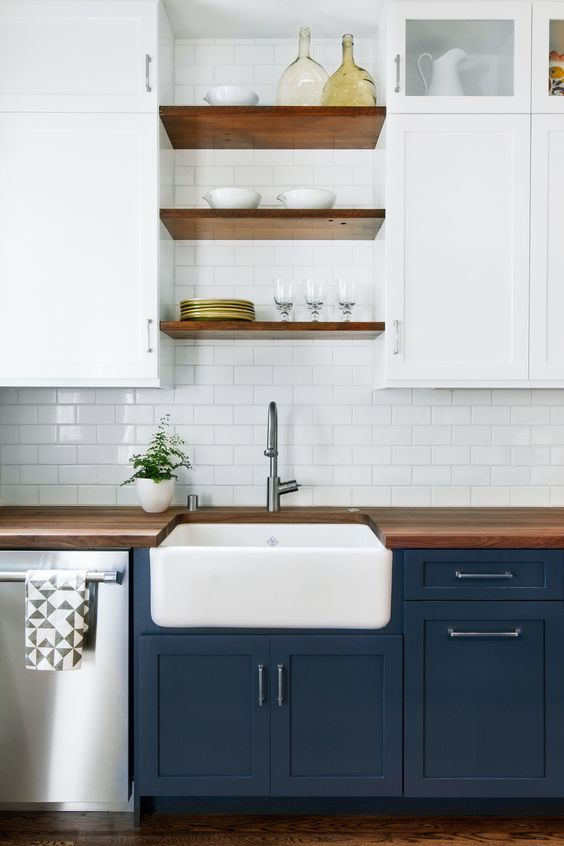
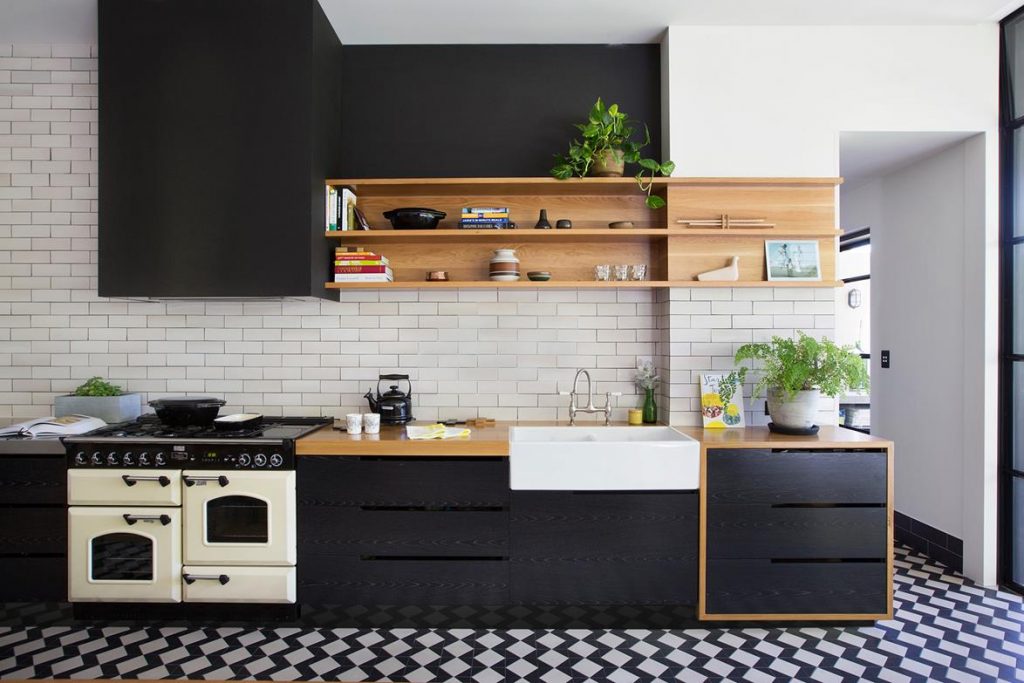
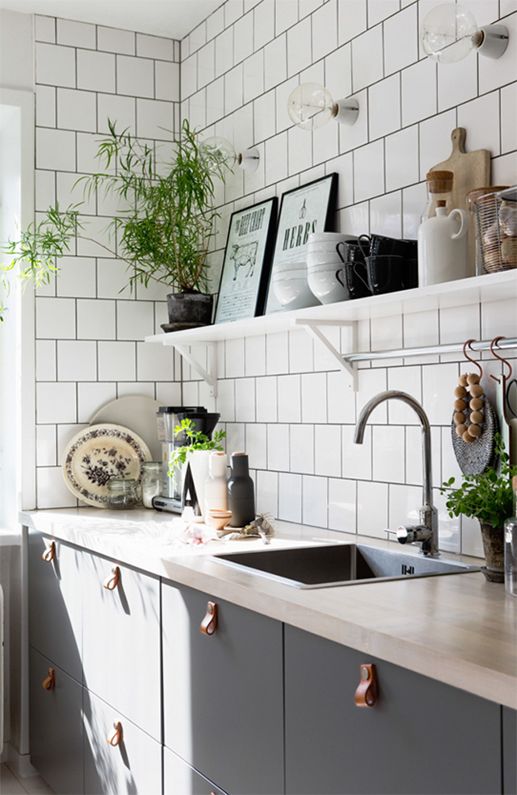
Dark cabinets with white backsplash
The contrast of opting for darker furniture with a white backsplash with assure lots of brightness. Furthermore, the Scandinavian style back and white kitchens that are a trend this year that we most certainly will be seeing more of in 2017! Consult our Scandinavian inspired homes here!
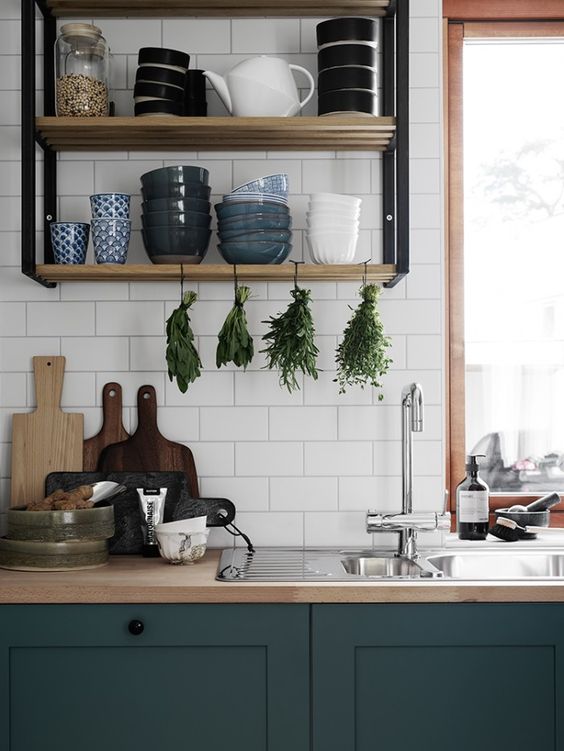
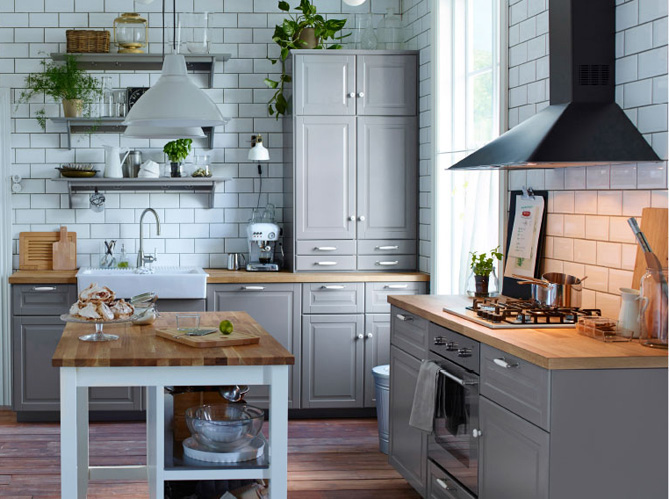
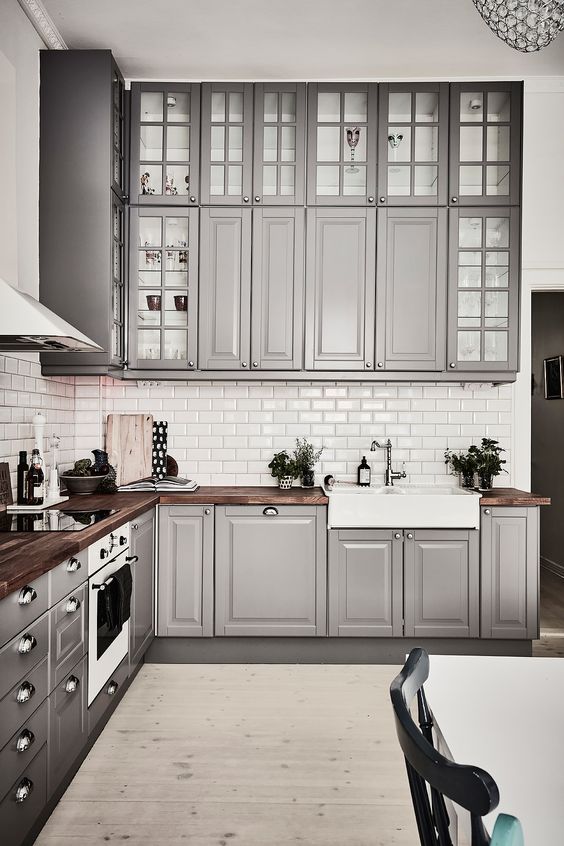
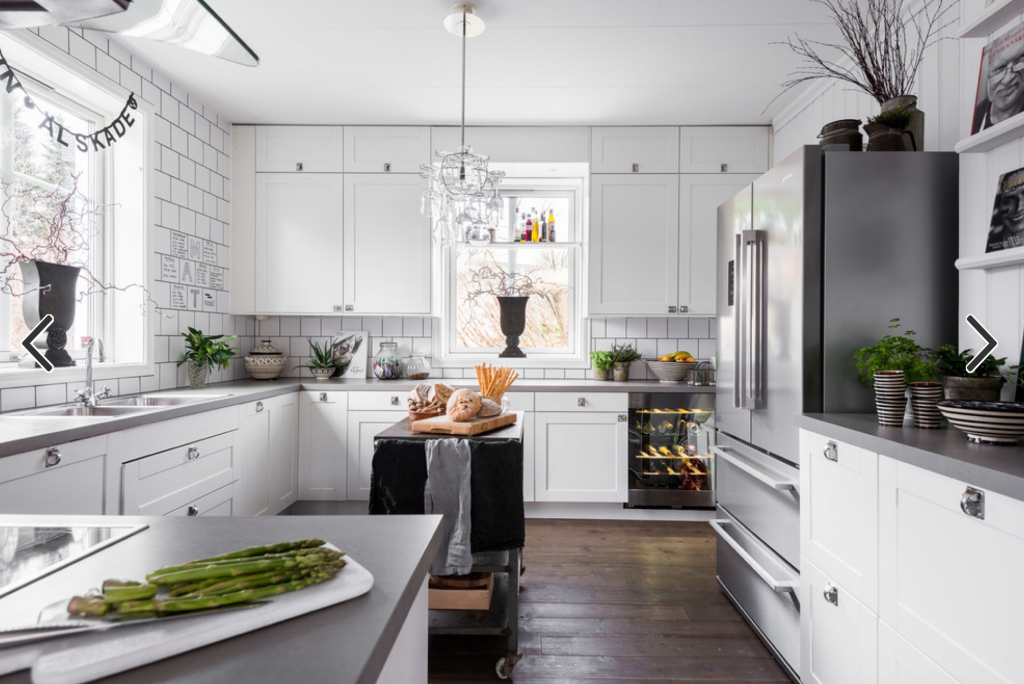
Subway style tiles mixed with grey
The mix of grey and white are an excellent choice for those wanting to create a soft and soothing atmosphere. The mixture of white tiles and pearl gray gives a welcoming feel to your kitchen. From anthracite grey to pearl grey, these tones offer a great variety of shades to create the perfect ambiance when mixed and harmonized with the other colors in the room. Harmonized with white, it symbolizes sobriety and elegance.
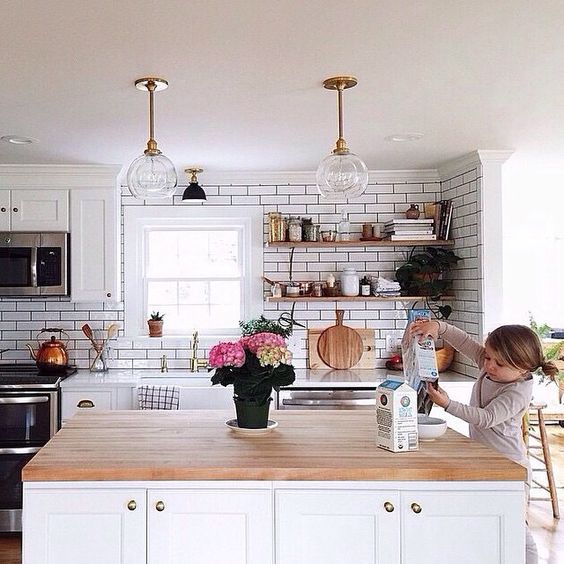
White mixed with wood and “metro” style Subway tiles
The combination or wood and white tiling is a sure thing in kitchen decorating. Embellished with a Subway style white backsplash, the result is astonishing as well as timeless. There are a multitude of possibilities when working with these 3 elements and it’s up to you to find the one that pleases you most!
 é
é


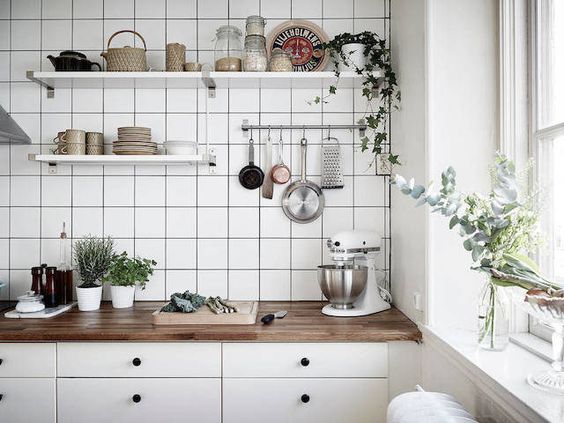
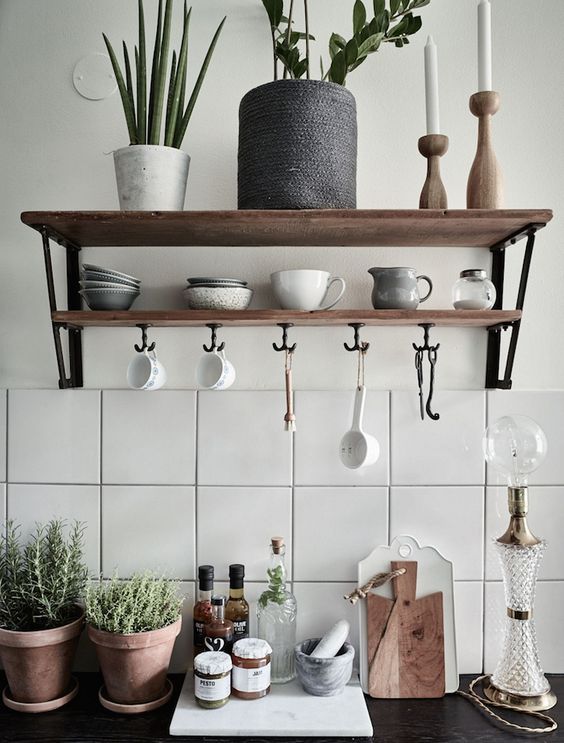
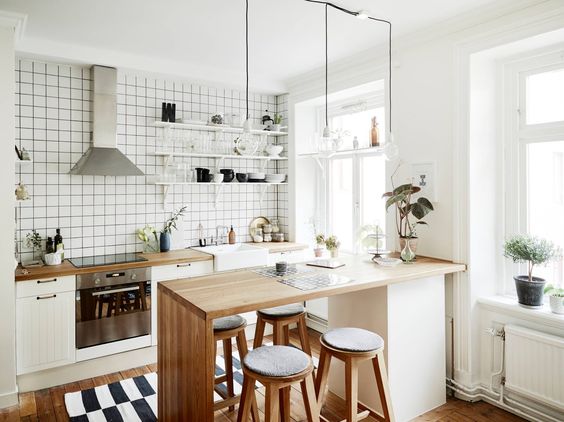
White square Subway style tiles for a light colored kitchen
Another trend we are seeing more and more of is the square tile. Offering a more Scandinavian feel, this shape of tile provides a more refined and neutral feel when installed straight. To obtain a more dynamic feel, try a brick bond laying pattern! (more ideas here: http://www.toppstiles.co.uk/style-and-inspiration/laying-patterns/
Have a look at my article “Shopping tips and inspiration for the photos I use in my articles” if you wonder where I like to shop for ideas!!
